General
Overview
Salt Edge has developed an API platform called Open Banking Gateway, which enables financial institutions to gain instant access to Customers' bank accounts in Europe and beyond.
This access is granted for both Account Information and Payment Initiation purposes through a unified API.
The Open Banking Gateway consists of the following components:
- Account Information API - this allows authorized TPPs to access all PSD2 AIS channels in the EU and beyond via a single API. It facilitates the aggregation of Customers' Account data.
- Payment Initiation API - this component assists authorized Third Parties, including Banks, in securely initiating Payments through PIS channels.
- Data Enrichment Platform - this platform transforms raw transaction data into actionable insights through various APIs, including:
- Transaction Categorization API - categorizes transactions, including those related to personal, business, and other specified categories.
- Merchant Identification API - determines the exact location of transactions and provides detailed information about the identified merchant.
- Financial Insights - a report generated using complex algorithms based on Bank data, offering financial behavior profiles of potential Customers to institutions.
LicensingNew
In the evolving landscape of Open Banking, TPPs are reshaping financial interactions, enabling seamless Payments and leveraging Transaction data. TSPs play a vital role by offering infrastructure support for TPPs, ensuring compliance without handling funds directly.
Salt Edge provides access to Partners who do not possess their license, allowing them to use the same APIs as our Clients under their License - enabling secure access to PSD2 channels, thus, delivering an aggregated approach.
Essentially, providing access through the Partnership Programme marks a significant milestone in prioritizing customer-centricity and optimizing the efficiency of financial services.
Data types
All responses returned by the Open Banking Gateway are in JSON format. The description of the data types encoded in a JSON response is provided below.
- BooleanA Boolean is a logical data type that can have only the values true or false
- DateA date expression is used to define a date, in the
YYYY-MM-DDformat - DatetimeA date expression is used to define a date and time, in the ISO-8601 format
- FloatA value corresponding to a real number using the double-precision representation
- IntegerA value corresponding to a 64-bit unsigned integer. For identifiers (
idfields), a 64-bit signed integer is used, with a maximum value of9_223_372_036_854_775_807 - ObjectA
stringrepresenting aJSONobject (please refer to RFC 4627 for more information) - StringA UTF-8 compatible sequence of characters
Security
Encryption
All sensitive data is encrypted using 2048-bit keys, establishing a secure environment for our Clients. None of the transmitted credentials are stored in the system as plain text; instead, they are always encrypted using an asymmetric encryption algorithm. If there is an issue with the Client's data, a WrongRequestFormat error will be returned.
We consistently monitor the Salt Edge API, fortifying it against malware attacks and regularly updating the security layers of our infrastructure. Salt Edge provides a stable and resilient environment, safeguarding all the credentials from potential attackers.
SSL certificate
Clients are recommended to verify the SSL certificate fingerprint for Salt Edge on each Connection.
Signature
For Live Clients, all requests should be signed. For Clients with other statuses, signing is optional:
- If the signature headers are not sent, the request will be processed without any signature validations.
- If the signature headers are sent, the request signature will be verified.
Caution
The public key should be inserted in the designated Public key section.
The private key must be securely stored on the Client’s server.
In the event of a potential security breach, the private key should be regenerated, and the public key should be updated in the Client’s profile.
Signature headers
Note
For a better understanding of how to adapt the corresponding headers in the Client’s application, refer to sample applications on platforms such as:
The inclusion of the following headers is essential for the Client's request to be considered signed:
- Expires-at - request expiration time as a UNIX timestamp in UTC timezone. We suggest using +1 minute from the current time. The maximum value allowed is 1 hour from now in UTC; otherwise, ExpiresAtInvalid error will be raised;
- Signature -
base64encodedSHA256signature of the string represented in the formExpires-at|request_method|original_url|post_body- where the 4 parameters are concatenated with vertical bars | and signed with the Client’s private key.
The fields request_method, original_url and post_body in the Signature header represent the following:
- request_method - uppercase method of the HTTP request (e.g.: GET, POST, PATCH, PUT, DELETE etc.);
- original_url - the full requested URL, including all complementary parameters;
- post_body - the request’s POST body. It should be left empty if it is a GET request, or the body is empty;
An example of the string used to generate the signature is as follows:
- GET string example:
1413802718|GET|https://www.saltedge.com/api/v6/providers?from_id=123|; - POST string example:
1413802718|POST|https://www.saltedge.com/api/v6/customers/|{"data":{"identifier":"my_unique_identifier"}};
RSA keys generation instruction
RSA is a widely-used asymmetric cryptographic algorithm, essential for generating a secure key pair: a public key for encryption and a private key for decryption, which are mandatory to possess in order to Go Live.
It facilitates secure communication, enables digital signatures for authentication, and plays a key role in protocols like SSL/ TLS, ensuring data integrity and confidentiality in online transactions and communications. RSA is a fundamental component in establishing secure connections, securing sensitive data transmission, and safeguarding information in various applications.
To generate these 2 keys, please follow the instructions:
1. Install openssl package
 |  |  |
|---|---|---|
Install via Homebrew: brew install openssl | Windows complete package.exe installer | Apt-get install openssl |
2. Create the RSA Key Pair
For Mac OS X and Ubuntu Linux:
  openssl genrsa -out private.pem 2048
  openssl rsa -pubout -in private.pem -out public.pem
For Windows:
- After the package has been installed, a folder named OpenSSL-Win32 should appear at the installation path.
- Next, a Command Prompt can be opened, and the current directory can be changed to this folder by typing:
cd C:\OpenSSL-Win32\bin, whereC:\OpenSSL-Win32should be replaced with the install path. - Then, the RSA keys can be generated by typing:
  openssl genrsa -out private.pem 2048
  openssl rsa -pubout -in private.pem -out public.pem
Follow the instructions that appear afterward.
Authentication
Note
For more information about the Expires-at and Signature headers, please consult the dedicated Signature page.
App ID and Secret
The App-id and Secret headers should be included in every request.
Note that the keys can be obtained by accessing the API keys page, from the Client Dashboard.
Here’s an example request listing all the countries that the API currently supports.
Rate limits
Open Banking Gateway employs various safeguards to mitigate bursts of incoming traffic and enhance stability. Applications that send numerous requests in rapid succession may encounter error responses with a status code of 429.
The table below outlines specific endpoints and their corresponding rate limits:
| HTTP method | URL | Requests per second |
|---|---|---|
| POST | /api/v6/merchants | 5 |
| GET | /api/v6/providers* | 10 |
| GET | /api/v6/countries | 10 |
| GET | /api/v6/rates | 10 |
| GET | /api/v6/categories | 10 |
| POST | /api/v6/categories/learn | 5 |
*Applicable to all the related /Provider endpoints
Versioning
Any incompatible changes to the API will lead to incremented versions, resulting in altered resource URLs.
Clients have a 12-month window to transition to the new API version, and the existing one will be declared as Deprecated.
All Clients will receive notifications regarding API deprecation.
New fields may be added to the current API version at any time without prior warning, with documentation added subsequently. However, already documented fields cannot be modified or removed. Please rely solely on the existing documentation.
Migration GuideNew
Migrating to API V6
An overview of Account Information and Payment Initiation Services, version 6, for Clients who are already onboarded with earlier versions.
API version 6 consolidates Salt Edge's Accounts and Payments APIs, catering to both Client and Partner environments.
To enhance the overall experience, benefit from improved performance, and take advantage of new functionalities, it is highly encouraged to promptly upgrade to version 6.
Caution
Clients have a 12-month window to transition to the new API version, and the existing one will be declared as Deprecated.
Major changes that should be made on the Client’s side include the following:
Migration from Account Information V5 to V6
- Change base URL from
https://www.saltedge.com/api/v5tohttps://www.saltedge.com/api/v6 - Change path for creating Widget session:
- for the initial
Connect: from/connect_sessions/createto/connections/connect - for
Reconnects: from/connect_sessions/reconnectto/connections/{{CONNECTION_ID}}/reconnect - for
Refreshes: from/connect_sessions/refreshto/connections/{{CONNECTION_ID}}/refresh
- for the initial
- Change PSD2 consent values:
- from
holder_informationtoholder_info - from
account_informationtoaccounts - from
transactions_informationtotransactions
- from
- Change fetch consent values:
- from
accountstoaccountsandbalance - from
accounts_without_balancetoaccounts
- from
- If Pending transactions were used, send
pending:truequery parameter for requests to/transactionsinstead of/transactions/pending - If Duplicated transactions were used, send
duplicated:truequery parameter for requests to/transactionsinstead of/transactions/duplicate - If Holder Information was used, send
include_holder_info:truequery parameter for requests to/connections/{{CONNECTION_ID}}and useholder_infofrom response, instead of making API request to/holder_info?connection_id={{CONNECTION_ID}} - If Signature was used to identify that the callback is originating from the Account Information API, make sure to update the public key to the V6 version.
Migration from Account Information V5 (Direct API) to V6
API V6 no longer supports Direct API. Therefore, Clients are expected to create a Widget session using the URL https://www.saltedge.com/api/v6/connections/connect URL and redirect Users to the data.connect_url from the response.
See Migration from AIS V5 to V6, for more details about the differences between versions.
Migration from Partners Account Information V1 to V6
- Change base URL from
https://www.saltedge.com/api/partners/v1tohttps://www.saltedge.com/api/v6 - Change path to create end-users from
/leadsto/customers - Change path for creating Widget session:
- for initial
Connect: from/lead_sessions/createto/connections/connect - for
Reconnects:from/lead_sessions/reconnectto/connections/{{CONNECTION_ID}}/reconnect - for
Refreshes: from/lead_sessions/refreshto/connections/{{CONNECTION_ID}}/refresh
- for initial
- Change PSD2 consent values:
- from
holder_informationtoholder_info - from
account_informationtoaccounts - from
transactions_informationtotransactions
- from
- Change fetch consent values:
- from
accountstoaccountsandbalance - from
accounts_without_balancetoaccounts
- from
- If Pending transactions were used, send
pending:truequery parameter for requests to/transactionsinstead of/transactions/pending - If Duplicated transactions were used, send
duplicated:truequery parameter for requests to/transactionsinstead of/transactions/duplicate - If Holder Information was used, send
include_holder_info:truequery parameter for requests to/connections/{{CONNECTION_ID}}and useholder_infofrom response, instead of making API request to/holder_info?connection_id={{CONNECTION_ID}} - If Signature was used to identify that the callback is originating from the Partners Account Information API, make sure to update the public key to the V6 version.
Migration from app API keys to service API keys
API V6 no longer supports app API keys, therefore Clients are expected to:
- establish their back-end services, using service API keys for authentication with API V6
- save
customer_idin a database associated with end-users - use end-users
customer_idin requests to API V6 from the Client’s backend service
See Migration from AIS V5 to V6 for more details about the differences between versions.
Migration from Payment Initiation V1 to V6
- Change base URL from
https://www.saltedge.com/api/payments/v1/payments/connecttohttps://www.saltedge.com/api/v6 - Providers:
- Rename
include_fake_providersparameter toinclude_sandboxes - Rename
provider_key_ownertokey_owner - Add new query parameters for the Providers List and Providers Show endpoints to filter:
include_ais_fieldsinclude_pis_fieldsinclude_credentials_fieldsexclude_inactive
- Rename
- Payment Templates:
- Change path from
/templatesto/payment_templates
- Change path from
- Payments:
- Change URL for Payment Initiation from
https://www.saltedge.com/api/payments/v1/payments/connecttohttps://www.saltedge.com/api/v6/payments/create - Rename
country_codeparameter topopular_providers_countryparameter for Payment Create endpoint - Rename
connect_templateparameter totemplateparameter for the Payment Create endpoint - Rename
include_fake_providersparameter toinclude_sandboxesfor the Payments Create endpoint to show Fake and Sandbox Providers, in the Salt Edge Widget - Rename
skip_provider_selectparameter toskip_provider_selection - Rename
creditor_agentparameter tocreditor_bicas part of the payment_attributes - Change the structure of the request body parameters for Payment Create endpoint:
- from
"provider_code": "fake_client_xf"to"provider": { "code": "fake_client_xf" } - from
"include_fake_providers": trueto"provider": { "include_sandboxes": true } - from
"country_code": "GB"to"widget": {"popular_providers_country": "GB"} - from
"connect_template": "default_v3"to"widget": {"template": "default_v3"} - from
"skip_provider_select": trueto"widget":{"skip_provider_selection": true} - from
{"theme": "light"}to"widget": {"theme": "light"} - from
"javascript_callback_type": "post_message"to"widget: {"javascript_callback_type": "post_message"} - from
"disable_provider_search": falseto"widget": {"disable_provider_search": false} - from
"show_consent_confirmation": trueto"widget":{"show_consent_confirmation": true} - from
"cancellation_scopes": "insufficient_funds"to"attempt": {"cancellation_scopes": "insufficient_funds"} - from
"custom_fields": {"key": "value"}to"attempt": {"custom_fields": {"key": "value"}} - from
"locale": "en"to"attempt": {"locale": "en"} - from
"return_to": "https://docs.saltedge.com"to"attempt": {"return_to": "https://docs.saltedge.com"}
- from
- Change URL for Payment Initiation from
Migration from Partner Payment Initiation V1 to V6
- Change base URL from
https://www.saltedge.com/api/partners/v1tohttps://www.saltedge.com/api/v6 - Customers:
- Change path from
/leadsto/customers - Change from Lead Create to Customer Create
- Change from Lead Remove to Customer Remove
- Change path from
- Providers:
- Rename
include_fake_providersparameter toinclude_sandboxes - Rename
provider_key_ownertokey_owner - Add new query parameters for the Providers List and Providers Show endpoints to filter:
include_ais_fieldsinclude_pis_fieldsinclude_credentials_fieldsexclude_inactive
- Rename
- Payment Templates:
- Change path from
/templatesto/payment_templates
- Change path from
- Payments:
- Change URL for Payment Initiation from
https://www.saltedge.com/api/partners/v1/payments/sessionstohttps://www.saltedge.com/api/v6/payments/create - Rename
country_codeparameter topopular_providers_countryparameter for Payments Create endpoint - Rename
connect_templateparameter totemplateparameter for the Payments Create endpoint - Rename
include_fake_providersparameter toinclude_sandboxesfor the Payments Create endpoint to show Fake and Sandbox Providers, in the Salt Edge Widget - Rename
skip_provider_selectparameter toskip_provider_selection - Rename
creditor_agentparameter tocreditor_bicas part of the payment_attributes - Change the structure of the request body parameters for the Payments Create endpoint:
- from
"provider_code": "fake_client_xf"to"provider": { "code": "fake_client_xf" } - from
"include_fake_providers": trueto"provider": { "include_sandboxes": true } - from
"country_code": "GB"to"widget": {"popular_providers_country": "GB"} - from
"connect_template": "default_v3"to"widget": {"template": "default_v3"} - from
"skip_provider_select": trueto"widget":{"skip_provider_selection": true} - from
{"theme": "light"}to"widget": {"theme": "light"} - from
"javascript_callback_type": "post_message"to"widget: {"javascript_callback_type": "post_message"} - from
"disable_provider_search": falseto"widget": {"disable_provider_search": false} - from
"show_consent_confirmation": trueto"widget":{"show_consent_confirmation": true} - from
"cancellation_scopes": "insufficient_funds"to"attempt": {"cancellation_scopes": "insufficient_funds"} - from
"custom_fields": {"key": "value"}to"attempt": {"custom_fields": {"key": "value"}} - from
"locale": "en"to"attempt": {"locale": "en"} - from
"return_to": "https://docs.saltedge.com"to"attempt": {"return_to": "https://docs.saltedge.com"}
- from
- Change URL for Payment Initiation from
Migration from Payment Initiation V1 (Direct API) to V6
- API V6 no longer supports Direct API. Therefore, Clients are expected to create a Widget session using
https://www.saltedge.com/api/v6/payments/createURL and redirect Users to the data.payment_url from the response.
See Migration from Payment Initiation V1 to V6, for more details about the differences between versions.
Callbacks
General
The critical components of the Account Information & Payment Initiation API operate asynchronously. Each web application must furnish a set of valid URLs that Salt Edge will use to provide notifications regarding the fetching progress. Other applications can poll the Account Information API to obtain updated information.
There are several key points regarding the requests sent to the Client's callback URLs:
- The
Content-Typeheader is set toapplication/json; - A Signature header identifies that the request was signed by the Account Information API.
- The request method is always
POST; - The JSON object sent will always have a
datafield; - The
metafield will indicate the version of the callbacks API.
To configure the callback URLs for the application, please access the callbacks page.
Note
Due to security reasons, the callbacks can be sent to port 80/HTTP only in Test and Pending Client statuses. Port 443/HTTPS is accepted by all statuses.
Additionally, callbacks do not follow redirects.
Request identification
To enable the Client to identify that the request is originating from the Account Information API, two options are available: Signature and Mutual TLS. For Partners, only the Signature method is applicable.
Signature
A base64-encoded SHA256 signature of the string is formed by concatenating the callback_url and post_body parameters with a vertical bar (|). This string is signed with the AIS or PIS API's private key.
The version of the signature key, used for signing the callback, can be found in the Signature-key-version header. The current version is 6.0, and its corresponding public key is provided below:
  -----BEGIN PUBLIC KEY-----
  MIIBIjANBgkqhkiG9w0BAQEFAAOCAQ8AMIIBCgKCAQEA8qxSS5BmftHK/eyW+o98
  NR89TyDmz1V8e6yyFdoMPddEYN4Bcidkk2whoJEc/T/AKghHQ9Nq+DuebnRYYcSJ
  YT99VbR1PpIw2R9i8z+DZ79hoizy6z+rwxGANnJOr5BDF5HUKJ8uKS9yGRieojFv
  Y9j+rxH6Fj6P90bO4d2igYYspKVoI3Zb3hWS0LrWN+JXAaW9qcOmQPTgO0WG0MUK
  gB3NNMfN7gMIkl3chbaULiEgVciP2qZTIGb1b7IDr5+fA9oVVGaXiybdieGHIa4J
  S7JNTf0JjWrIKd2DaczKULnghqNQsnoCu+S8BurEOJR5EN1BBfQBPlbSh+ru1zgZ
  AQIDAQAB
  -----END PUBLIC KEY-----
An example string for generating the signature is as follows:
https://www.client.com/api/callbacks/success|{"data":{"connection_id":"111111111111111111","customer_id":"222222222222222222","custom_fields":{}},"meta":{"version":"6","time":"2020-07-07T13:00:28Z"}}
The pseudocode for generating the signature is:
base64(sha256_signature(private_key, "callback_url|post_body"))
MTLS
To authenticate that a callback is originating from the Account Information or Payment Initiation API, please employ Client Certificate Authentication.
a. Navigate to Account -> Settings -> Callbacks. At the right, the Mutual TLS section can be found.
b. Click on Generate CSR.
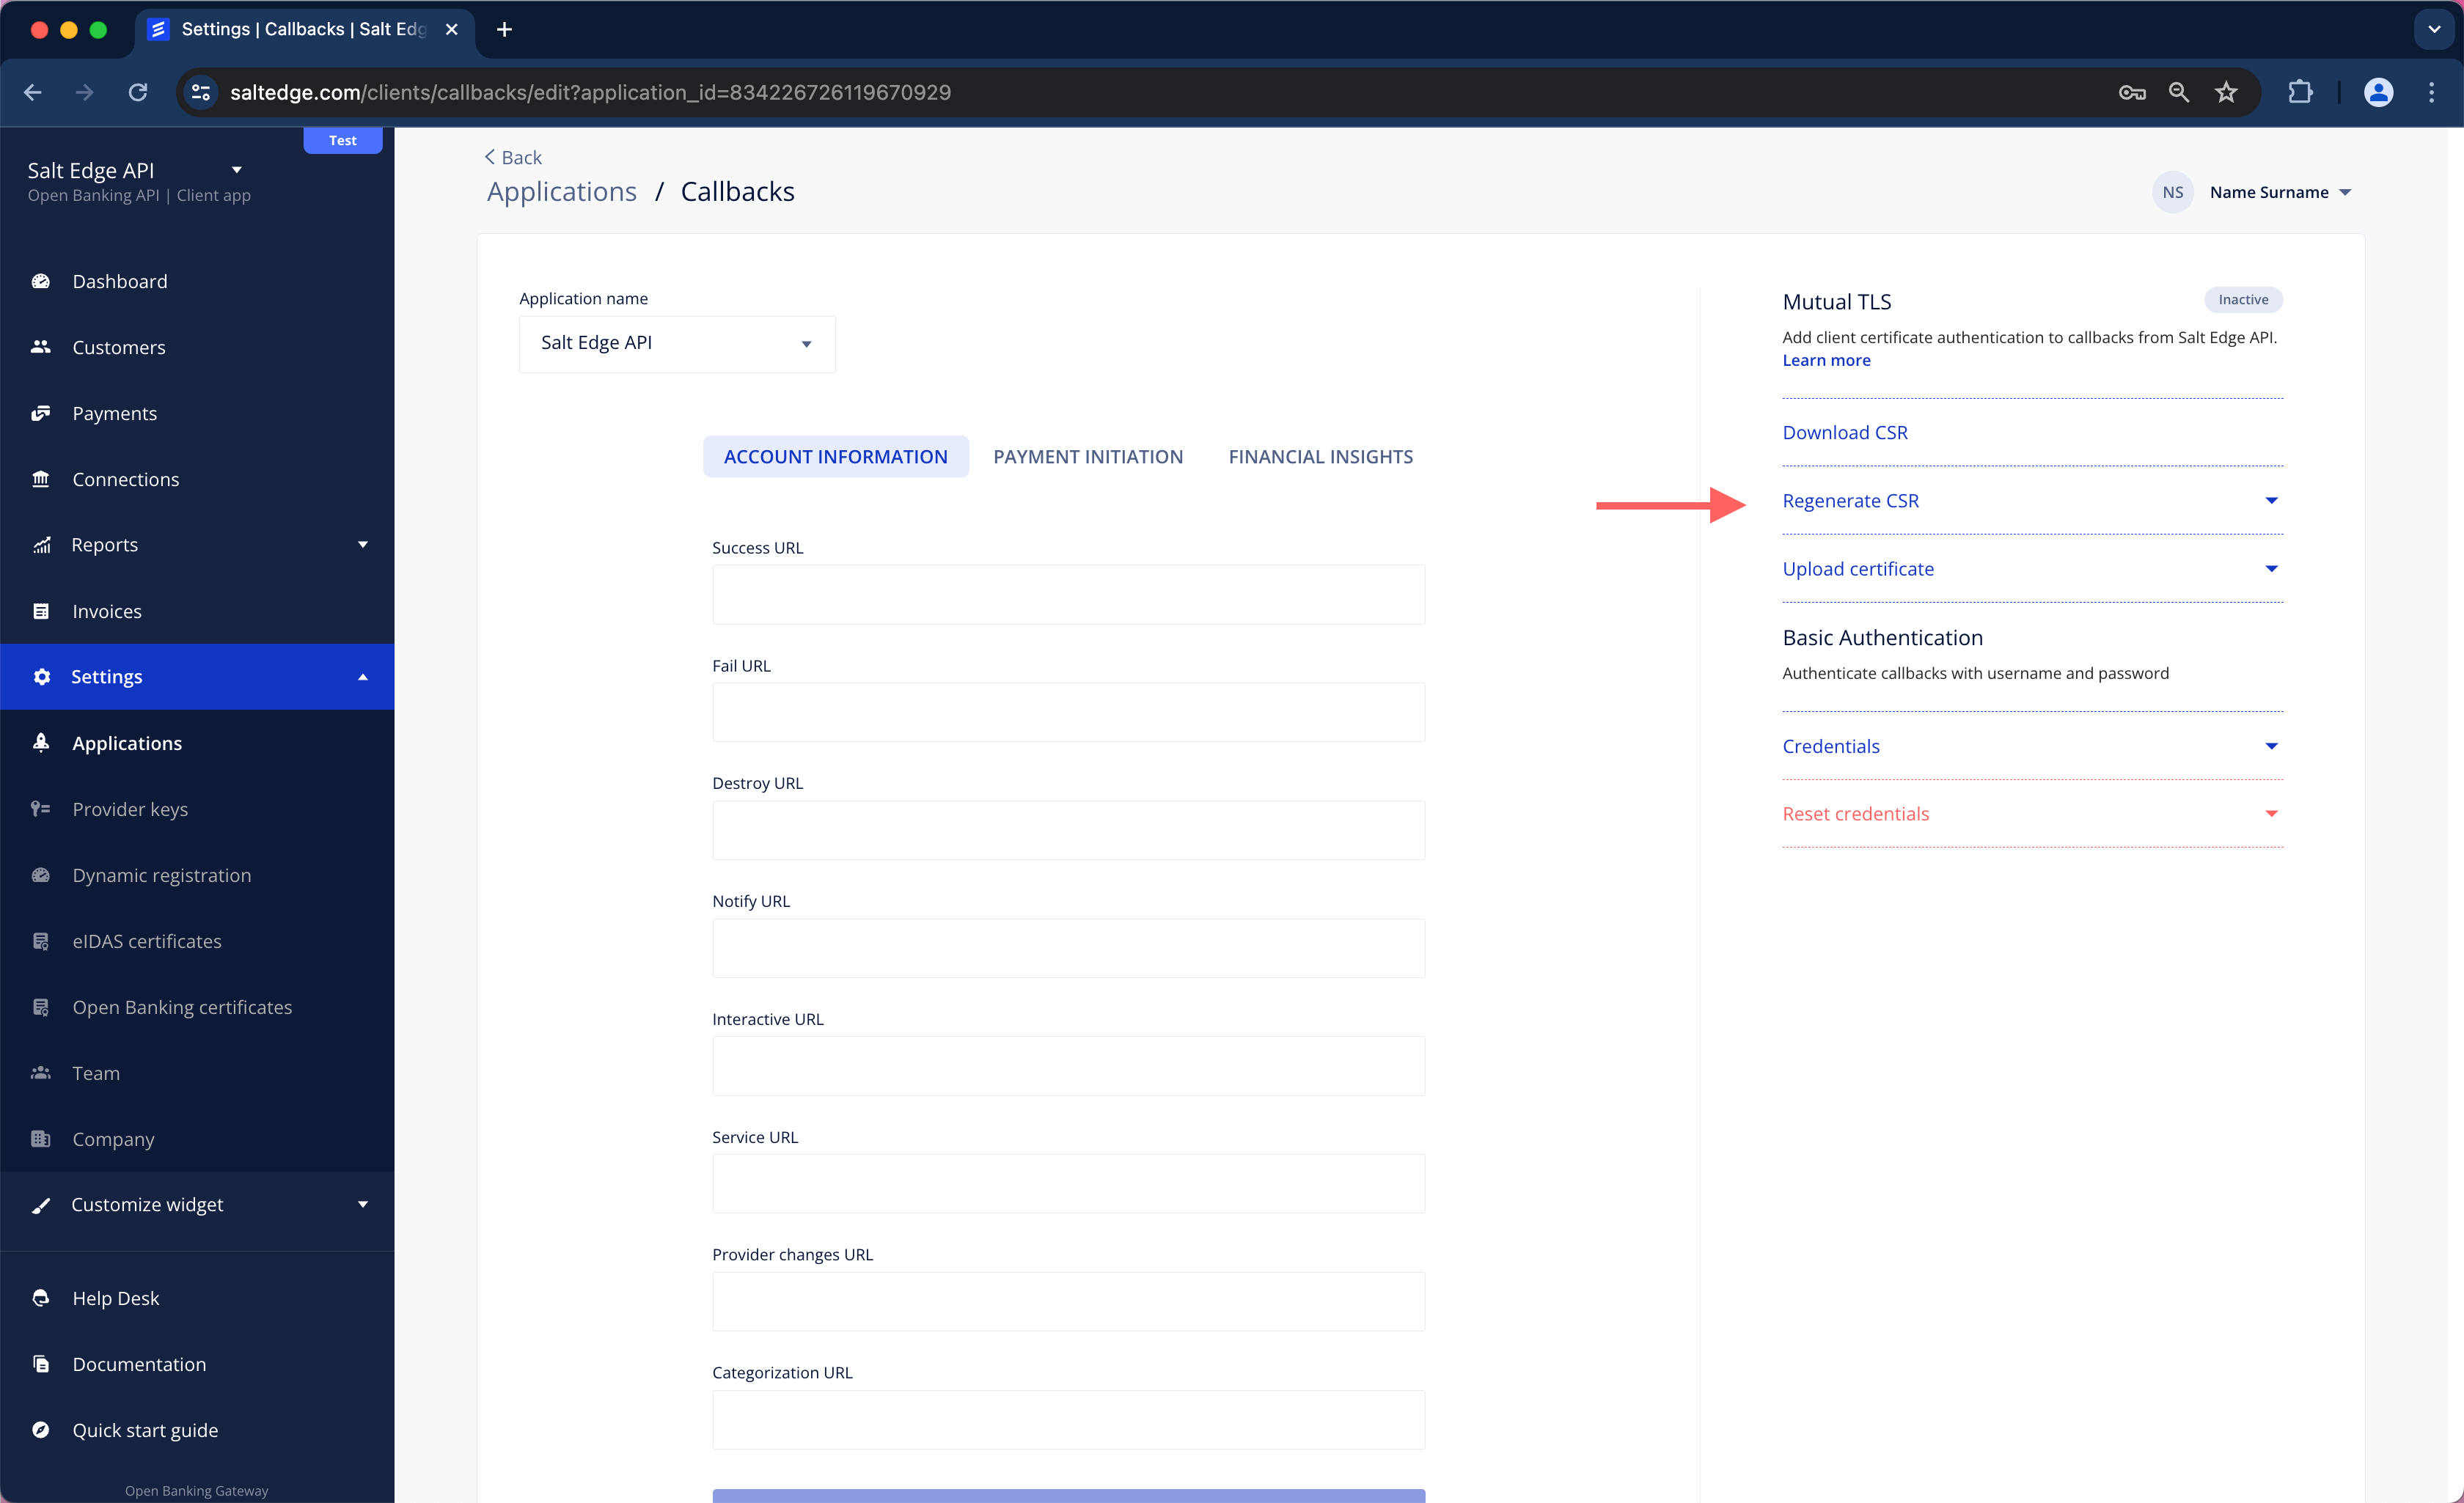
c. Configure certificate attributes as necessary and then click on Generate.
d. Download the CSR.
e. Use the Certificate Authority (CA) to generate a Client certificate from the downloaded Certificate Signing Request (CSR).
openssl x509 -req -days 365 -in salt_edge_callbacks.csr -CA ca.crt -CAkey ca.key -set_serial 01 -out client.crt
f. Upload the generated certificate using the following field.
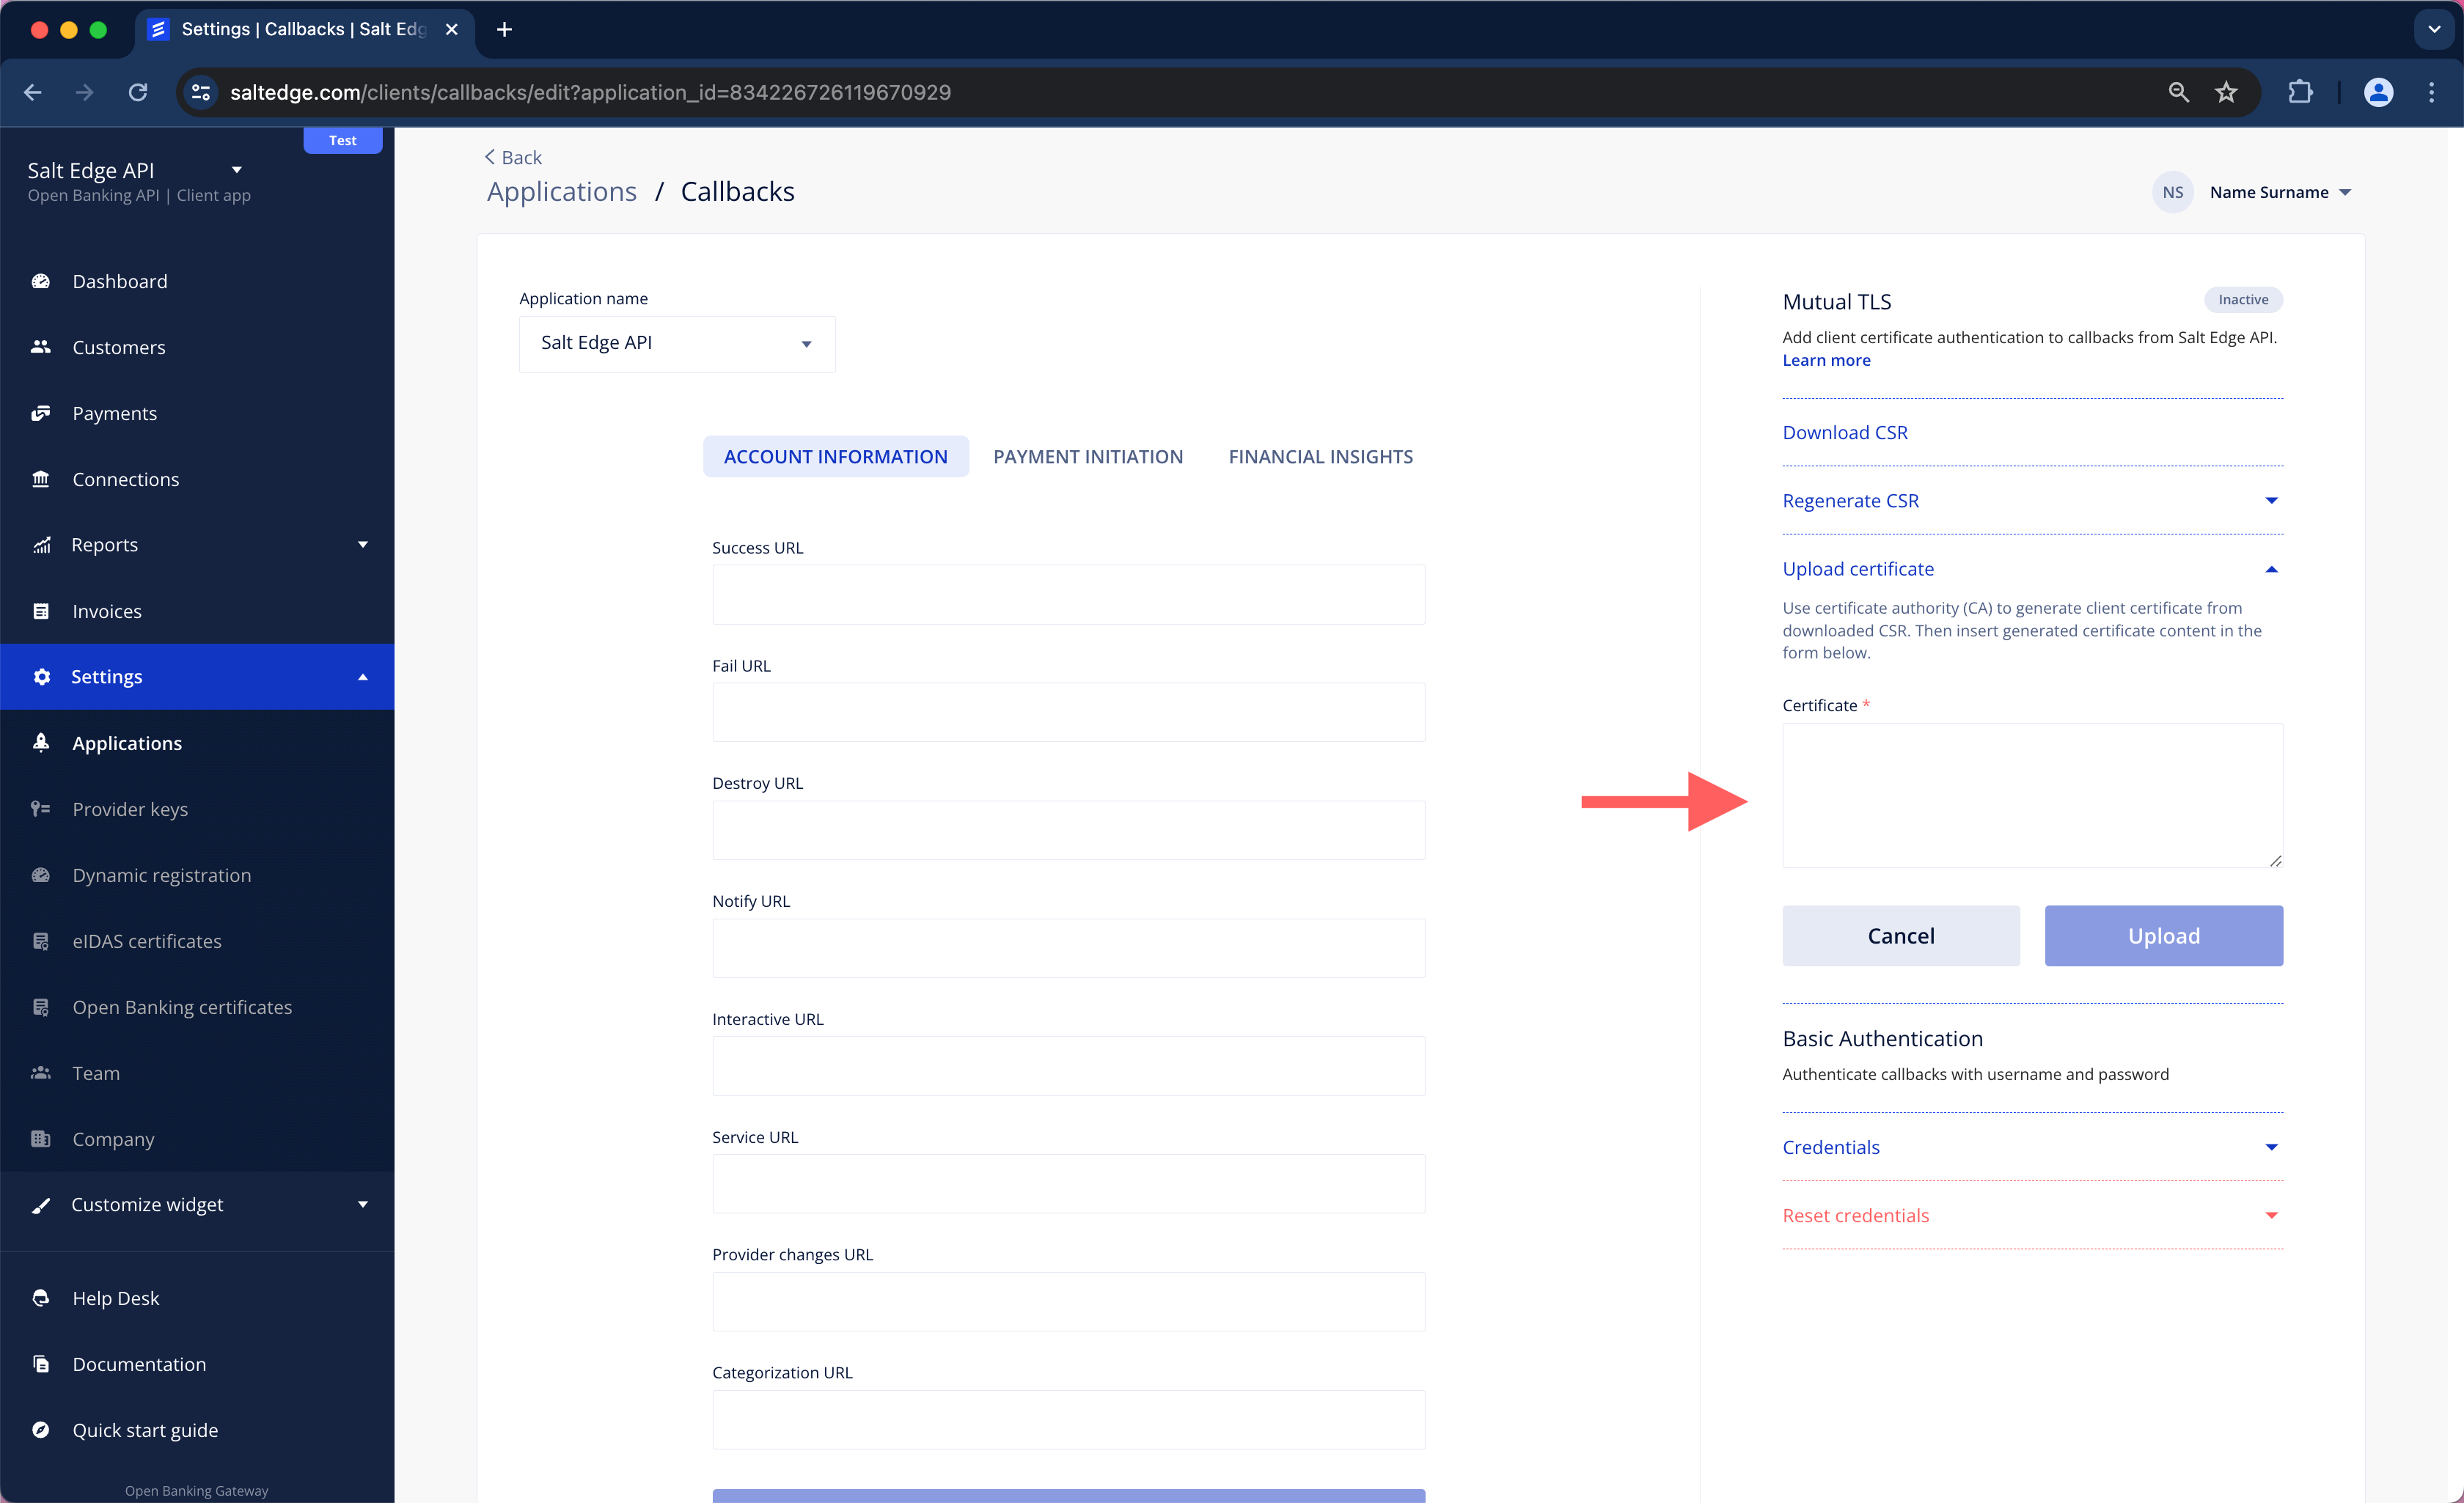
To understand how it could be implemented on the server side, refer to this example.
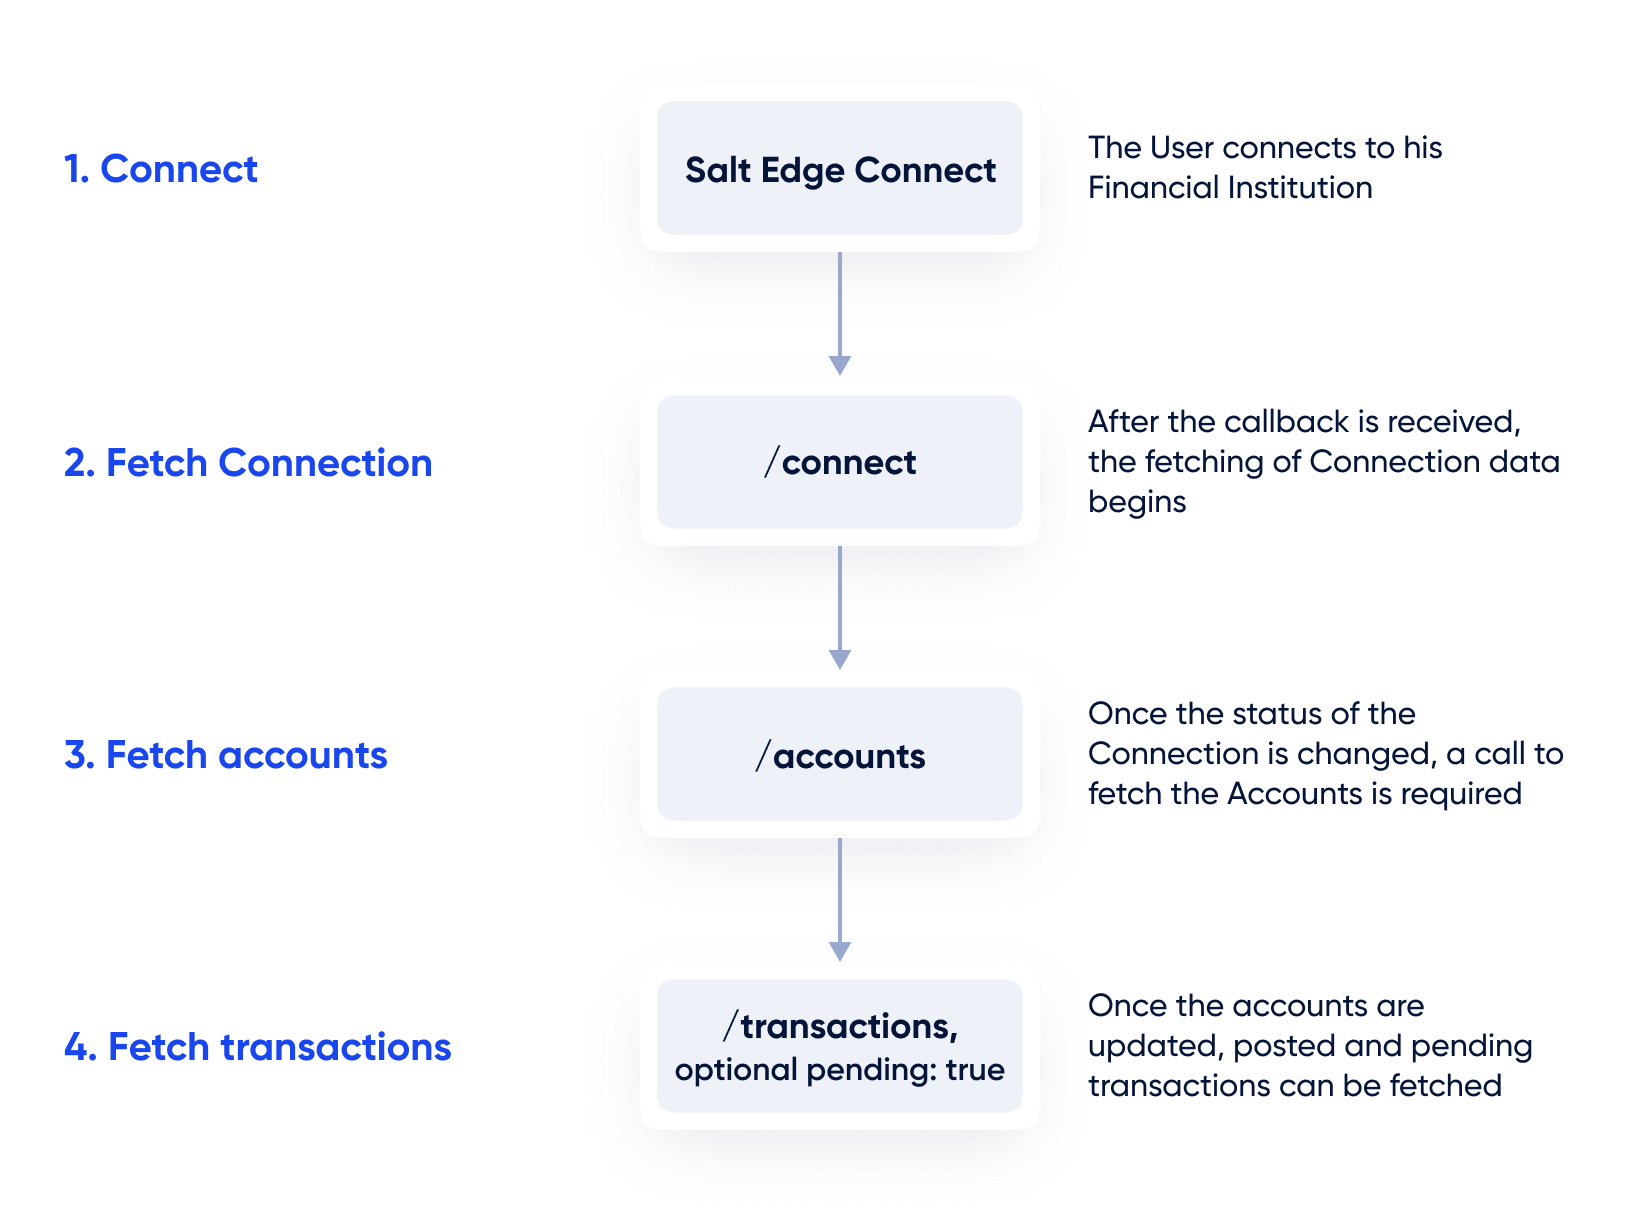
To prevent unnecessary requests, performance issues, and fetching all data, follow the guidance provided in the following diagram:
Pagination
Most Account Information API routes return lists of paginated objects rather than the entire dataset. The data is segmented into smaller chunks known as pages.
By default, when the Client requests a list of paginated resources, a next_id in the meta object response will be received. The value of next_id corresponds to the resource_id with which the next page will commence.
To customize the number of items per page the per_page attribute in the request can be included, specifying a range between 100 and 1000 items. This attribute indicates the quantity of items per page. If no per_page parameter is sent, the default is set to 100 items.
To retrieve all the data, an additional from_id parameter with the corresponding ID in the URL or use the next_page attribute should be included, which already contains from_id parameter appended to the URL.
AIS
Note
Testing the Widget can be easily initiated from the Dashboard page by pressing New Connection button.
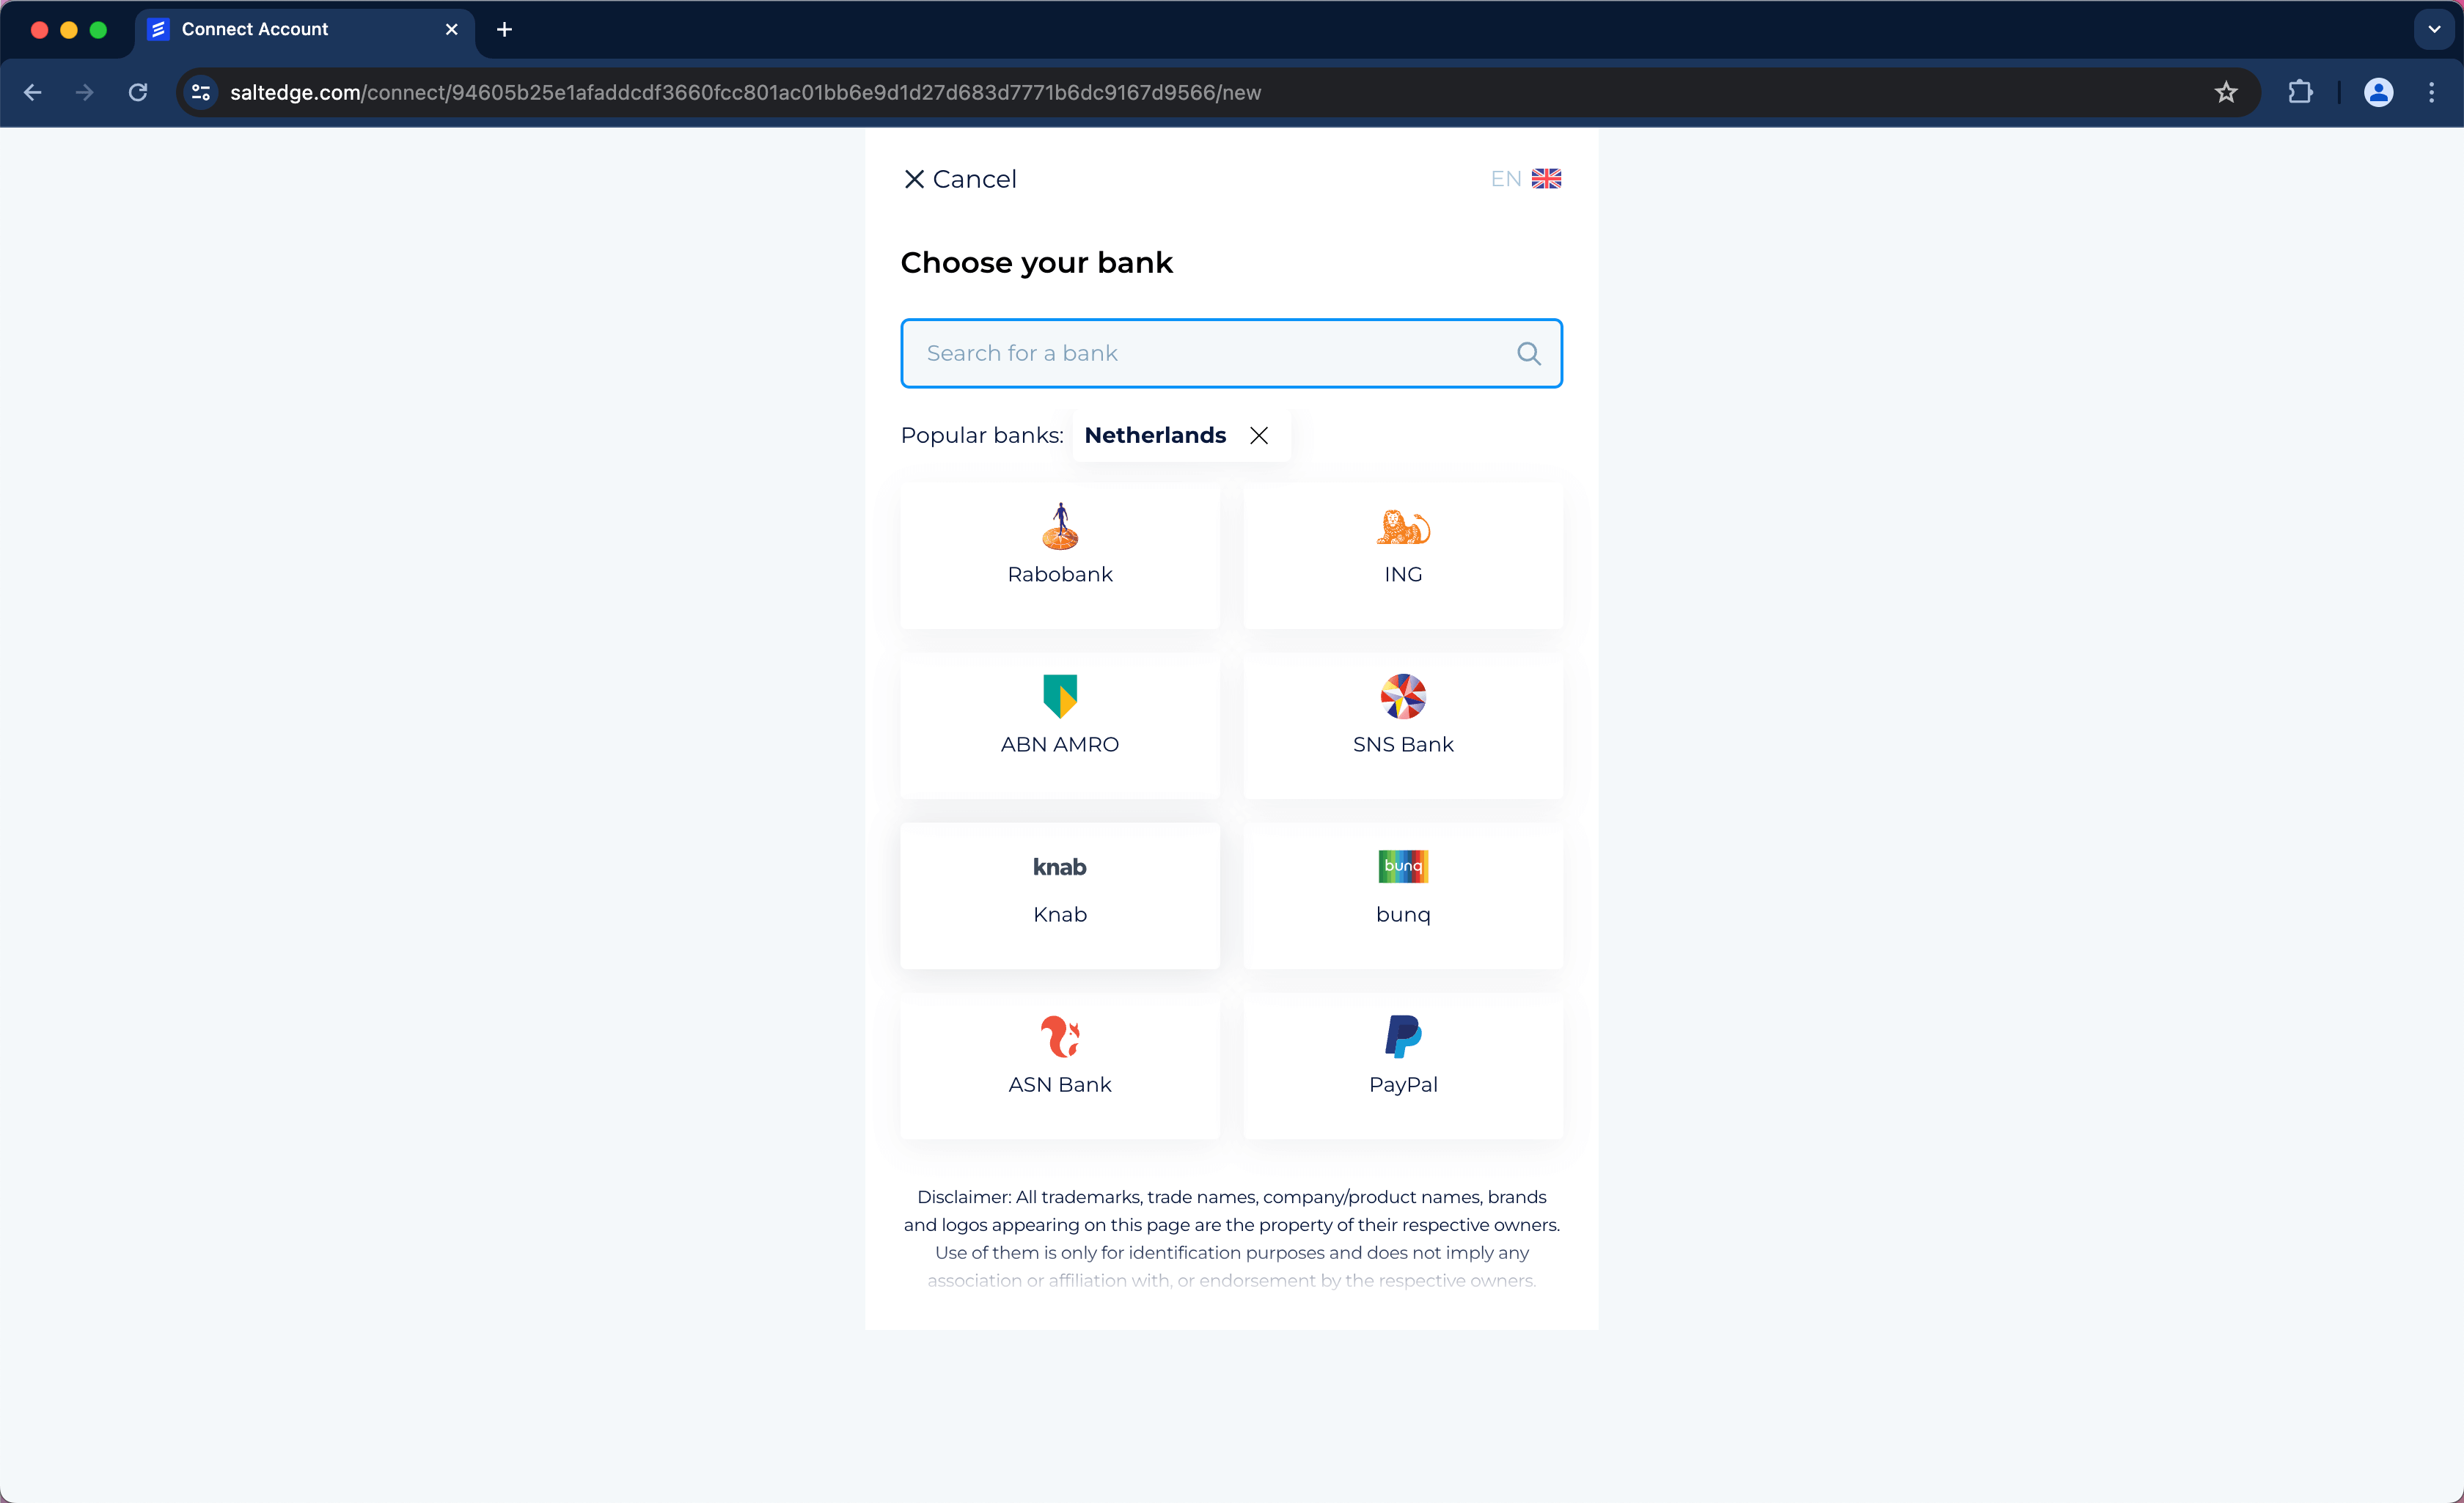
Once a connect_url has been received by the Client’s application for connecting or reconnecting a Connection, the User can be redirected to the Salt Edge connect_url. At the connect_url, a screen will be presented, allowing the User to select a country and a Provider.
The User will also be prompted to input the necessary credentials and, if required, any interactive credentials.
For instance, if Netherlands is chosen as the country, the following popular Providers will be displayed:
The User will also be prompted to input the necessary credentials and, if required, any interactive credentials.
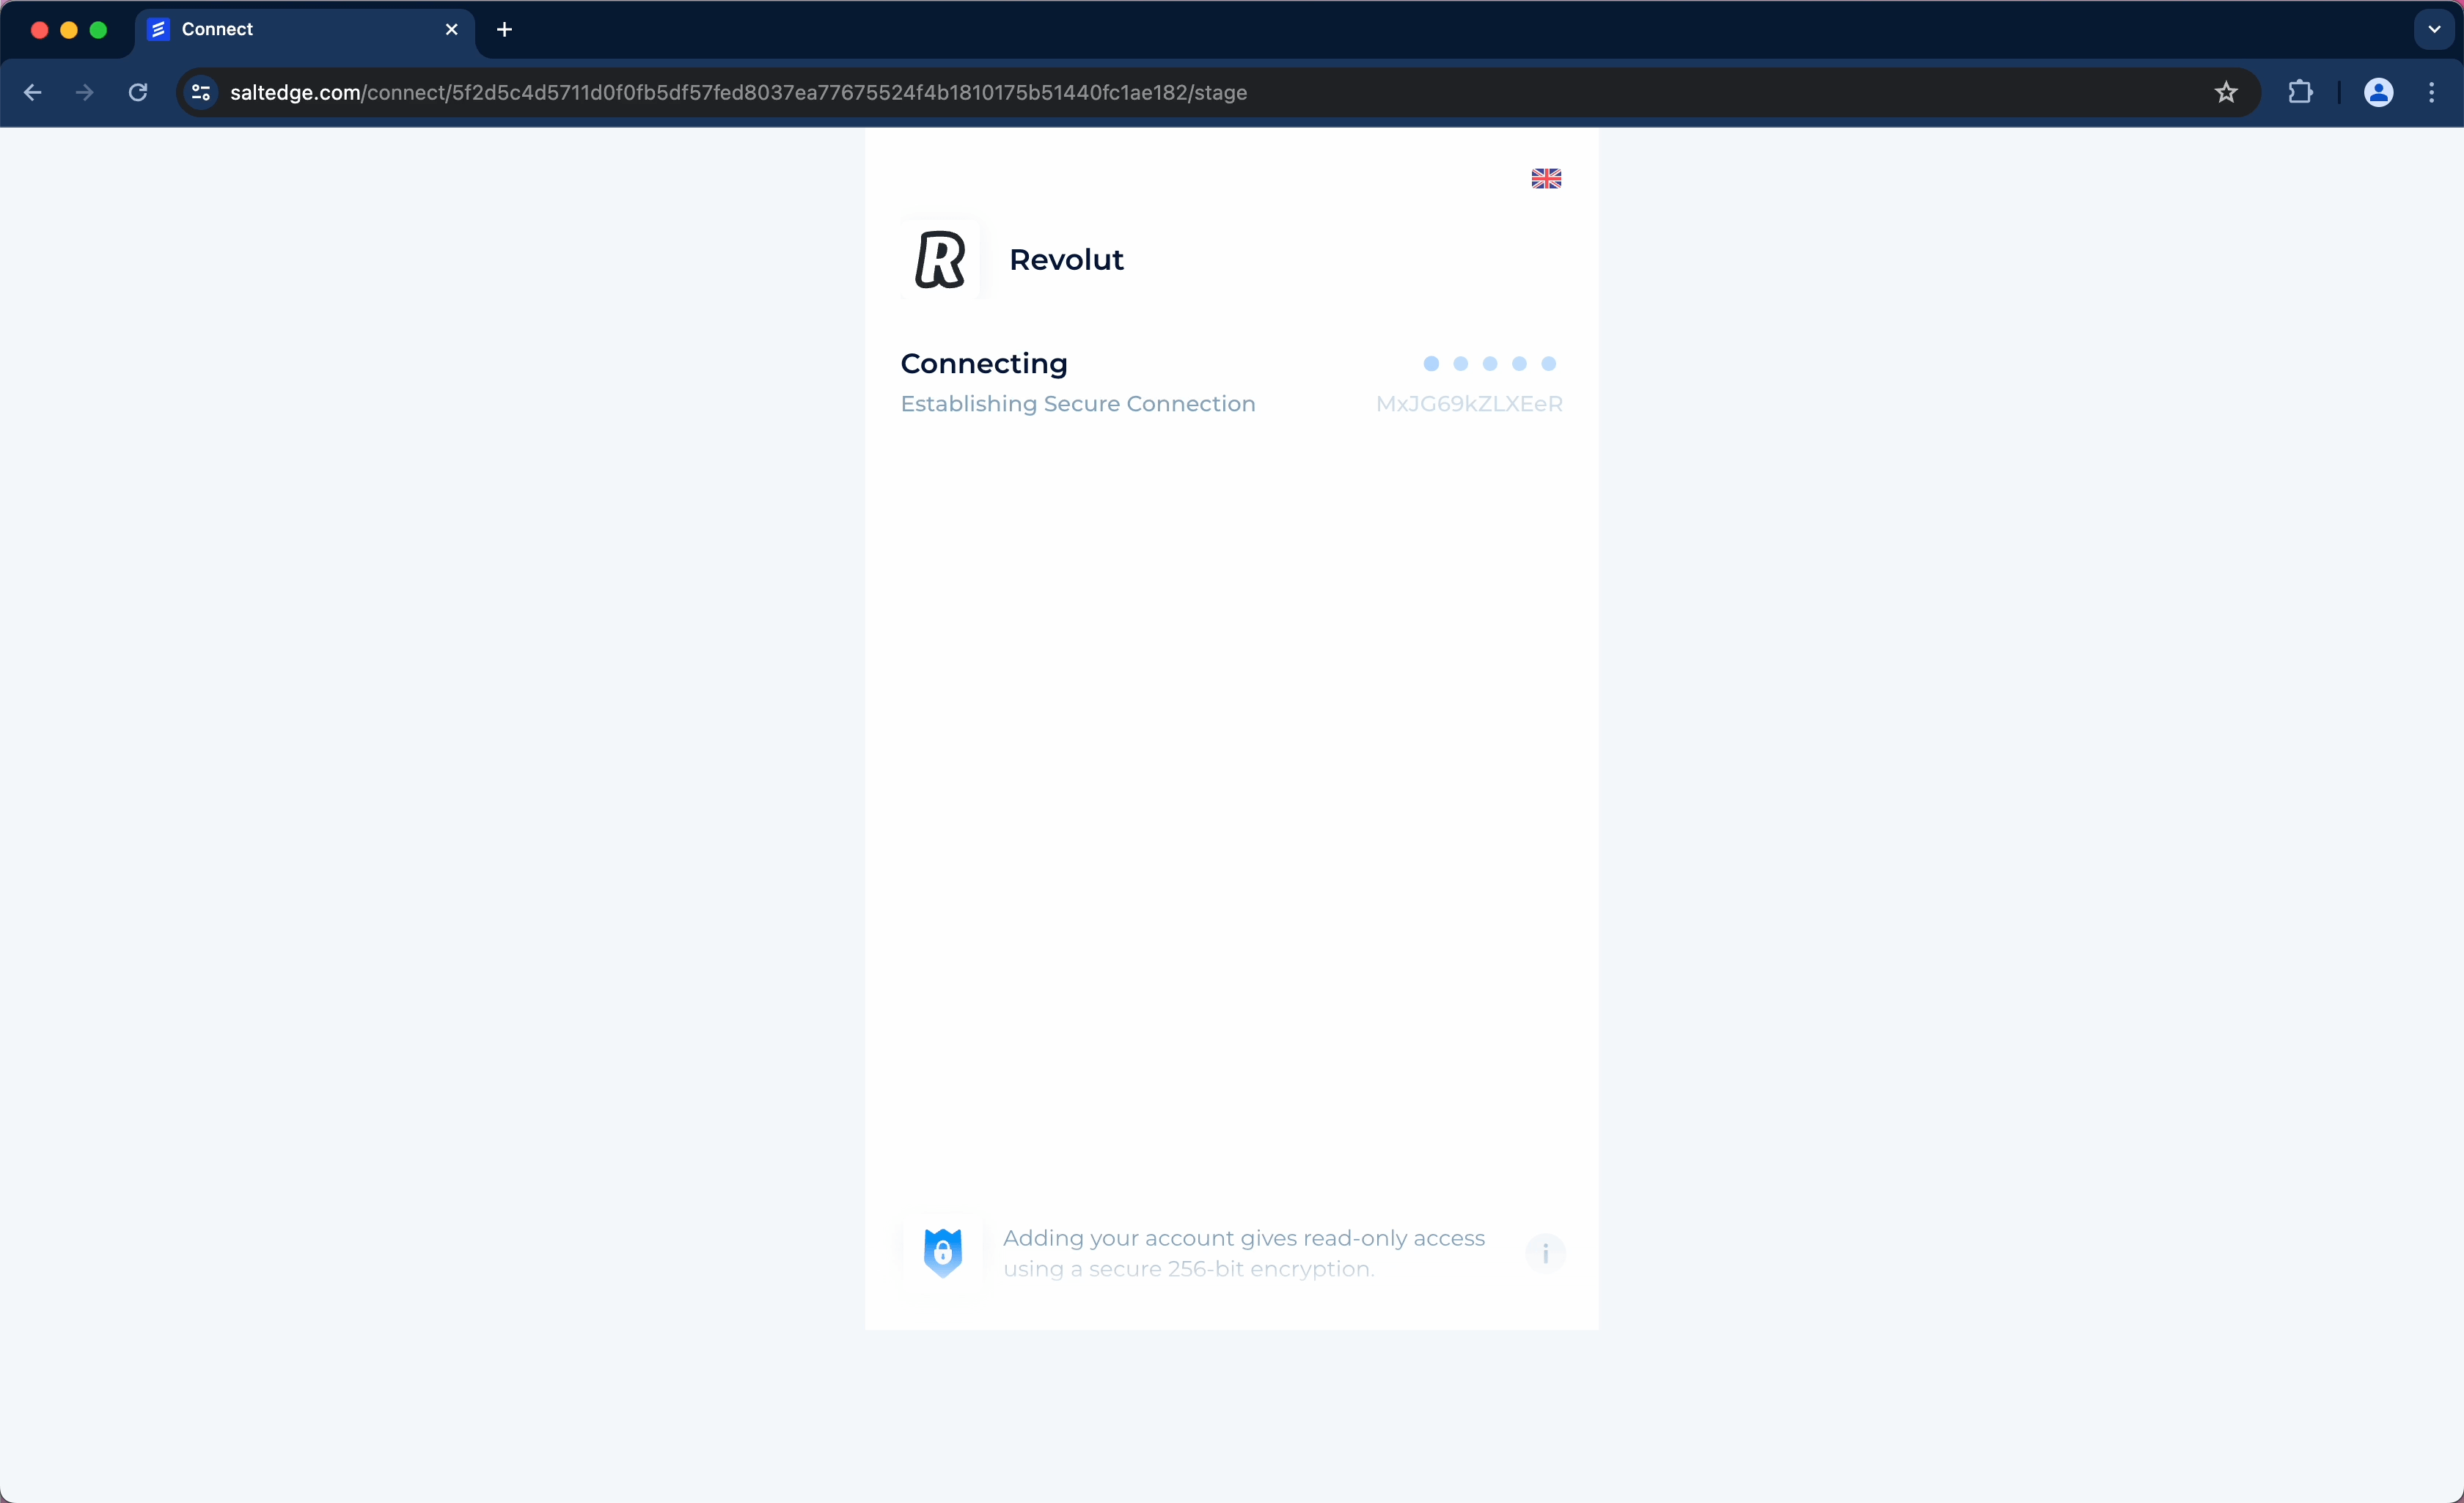
After the fetching is completed, the User will be redirected back to the Client’s application.
Note
Please note that each Client has a predefined limit on the maximum number of concurrent sessions allowed.
This limit encompasses Connections/Connect, Reconnect and Refreshes (via Widget).
Note
Salt Edge Widget is compatible only with the two most recent versions of modern browsers.
Using Widget in iframe
Once a connect_url is received, it can be embedded in an iframe. However, there are several considerations to be taken into account when doing so:
- Callbacks need to be subscribed to, and the iframe should be closed when the Connection process finishes.
- The Connection of Providers that authenticate via redirect may not function. This is due to HTTP headers ( X-Frame-Options, Content-Security-Policy ) imposed by most Providers, restricting the inclusion of the authentication page in an iframe.
Several ways exist to mitigate the last point:
Iframe injection
The inserted URL has a custom scheme and host. The scheme of the URL is saltbridge and the host is connect. Here's an example of such a URL:
saltbridge://connect/{"data":{"connection_id":"997674448","stage":"fetching","secret":"Oqws977brjJUfXbEnGqHNsIRl8PytSL60T7JIsRBCZM", "custom_fields":{"key":"value"}, "api_stage":"start"}}
Note
The URL will be URLEncoded (percent-encoded); the URL above is not URLEncoded to preserve its readability.
Once the app has captured the inserted URL, it has to serialize the JSON-encoded URL path following the scheme and the host. Here’s another example, this time of a duplicated Connection callback:
saltbridge://connect/{"data":{"duplicated_connection_id":"994317674","stage":"error","custom_fields":{"key":"value"}, "api_stage":"finish"}}
Once the app has decoded the URL path, it can start performing several actions like accounts listing or error handling.
JavaScript callbacks
Post message
If the Connect page, wrapped in an iframe, is accessed, Window.postMessage can be used (or window.ReactNativeWebView.postMessage for ReactNativeWebView), enabling cross-origin communication.
Client side callbacks
When a connect_url is requested, an optional argument, javascript_callback_type, can be passed. This argument activates one of the following notification methods:
- By inserting an iframe with a specific source URL into the connect page.
- Through an external object, calling window.external.SaltBridge (employed by DotNet applications).
- Through an external object, calling window.external.Notify (used by DotNet applications).
- Through postMessage, calling window.addEventListener (applied when Connect is in an iframe, popup, or new tab). For React Native WebView, the WebView
onMessageprop should be used.
Any of these callbacks will be sent by Salt Edge Widget only if javascript_callback_type was specified in the Connections/Create request.
Widget callbacks
There are two callback types for Salt Edge Widget:
- Standard callback
- Duplicated connection callback
Possible stage values for each callback type are fetching, success, and error. The parameter api_stage provides detailed information on the fetching process.
Fetching
  {
    "data": {
      "connection_id": "111111111111111111",
      "stage": "fetching",
      "secret": "Oqws977brjJUfXbEnGqHNsIRl8PytSL60T7JIsRBCZM",
      "custom_fields": {
        "key": "value"
      },
      "api_stage": "start"
    }
  }
For a duplicated Connection:
  {
    "data": {
      "duplicated_connection_id": "111111111111111112",
      "stage": "fetching",
      "custom_fields": {
        "key": "value"
      },
      "api_stage": "start"
    }
  }
Success
For example, when a Connection is created by the User using Salt Edge Widget, the following success callback will be sent:
  {
    "data": {
      "connection_id": "111111111111111111",
      "stage": "success",
      "secret": "Oqws977brjJUfXbEnGqHNsIRl8PytSL60T7JIsRBCZM",
      "custom_fields": {
        "key": "value"
      },
      "api_stage": "finish"
    }
  }
For a duplicated Connection:
  {
    "data": {
      "duplicated_connection_id": "111111111111111112",
      "stage": "success",
      "custom_fields": {
        "key": "value"
      },
      "api_stage": "finish"
    }
  }
Error
At times, the information retrieval from the Provider's page may fail. This can occur due to reasons such as the User not sending interactive data, incorrect credentials, or a failure in one of the steps of the fetching process. In such cases, an error callback will be received, containing a JSON similar to the following:
  {
    "data": {
      "connection_id": "111111111111111111",
      "stage": "error",
      "secret": "Oqws977brjJUfXbEnGqHNsIRl8PytSL60T7JIsRBCZM",
      "custom_fields": {
        "key": "value"
      },
      "api_stage": "finish"
    }
  }
For a duplicated Connection:
  {
    "data": {
      "duplicated_connection_id": "111111111111111112",
      "stage": "error",
      "custom_fields": {
        "key": "value"
      },
      "api_stage": "finish"
    }
  }
Closing behaviour
Upon completing the transaction fetching, the Salt Edge Widget is automatically redirected to the return_to URL. This ensures a seamless User Experience by removing the Widget from the screen, once the transaction import process is complete.
Transaction Limit per Account:
The User will be redirected to the Client's application as soon as the first transactions are fetched from the Provider. When all other transactions are fetched, a success callback is sent.
Import Process Duration:
The duration of the import process may vary based on the number of accounts and transactions involved. Factors such as network speed, server response time, and the complexity of the transaction data can influence the time required for the import process. Users should be aware that larger datasets may require more time to complete the import process, while smaller datasets will generally import more quickly.
Users are recommended to be patient and allow the Salt Edge Widget sufficient time to import and process the transactions, especially when dealing with a significant number of accounts and transactions. The background import process continues even after the Widget has closed, allowing Users to proceed with their tasks while the remaining transactions are imported.
PIS
Note
Testing the Widget can be easily initiated from the Dashboard or Payments by pressing New Payment button.
Once a payment_url has been received by the Client’s application for Payment Initiation, the User can be redirected to the Salt Edge Widget via the previously generated URL.
The User will also be prompted to choose a Provider, input the necessary credentials, and if required, any interactive credentials.
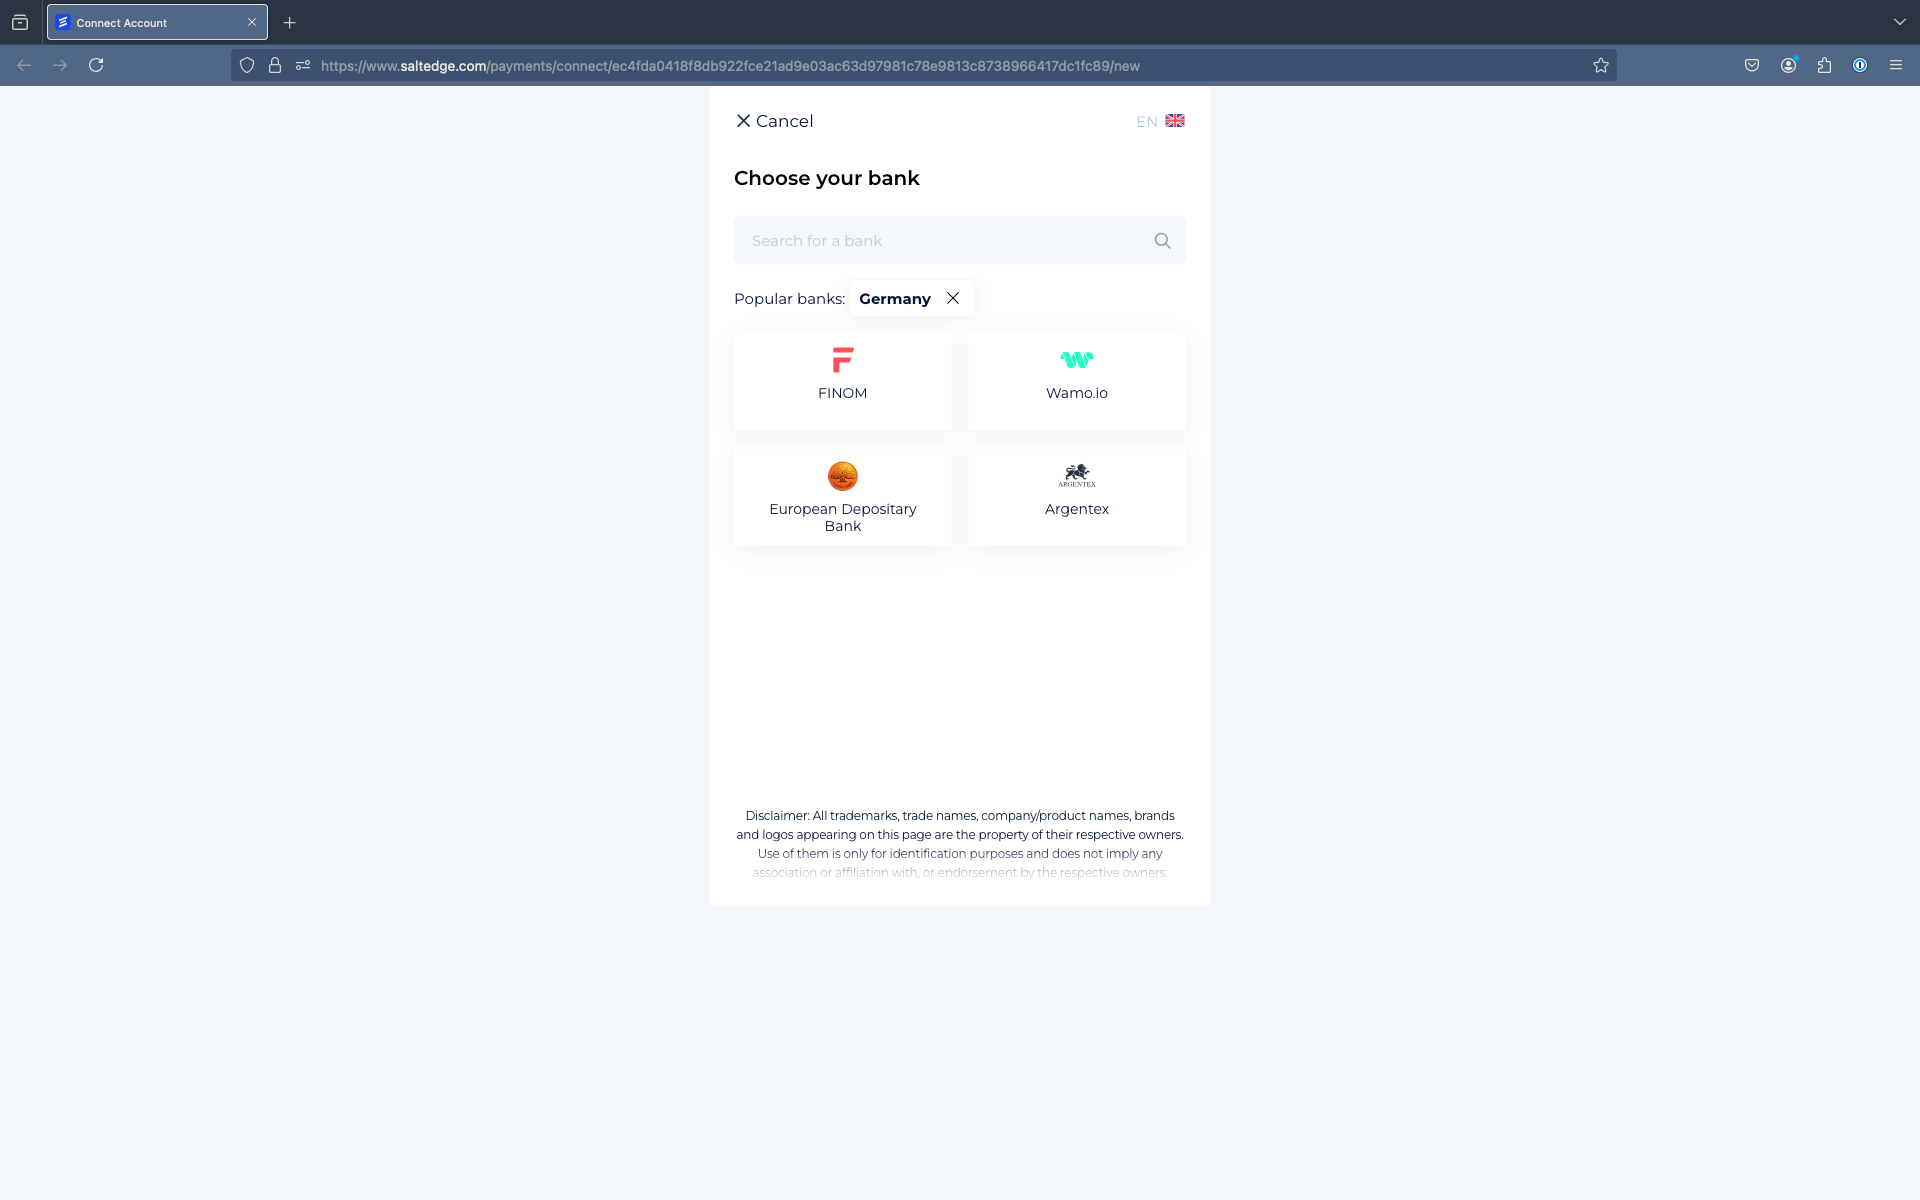
After Payment is completed, the User will be redirected back to the Client’s application.
Embed Widget in your app
At the moment, the only way to embed Salt Edge Widget in your application is to open it in a pop-up. When opening it in a pop-up using window.open, it will post notifications during the payment process. To enable these notifications when you request an URL for Payments/ Create, you can pass an optional argument javascript_callback_type with the value post_message.
This tells Salt Edge Widget to use postMessage for sending messages to a parent window. You can then subscribe to those messages by calling window.addEventListener("message", callback) in the parent window.
Errors
Errors Attributes
- ClassstringThe class of the error
- MessagestringA message describing the error
- Documentation_urlstringA link for error documentation
- Request_idstringA unique identifier for this specific HTTP request. Can be sent to support for debugging
- RequestobjectThe body of the request that caused the error
AIS
API layer errors
- Errors can occur if the Client:
- configures API requests incorrectly
- accesses deprecated endpoints, routing problems
- has not set up or updated API keys
- sends invalid or malformed data
- encounters issues with their servers
- Errors can also occur due to Salt Edge’s outage, downtime, performance, or load balancer issues.
- These errors are usually not displayed to end-users.
| Error Class | HTTP code | Description |
|---|---|---|
| AccountNotFound | 404 | An Account with the sent account_id could not be found |
| ActionNotAllowed | 400 | The Client has no access to the required route |
| ActionNotSupported | 406 | Action is not supported by active eIDAS Certificate |
| AispConsentAlreadyRevoked | 400 | The consent has already been revoked |
| AispConsentExpired | 406 | Refresh is not possible because the consent has been revoked |
| AispConsentNotFound | 404 | A consent with such an id does not exist |
| AispConsentRevoked | 406 | Refresh is not possible because the consent has been revoked |
| AispConsentScopesInvalid | 406 | The value of consent scopes parameter is invalid |
| AispConsentScopesNotAllowed | 406 | The value of the consent scopes parameter is not permitted by the Provider and/ or for the Partner's API |
| AllAccountsExcluded | 406 | All accounts have been excluded from the Connection fetching process |
| ApiKeyNotFound | 404 | The API key with the provided app_id and secret does not exist or is inactive |
| AttemptNotFound | 404 | An attempt with such an ID does not exist |
| BackgroundRefreshNotAllowed | 406 | Background refresh is not allowed, as this Connection requires User interaction (via Widget) |
| ConnectInternalServerError | 500 | An error occured at the Widget level |
| ConnectionAlreadyProcessing | 409 | The Connection is already being processed |
| ConnectionCannotBeRefreshed | 406 | The next refresh attempt will be allowed according to the next_refresh_possible attribute, or if the Connection's status is inactive |
| ConnectionDisabled | 406 | Connection, reconnection, or fetching a Connection was attempted by the Client, but it appears to have been disabled |
| ConnectionDuplicated | 409 | An attempt was made by the Client to create a Connection that already exists |
| ConnectionFetchingStopped | 406 | Connection fetching stopped either due to a fetching timeout or because the Connection was deleted during the fetch process |
| ConnectionNotFound | 404 | The requested connection_id does not match any existing Connections |
| CountryNotFound | 404 | A country_code that is not present in the Salt Edge system is being sent |
| CredentialsNotMatch | 406 | New Connection credentials do not match the old ones upon reconnection |
| CustomerBlocked | 406 | A User was automatically blocked due to the receipt of too many InvalidCredentials errors. Access will automatically be restored the following day. |
| CustomerNotFound | 404 | The User with the provided customer_id does not exist |
| DuplicatedCustomer | 409 | The User being attempted to be created already exists |
| IdentifierInvalid | 406 | An invalid identifier was sent for creating a User |
| InternalServerError | 500 | An internal error has been encountered |
| PartnerConsentAlreadyRevoked | 406 | The Partner consent has already been revoked |
| PartnerConsentNotFound | 406 | A partner consent with such an id does not exist |
| PartnerConsentRevoked | 406 | The partner consent has been revoked by the User |
| ProviderDisabled | 406 | The accessed Provider has been disabled. Consequently, it is no longer supported. |
| ProviderInactive | 406 | The requested Provider has the inactive status. This means that new Connections cannot be created, while the current ones cannot be refreshed or reconnected. |
| ProviderNotFound | 404 | A Provider with such a provider_code could not be found |
| RateLimitExceeded | 406 | Too many connections are being processed at the same time from one application |
| RequestError | 404 | An error occurred while processing the request. This error happens when the specific resource referenced in the request has not been found. |
| RequestExpired | 400 | The request has expired, exceeding the duration specified in the Expires-at header |
| RouteNotFound | 404 | The action and/or the endpoint attempted to access do not exist |
| ValueOutOfRange | 400 | The action and/or the endpoint attempted to access do not exist |
| WrongProviderMode | 400 | The received provider_mode is not supported by Salt Edge |
Caution
If a 500 error is encountered, please ensure that this error is reported to the Customer Care Team.
Client configuration layer errors
- Errors may occur if the Client:
- hasn’t configured the Account properly
- sends invalid or malformed data
- has not set up or updated API keys
- Errors will not affect Connections, as none of these errors will allow the initiation of a Connection.
| Error Class | HTTP code | Description |
|---|---|---|
| ActionTemporarilyNotAllowed | 400 | This action is currently restricted by the Client Account settings or PSD limits. Please contact the dedicated Project Manager for more details. |
| AppIdNotProvided | N/A | The app_id was not provided in the request headers |
| ApplicationNotFound | 404 | The Client's application cannot be found, likely because it has been removed |
| ClientDisabled | 406 | The Client’s Account has been disabled |
| ClientNotFound | 404 | The API key used in the request does not correspond to a registered Client |
| ClientPending | 406 | The Client is pending approval. More information about the pending status can be found on the Pending guides page |
| ClientRestricted | 406 | The Client is in restricted status. More information about the restricted status can be found on the Restricted guides page |
| ConnectionLimitReached | 406 | The Client exceeded the number of Connections allowed in Test or Pending status. Please contact support to increase it. |
| CustomerLocked | 406 | The User was locked manually in the Dashboard and may be unlocked |
| ExpiresAtInvalid | 400 | The Expires-at header is either invalid or set to more than 1 hour from now in UTC |
| InvalidEncoding | 400 | Invalid JSON encoded values have been detected |
| MissingExpiresAt | 400 | The Expires-at field is missing in the headers |
| MissingSignature | 400 | The signature field is missing in the headers |
| ProviderKeyNotFound | 404 | The Client does not possess a key for the selected Provider |
| PublicKeyNotProvided | 400 | The public key has not been not specified on the dedicated Keys & Secrets page |
| SecretNotProvided | 400 | The Secret was not provided in request headers |
| SessionExpired | 400 | The Widget token expired, and an attempt was made by the User to open the Widget |
| SessionLost | 400 | The Widget token was removed and an attempt is made by the User to open the Widget |
| SignatureNotMatch | 400 | The Signature header does not match the correct one |
| TooManyConnectionIDs | 400 | Please limit your connection_ids to fewer than 1000 |
| TPPregistration | 406 | Issues related to the certificates and/ or app ID have been detected |
| WrongRequestFormat | 400 | Some parameters or the entire JSON request are in the wrong format |
Provider layer errors
- Errors could occur either between Salt Edge and the Provider, or on the Provider’s end.
- Some of the errors are displayed to the end-users, while others remain hidden.
- Multiple reasons can cause the errors, such as Provider issues, incorrect User actions, invalid PSD2 access etc.
ExecutionTimeout,ProviderErrorandProviderUnavailable(unless the Provider states it's temporarily unavailable) should be reported to Salt Edge.
| Error Class | HTTP code | Description |
|---|---|---|
| ConsentError | 406 | An issue with the User’s consent has been detected due to an already existing consent, expiry, or invalidation on the Provider’s end |
| ExecutionTimeout | 406 | The entire fetching process took too long to execute |
| FetchingTimeout | 406 | One of the steps of the fetching process took too long to execute |
| ProviderError | 406 | An error on the Provider's side is obstructing Salt Edge from obtaining the data for the Connection |
| ProviderUnavailable | 406 | The Provider is currently unavailable on a temporary basis |
| RevokeFailed | 406 | The Consent has been revoked by the Provider, due to two active consents for a User |
| TokenError | 406 | The token has been invalidated by the Provider, revoked by the User, expired, or is already in use |
User layer errors
- The User Error layer refers to errors or issues that arise due to actions or decisions made by the end-user interacting with the Widget. These errors can include inputting incorrect data, misunderstanding instructions, or making mistakes during the user flow.
Unfinished- the authorization on the Provider’s end was not completed successfully. The reason can only be identified by considering the User's feedback. Such errors should be reported to Salt Edge so that the Provider can be contacted for assistance and clarification.
| Error Class | HTTP code | Description |
|---|---|---|
| AccountError | 406 | Issues related to the User's Account have been detected |
| InteractiveTimeout | 400 | The User took too long to respond to the interactive question |
| InvalidCredentials | 406 | The User tried to connect or reconnect a Connection with invalid credentials |
| InvalidInteractiveCredentials | 406 | Incorrect interactive credentials were sent during Account Information |
| TooManyRequests | 400 | Too many requests have been made by the User for connecting or reconnecting a Connection from one IP address |
| Unfinished | 406 | The journey was left by the Users, and there is no tracking of their actions |
| UnsupportedBrowser | 400 | The User employs an Internet Explorer version older than 10 |
PIS
API layer errors
- Errors can occur if the Client:
- configures API requests incorrectly
- accesses deprecated endpoints, routing problems
- has not set up or updated API keys
- sends invalid or malformed data
- encounters issues with their servers
- Errors can also occur due to Salt Edge’s outage, downtime, performance, or load balancer issues.
- These errors are usually not displayed to end-users.
| Error Class | HTTP code | Description |
|---|---|---|
| ActionNotAllowed | 400 | The Client has no access to the required route |
| ActionNotSupported | 406 | Action is not supported by an active eIDAS Certificate |
| ApiKeyNotAllowed | 406 | API keys of the app type cannot be used for API V6. Please use an API key of type service. |
| ApiKeyNotFound | 404 | The API key with the provided app_id and secret does not exist or is inactive |
| BulkPaymentNotFound | 404 | The requested bulk_payment_id does not match any existing Bulk Payment |
| BulkPaymentTemplateNotFound | 404 | The Bulk Payment template does not match any existing bulk payment templates |
| CountryNotFound | 404 | A country_code that is not present in the Salt Edge system is being sent |
| CustomerBlocked | 406 | A User was automatically blocked due to the receipt of too many InvalidCredentials errors. Access will automatically be restored the following day. |
| CustomerNotFound | 404 | The User with the provided customer_id does not exist |
| DuplicatedCustomer | 409 | The User being attempted to be created already exists |
| IdentifierInvalid | 406 | An invalid identifier was sent for creating a User |
| InternalServerError | 500 | An internal error has been encountered |
| InvalidPaymentAttributes | 406 | Some of the payment_attributes are invalid |
| InvalidRefundAttributes | 406 | Some of the refund attributes provided are invalid |
| MissingPaymentAttributes | 406 | Some payment_attributes are missing |
| P2PPaymentAttributesNotMatchAISP | 406 | The account number has not been whitelisted. Please contact support for more details. |
| PaymentAlreadyStarted | 406 | The Payment is already processing |
| PaymentNotFound | 404 | The requested payment_id does not match any existing Payment |
| PaymentTemplateNotFound | 404 | The Payment template does not match any existing payment templates |
| PaymentTemplateNotSupported | 406 | The selected Payment template is not supported by the chosen Provider |
| ProviderDisabled | 406 | The attempted Provider to be accessed is disabled |
| ProviderInactive | 406 | The requested Provider has the inactive status. This means that new Payment cannot be created |
| ProviderNotFound | 404 | A Provider with such a provider_code could not be found |
Caution
If a 500 error is encountered, please ensure that this error is reported to the Customer Care Team.
Client configuration layer errors
- Errors may occur if the Client:
- hasn’t configured the Account properly
- sends invalid or malformed data
- has not set up or updated API keys
- Errors will not affect Payments, as none of these errors will allow the initiation of a Payment.
| Error Class | HTTP code | Description |
|---|---|---|
| ActionTemporarilyNotAllowed | 400 | This action is currently restricted by the Client Account settings or PSD limits. Please contact the dedicated Project Manager for more details. |
| AppIdNotProvided | N/A | The app_id was not provided in the request headers |
| ApplicationNotFound | 404 | The Client's application cannot be found, likely because it has been removed |
| ClientPending | 406 | The Client is pending approval. More information about the pending status can be found on the Pending guides page |
| ClientRestricted | 406 | The Client is in restricted status. More information about the restricted status can be found on the Restricted guides page |
| CustomerLocked | 406 | The User was locked manually in the Dashboard and may be unlocked |
| ExpiresAtInvalid | 400 | The Expires-at header is either invalid or set to more than 1 hour from now in UTC |
| InvalidEncoding | 400 | Invalid JSON encoded values have been detected |
| MissingExpiresAt | 400 | The Expires-at field is missing in the headers |
| MissingSignature | 400 | The signature field is missing in the headers |
| PaymentLimitReached | 406 | The Client has surpassed the allowable number of Payments allowed in either Test or Pending status |
| PaymentSettingsExceeded | 406 | The number of Payments per month or the total amount per Partner/ Creditor/ Debtor has been exceeded |
| ProviderKeyNotFound | 404 | The Client does not possess a key for the selected Provider |
| PublicKeyNotProvided | 400 | The public key has not been not specified on the dedicated Keys & Secrets page |
| RefundNotAllowed | 406 | Refund restricted as per application settings. Please contact support for more details. |
| SecretNotProvided | 400 | The Secret was not provided in request headers |
| SessionExpired | 400 | The Widget token expired, and an attempt was made by the User to open the Widget |
| SessionLost | 400 | The Widget token was removed and an attempt is made by the User to open the Widget |
| SignatureNotMatch | 400 | The Signature header does not match the correct one |
| TooManyConnectionIDs | 400 | Please limit your connection_ids to fewer than 1000 |
| TPPRegistrationError | 406 | Issues related to the certificates and/ or app ID have been detected |
| WrongRequestFormat | 400 | Some parameters or the entire JSON request are in the wrong format |
Provider layer errors
- Errors could occur either between Salt Edge and the Provider, or on the Provider’s end.
- Some of the errors are displayed to the end-users, while others remain hidden.
- Multiple reasons can cause the errors, such as Provider issues, incorrect User actions, invalid PSD2 access etc.
ExecutionTimeout,ProviderErrorandProviderUnavailable(unless the Provider states it's temporarily unavailable) should be reported to Salt Edge.
| Error Class | HTTP code | Description |
|---|---|---|
| BulkPaymentsNotSupported | 406 | Specified provider does not support bulk payments |
| ExecutionTimeout | 406 | The entire fetching process took too long to execute |
| PaymentFailed | 406 | The Payment creation failed due to an unspecified reason |
| PaymentStatusUnavailable | 200 | The Payment status has not yet changed on the Provider's side. It may remain authorizing until an updated status from the Provider is received, indicating either rejection or acceptance. |
| PaymentValidationError | 406 | Payment validation failed for unknown reasons |
| ProviderError | 406 | An error on the Provider's side is obstructing Salt Edge from obtaining the data for the Connection |
| ProviderUnavailable | 406 | The Provider is currently unavailable on a temporary basis |
| TokenError | 406 | The token has been invalidated by the Provider, revoked by the User, expired, or is already in use |
User layer errors
- The User Error layer refers to errors or issues that arise due to actions or decisions made by the end-user interacting with the Widget. These errors can include inputting incorrect data, misunderstanding instructions, or making mistakes during the user flow.
Unfinished- the authorization on the Provider’s end was not completed successfully. The reason can only be identified by considering the User's feedback. Such errors should be reported to Salt Edge so that the Provider can be contacted for assistance and clarification.
| Error Class | HTTP code | Description |
|---|---|---|
| AccountError | 406 | Issues related to the User's Account have been detected |
| InsufficientFunds | 406 | The User lacks the necessary funds to complete the payment |
| InteractiveTimeout | 400 | The User took too long to respond to the interactive question |
| InvalidCredentials | 406 | The User tried to connect or reconnect a Connection with invalid credentials |
| InvalidInteractiveCredentials | 406 | Incorrect interactive credentials were sent during Account Information |
| PaymentNotAllowed | 406 | The User has been blocked by Salt Edge from being able to perform payments |
| TooManyRequests | 400 | Too many requests have been made by the User for connecting or reconnecting a Connection from one IP address |
| Unfinished | 406 | The journey was left by the Users, and there is no tracking of their actions |
| UnsupportedBrowser | 400 | The User employs an Internet Explorer version older than 10 |
Enrichment
API layer errors
- Errors can occur if the Client:
- Configures API requests incorrectly
- Accesses deprecated endpoints, routing problems
- Has not set up or updated API keys
- Sends invalid or malformed data
- Encounters issues with their servers
- Errors can also occur due to Salt Edge's outage, downtime, performance, or load balancer issues.
- These errors are usually not displayed to end-users. In cases of internal issues, categorization tasks will be retried until a successful categorization is possible.
| Error Class | HTTP code | Description |
|---|---|---|
| BatchSizeLimitExceeded | 406 | More than 100 objects were sent in the request (100 is the limit) |
| CategorizationLimitReached | 400 | The nr. of transactions per User that can be categorized has reached the limit |
| DuplicatedRecord | 403 | A duplicate Account or transaction was uploaded to the bucket |
| EnrichmentError | 500 | An error occurred during the categorization |
| InvalidParams | 400 | The JSON request contains invalid parameters |
| InvalidRequestFormatError | 400 | The JSON request is incorrectly formed |
| MissingParams | 400 | Missing required parameters for categorization |
| MissingRequiredFields | 400 | Missing required fields for categorization |
| RecordNotFound | 404 | An entity with the sent id could not be found |
| ReportConsentRevoked | 406 | The User revoked the consent for the report |
| ReportExpired | 406 | The report's storage time ended, and it was deleted |
| ReportFetchError | 406 | The report could not be retrieved |
| ReportNotFound | 404 | A report with the provided report_id could not be found |
| ResourceNotFoundError | 404 | A resource with the provided id could not be found |
| StandaloneCategorizationError | 406 | An error occurred during the categorization |
| TooManyImportObjectsError | 403 | The total nr. of accounts/ transactions per bucket has reached the limit |
| WrongReportType | 400 | We have received a wrong report type |
Certificates updateNew
For Clients possessing their own certificates, it is acknowledged that these certificates have a defined validity term. It is imperative for them to perform certificate updates in advance.
Note
Salt Edge notifies Clients well in advance of upcoming deadlines:
- QWAC/QSEAL: 90 days before, with reminders at 60, 30, and 1 day before the deadline.
- OBWAC/OBSEAL: 30 days before, with reminders at 15 and 1 day before the deadline.
Before ordering the new certificate, ensure that:
- The certificate term is the maximum possible for a QTSP.
- The subject and issuer will be correct and identical to the expired certificate.
- The QTSP provides both simple and full-chain certificates (ideally a 5-chain certificate).
The QTSP is ready to provide priority support during the first month after the certificate is issued.
The QTSP should be able to provide a QWAC certificate with 2 redirect-URIs, so that the *saltedge.com domain (aside from the Client’s domain) is part of the CN or SAN fields.
Certificates must be created based on the CSR generated in the Salt Edge Dashboard.
The certificate rotation process should start at least a month before the certificate expiration date.
GlossaryNew
This section has been crafted to serve as the primary resource for understanding key terms, acronyms, and concepts related to Salt Edge’s API and PSD2 context.
| id | name | description |
|---|---|---|
| Account | one of the accounts associated with a Connection. It can be a credit card Account, a savings Account, one of the online accounts etc. | |
| AIS | Account Information Service | AIS allows TPPs to access and retrieve Account Information from Users’ bank accounts with their explicit consent. AIS facilitates a secure and regulated way for TPPs to provide valuable insights into Customers' financial data, supporting services like financial management or analysis without handling funds directly. |
| API | Application Programming Interface | refers to a set of protocols and tools that enable TPPs to securely access and interact with Banks' systems. APIs facilitate the exchange of information, allowing TPPs to offer services like AIS or PIS, with the explicit Consent of the Account holder, promoting a regulated and standardized approach to financial data and transaction processing. |
| Application | the Client's main Account can hold and manage multiple applications in different statuses. The applications serve as children to the primary Account. Creating different applications does not allow for the use of different Certificates. Therefore, different Client accounts should be created. | |
| ASPSP/ Provider | Account Servicing Payment Service Provider | a bank or an online payment system. An ASPSP is a financial institution that provides and maintains payment accounts for Users. ASPSPs play a pivotal role in the PSD2 framework by granting authorized TPPs, such as AISPs and PISPs, access to Account Information and Payment Initiation Services, respectively. These Providers facilitate competition and innovation in the financial sector while adhering to PSD2's regulatory requirements, including Strong Customer Authentication and secure data exchange, to ensure the protection of User information and financial transactions. |
| CA | Certificate Authority | a trusted entity responsible for issuing and managing digital certificates. These certificates are used for secure communication and authentication between various entities within the financial ecosystem, including financial institutions and TPPs. The CA verifies the identity of the requesting party before issuing a digital certificate, which contains the public key associated with that entity. This process enhances the overall security of transactions and data exchange, ensuring compliance with the robust security requirements mandated by PSD2. |
| Category | one of the personal, business or other categories that can be assigned to a transaction | |
| Client | the legal entity holding an Open Banking license, operating as a TPP and having an agreement with Salt Edge for API consumption. Sometimes, Client and Partner can be interchangeably used. However, please refer to the “Partner” label to ensure that the information is related only to the Partner program. | |
| Connection | a Connection represents a permanent Connection of a specific Customer to a Provider, with a set of credentials required for accessing the Accounts and Transactions. A single User represents a single Customer in Account Information API. | |
| Consent | the end-users' permission to TPPs to access their financial data | |
| Country | the country where a Provider is located | |
| CSR | Certificate Signing Request | a cryptographic request generated by a financial institution or a TPP to obtain a digital certificate. This request includes the entity's public key and other relevant information. The CSR is submitted to a CA, to acquire a digital certificate, which is subsequently used for secure communication and authentication within the PSD2 framework. The use of digital certificates, facilitated through the CSR process, enhances the overall security of transactions and data exchange in compliance with PSD2's stringent security standards. |
| Currency | a string code that is used for an Account | |
| Customer | an end-user of the Client who is consuming Salt Edge’s APIs | |
| eIDAS | Electronic Identification and Trust Services | refers to the Electronic Identification, Authentication, and Trust Services regulation. It establishes a framework for secure electronic transactions and communications within the European Union. eIDAS ensures the validity and recognition of electronic identification and authentication, enhancing the security and reliability of digital services, including those related to Open Banking |
| Holder Info | information about the Account holder | |
| Interactive Field | an interactive field for authentication to a specific Provider. | |
| Merchant | a company that sells goods or provides services to the Customer | |
| MTLS | Mutual Transport Layer Security | refers to a security mechanism employed for strong authentication and secure communication between entities in the financial ecosystem. MTLS involves the exchange of digital certificates between the parties, ensuring both the server (financial institution or service Provider) and the Client (e.g., a Third-Party Provider) mutually authenticate each other. This two-way authentication enhances the overall security of data transmission and access to financial services, aligning with PSD2's stringent security requirements to protect sensitive Customer information and transactions. |
| Partner | the legal entity, not possessing an Open Banking license, operating through the Partner Program, and having an agreement with Salt Edge for API consumption | |
| Payment | a Payment that was made using Payment Initiation API | |
| PIS | Payment Initiation Service | PIS enables TPPs to initiate Payments directly from Users’ bank accounts with their explicit consent. PIS provides a secure and regulated mechanism for TPPs to initiate payments on behalf of users, offering convenience and flexibility in financial transactions without the need for direct access to sensitive Account information. |
| PSD2 | Payment Service Directive 2 | or the Revised Payment Services Directive, is a regulatory framework in the European Union that governs payment services and promotes competition and innovation in the financial sector. It mandates the opening of banking APIs to authorized TPPs, allowing them secure access to Customer Account Information and the Initiation of Payments. PSD2 aims to enhance consumer protection, foster transparency, and drive advancements in the financial services landscape. |
| QTSP | Qualified Trust Service Provider | plays a crucial role in providing qualified electronic signatures, seals, time stamps, and other related services that are deemed secure and compliant with the requirements set forth in eIDAS Regulation. Under PSD2, QTSPs can issue qualified certificates that are recognized as meeting specific standards for security and reliability. The use of qualified certificates helps ensure the integrity and authenticity of electronic transactions, contributing to the overall security of payment services. |
| Required field | a mandatory field for authentication to a specific Provider. | |
| SAML | Security Assertion Markup Language | a protocol used for exchanging authentication and authorization data between parties, allowing secure communication and facilitating Single Sign-On (SSO) across different financial institutions and service providers within the PSD2 ecosystem. It ensures a standardized and secure method for validating User identities and authorizing access to financial information and services. |
| SCA | Strong Customer Authentication | in the context of PSD2, SCA is a security measure designed to protect Users and enhance the security of electronic payments. SCA requires the authentication of Users through the use of at least two independent factors from the categories of knowledge (something only the User knows), possession (something only the User possesses), and inherence (something the User is). This multi-factor authentication ensures a higher level of security during online transactions, reducing the risk of unauthorized access and fraudulent activities. PSD2 mandates the implementation of SCA to safeguard Users' financial data and transactions within the regulated payment services ecosystem |
| TPP | Third Party Provider | an entity that offers services to consumers by interacting with Banks. TPPs enable customers to make and receive Payments, access financial transaction data, and explore new card-based offerings. In the context of PSD2, TPPs act as intermediaries between the Bank (the second party) and the bank Customer (the first party), allowing consumers to engage with financial services through the TPP's platform. |
| Transaction | a single financial movement made within an Account | |
| TSP | Technical Service Provider | an entity that exclusively offers technical services, such as processing and storing data, privacy protection, and providing IT and communication infrastructure. Importantly, TSPs do not handle funds or directly access user Account information, ensuring a focus on technical support without engaging in financial transactions. |
| User/ Customer/ PSU | Payment Service User | a User of the Client who is consuming Salt Edge’s APIs. It typically refers to an individual or entity that holds an Account with a financial institution. This User, often a Consumer or a Business, engages in financial transactions and may grant access to their Account Information to authorized TPPs under the PSD2 framework. Users have control over their data and can provide explicit consent for TPPs to access specific Account Information or initiate Payments on their behalf, promoting transparency, security, and Customer choice within the PSD2-regulated financial ecosystem. |
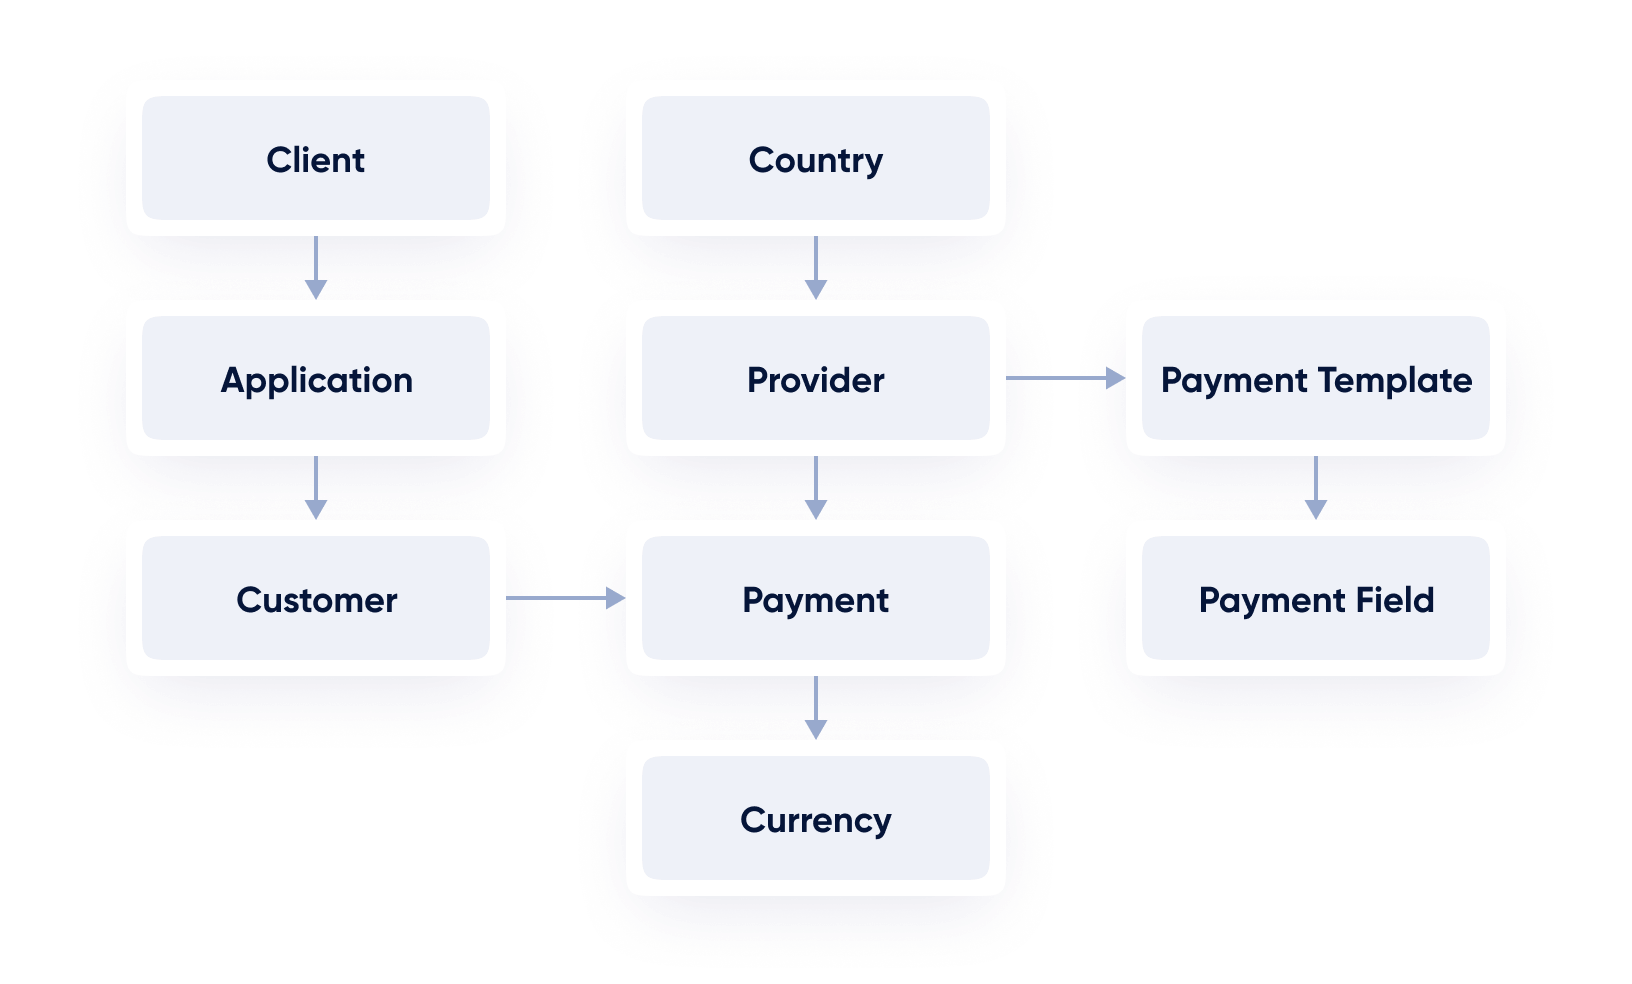
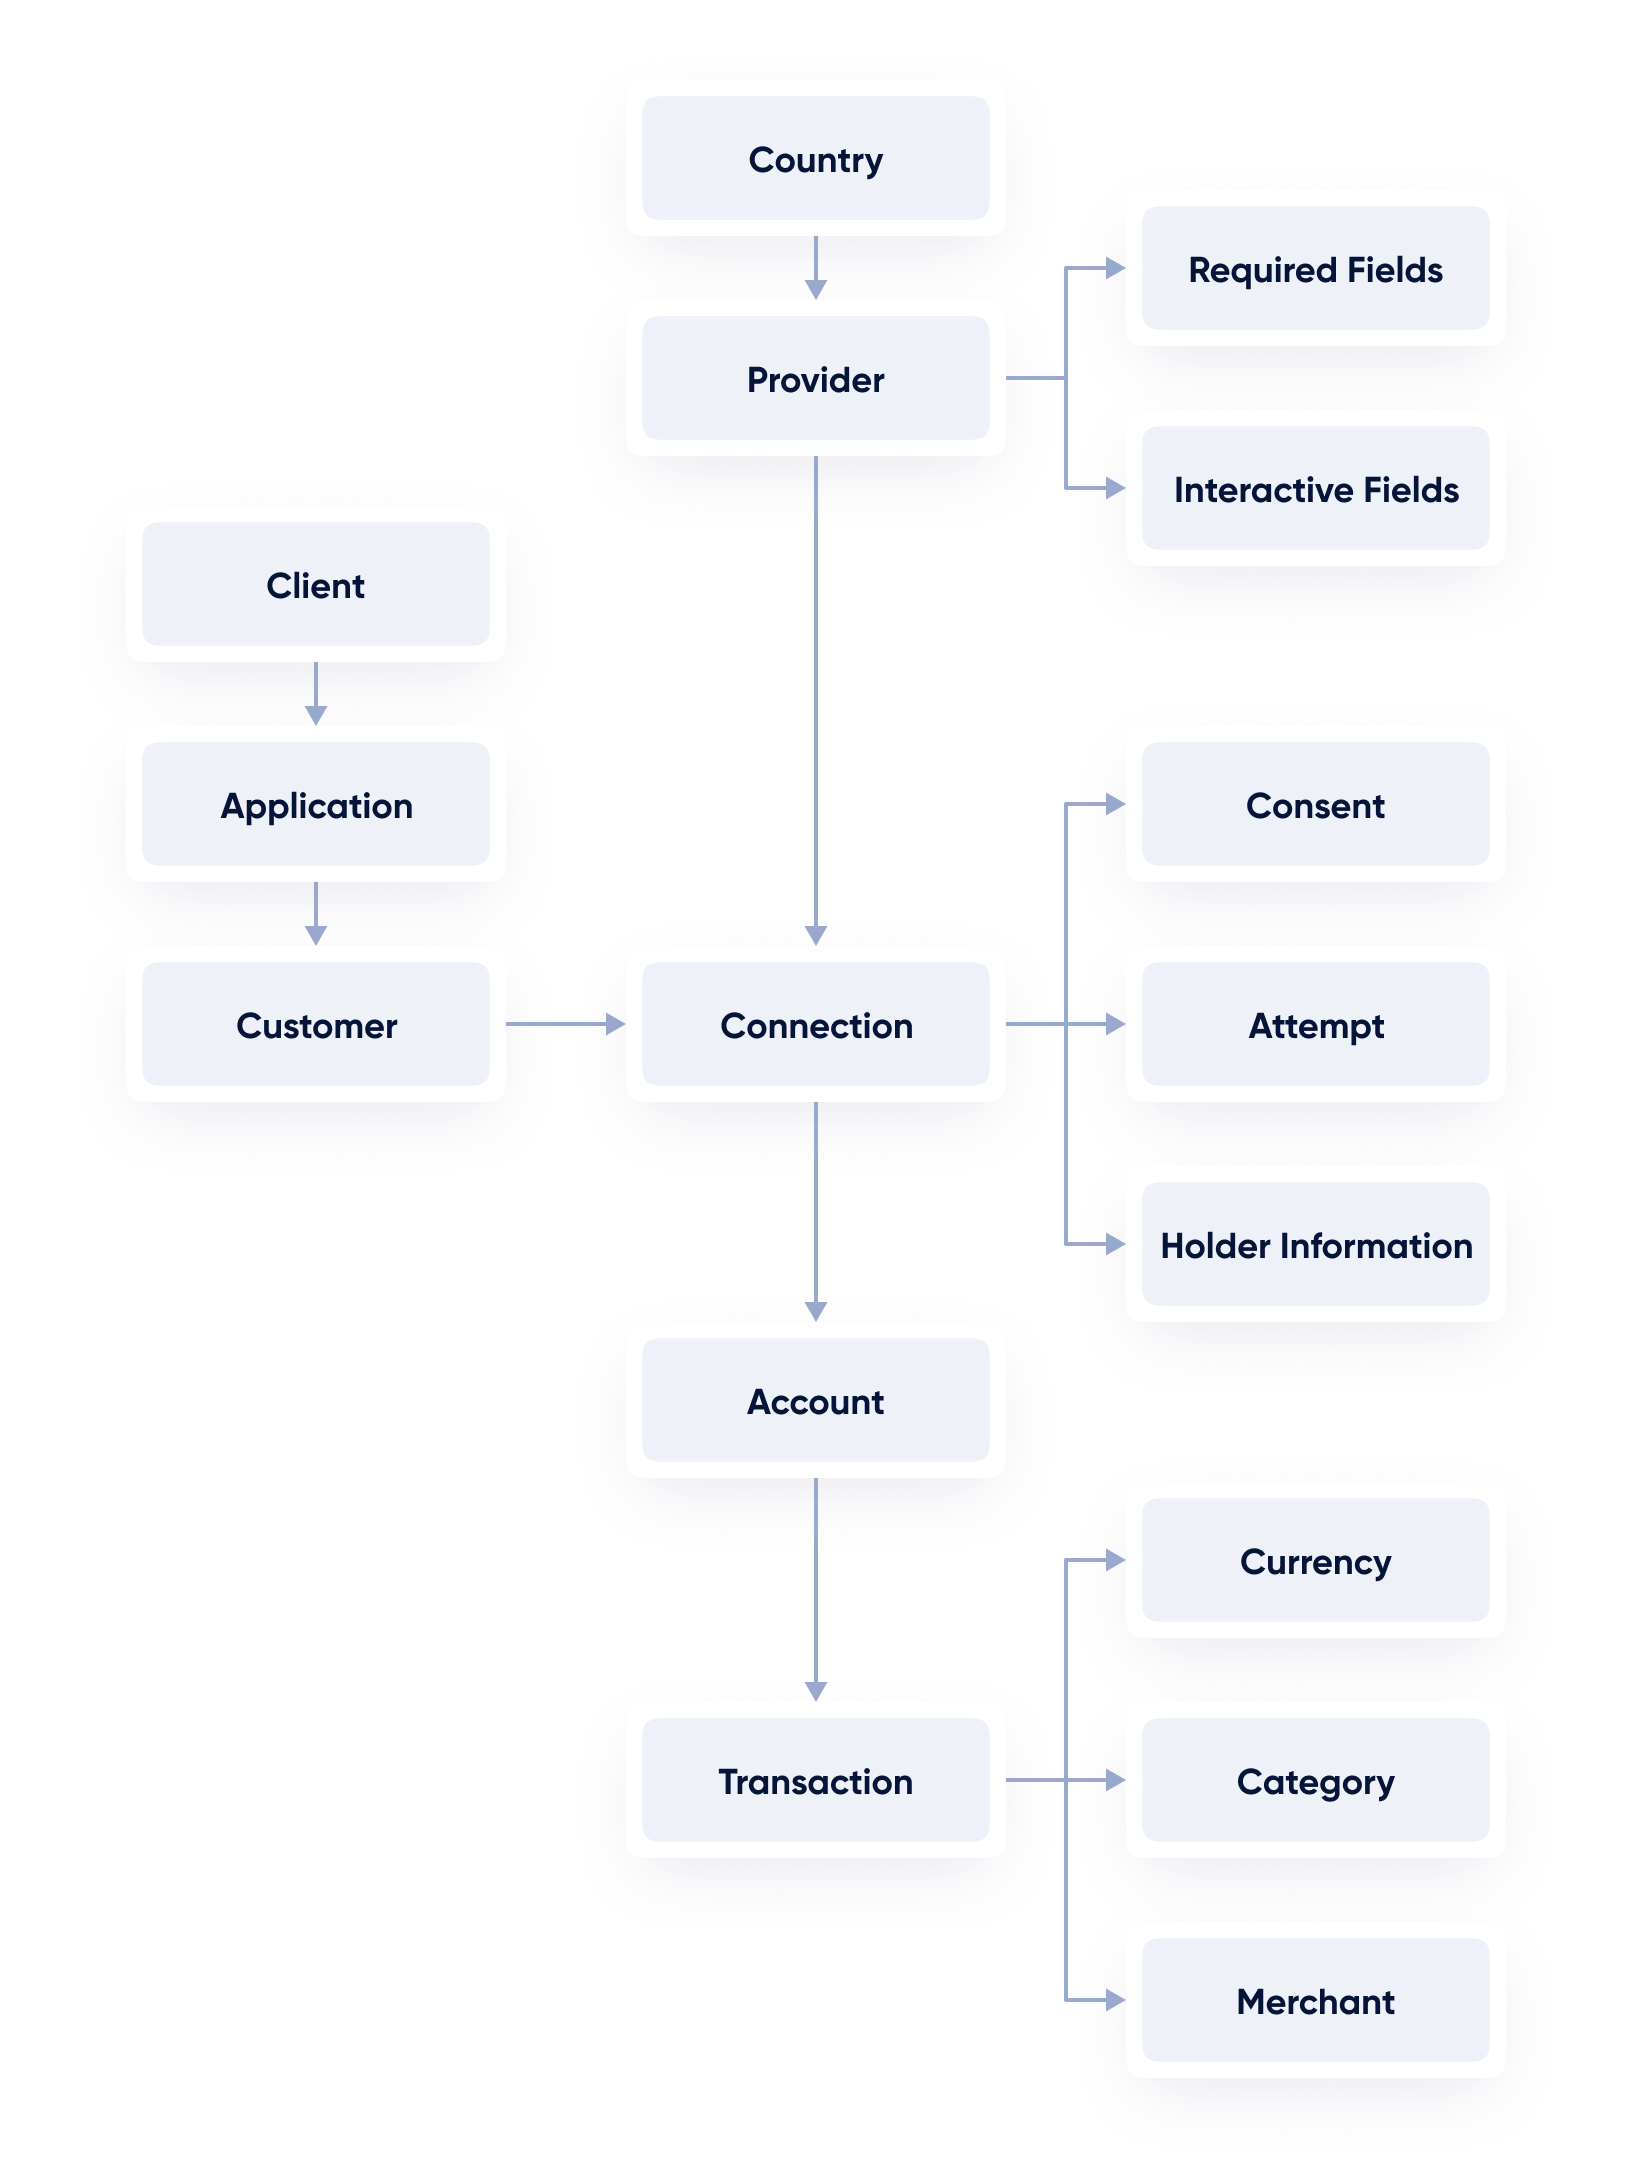
Here’s how the beforementioned parties interact with each other.
API Documentation
Dashboard
Salt Edge Client Dashboard is the interface that provides Clients with a centralized view and control over various aspects of their Account, services and information.
As a Client, the Open Banking Gateway application can be accessed by others with the Owner’s permission. To enable this, teammates need to be created, allowing them to access the information provided by the interface.
If the same email address is used for registration in various applications (such as Client API and Partner program API), then all the applications can be accessed from the same interface by switching between them.
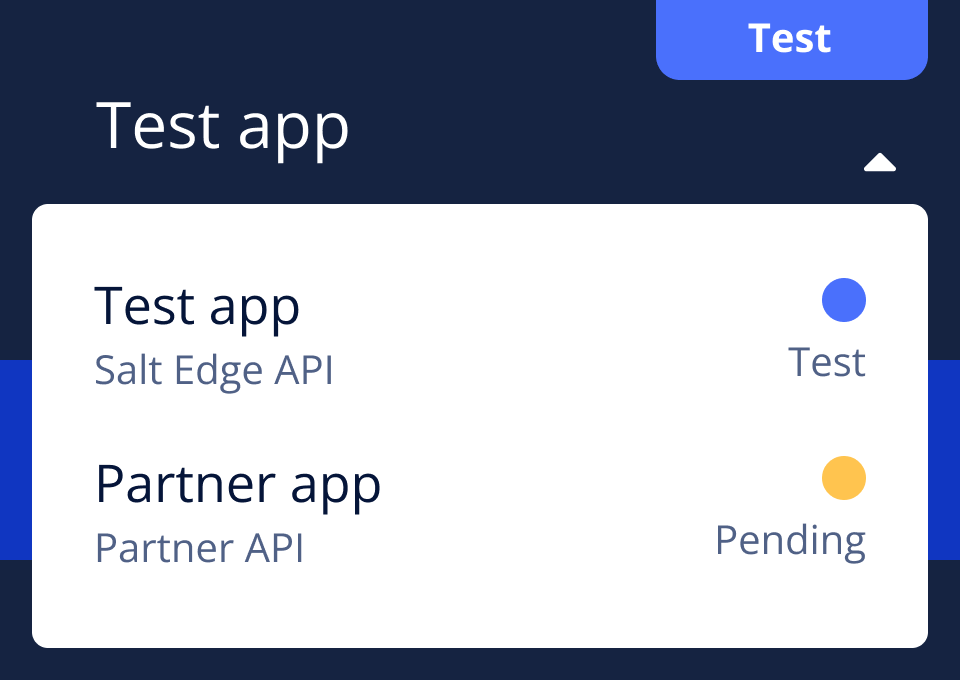
SAMLNew
Security Assertion Markup Language is an XML-based open standard for exchanging authentication and authorization data between parties, particularly in the context of web-based single sign-on systems, mostly by Enterprises.
It enables a secure and seamless exchange of User identity information between an identity Provider and a service Provider.
For our Client Dashboard, we provide two types of authentication:
- Using email and password.
- Using SAML and the Client's own identity Provider along with its authentication methods.
To support role-based authorization controls, the Client's identity Provider should include additional custom fields in the SAML response. These fields will be mapped to access roles within the Client Dashboard.
Statuses
While using Open Banking Gateway, the application can be assigned one of several statuses, each with its limitations.
Pending
Upon registration, the Pending status will be assigned to the Client’s application. Access to Fake Providers (Account Information and Payment Initiation) and the usage of up to 10 fake Connections are permissible at this stage. When an action not permitted for Pending Clients is attempted, a ClientPending error is returned.
Success
While the app is not in Live status, data destruction is also allowed, enabling the removal of all Customers along with their corresponding Connections, Accounts, and Transactions.
To upgrade the status from Pending, the following steps must be taken:
1. Application Information must be provided in the Applications section of the Client Dashboard.
2. Company Information should be provided in the Company section of the Client’s profile.
3. Valid Callback URLs must be provided, with their purpose described in the (Account Information Callbacks and Payment Initiation Callbacks) section of this guide.
4. To elevate the status to Test, access the request test access page and complete all the specified requirements.
The application will be assessed, and the upgrade to the Test status will be processed within two business days.
Test
To retrieve Live Bank Account data and initiate Payments through the Open Banking Gateway, the Test access page should be accessed, and all requirements must be filled in. Once completed, the "Request Test Access" button should be pressed.
In the Test status, Live Providers can already be used by the Client, but it is still limited to 100 Connections. Additionally, Clients with eIDAS certificates holding the PISP role can test Live Providers.
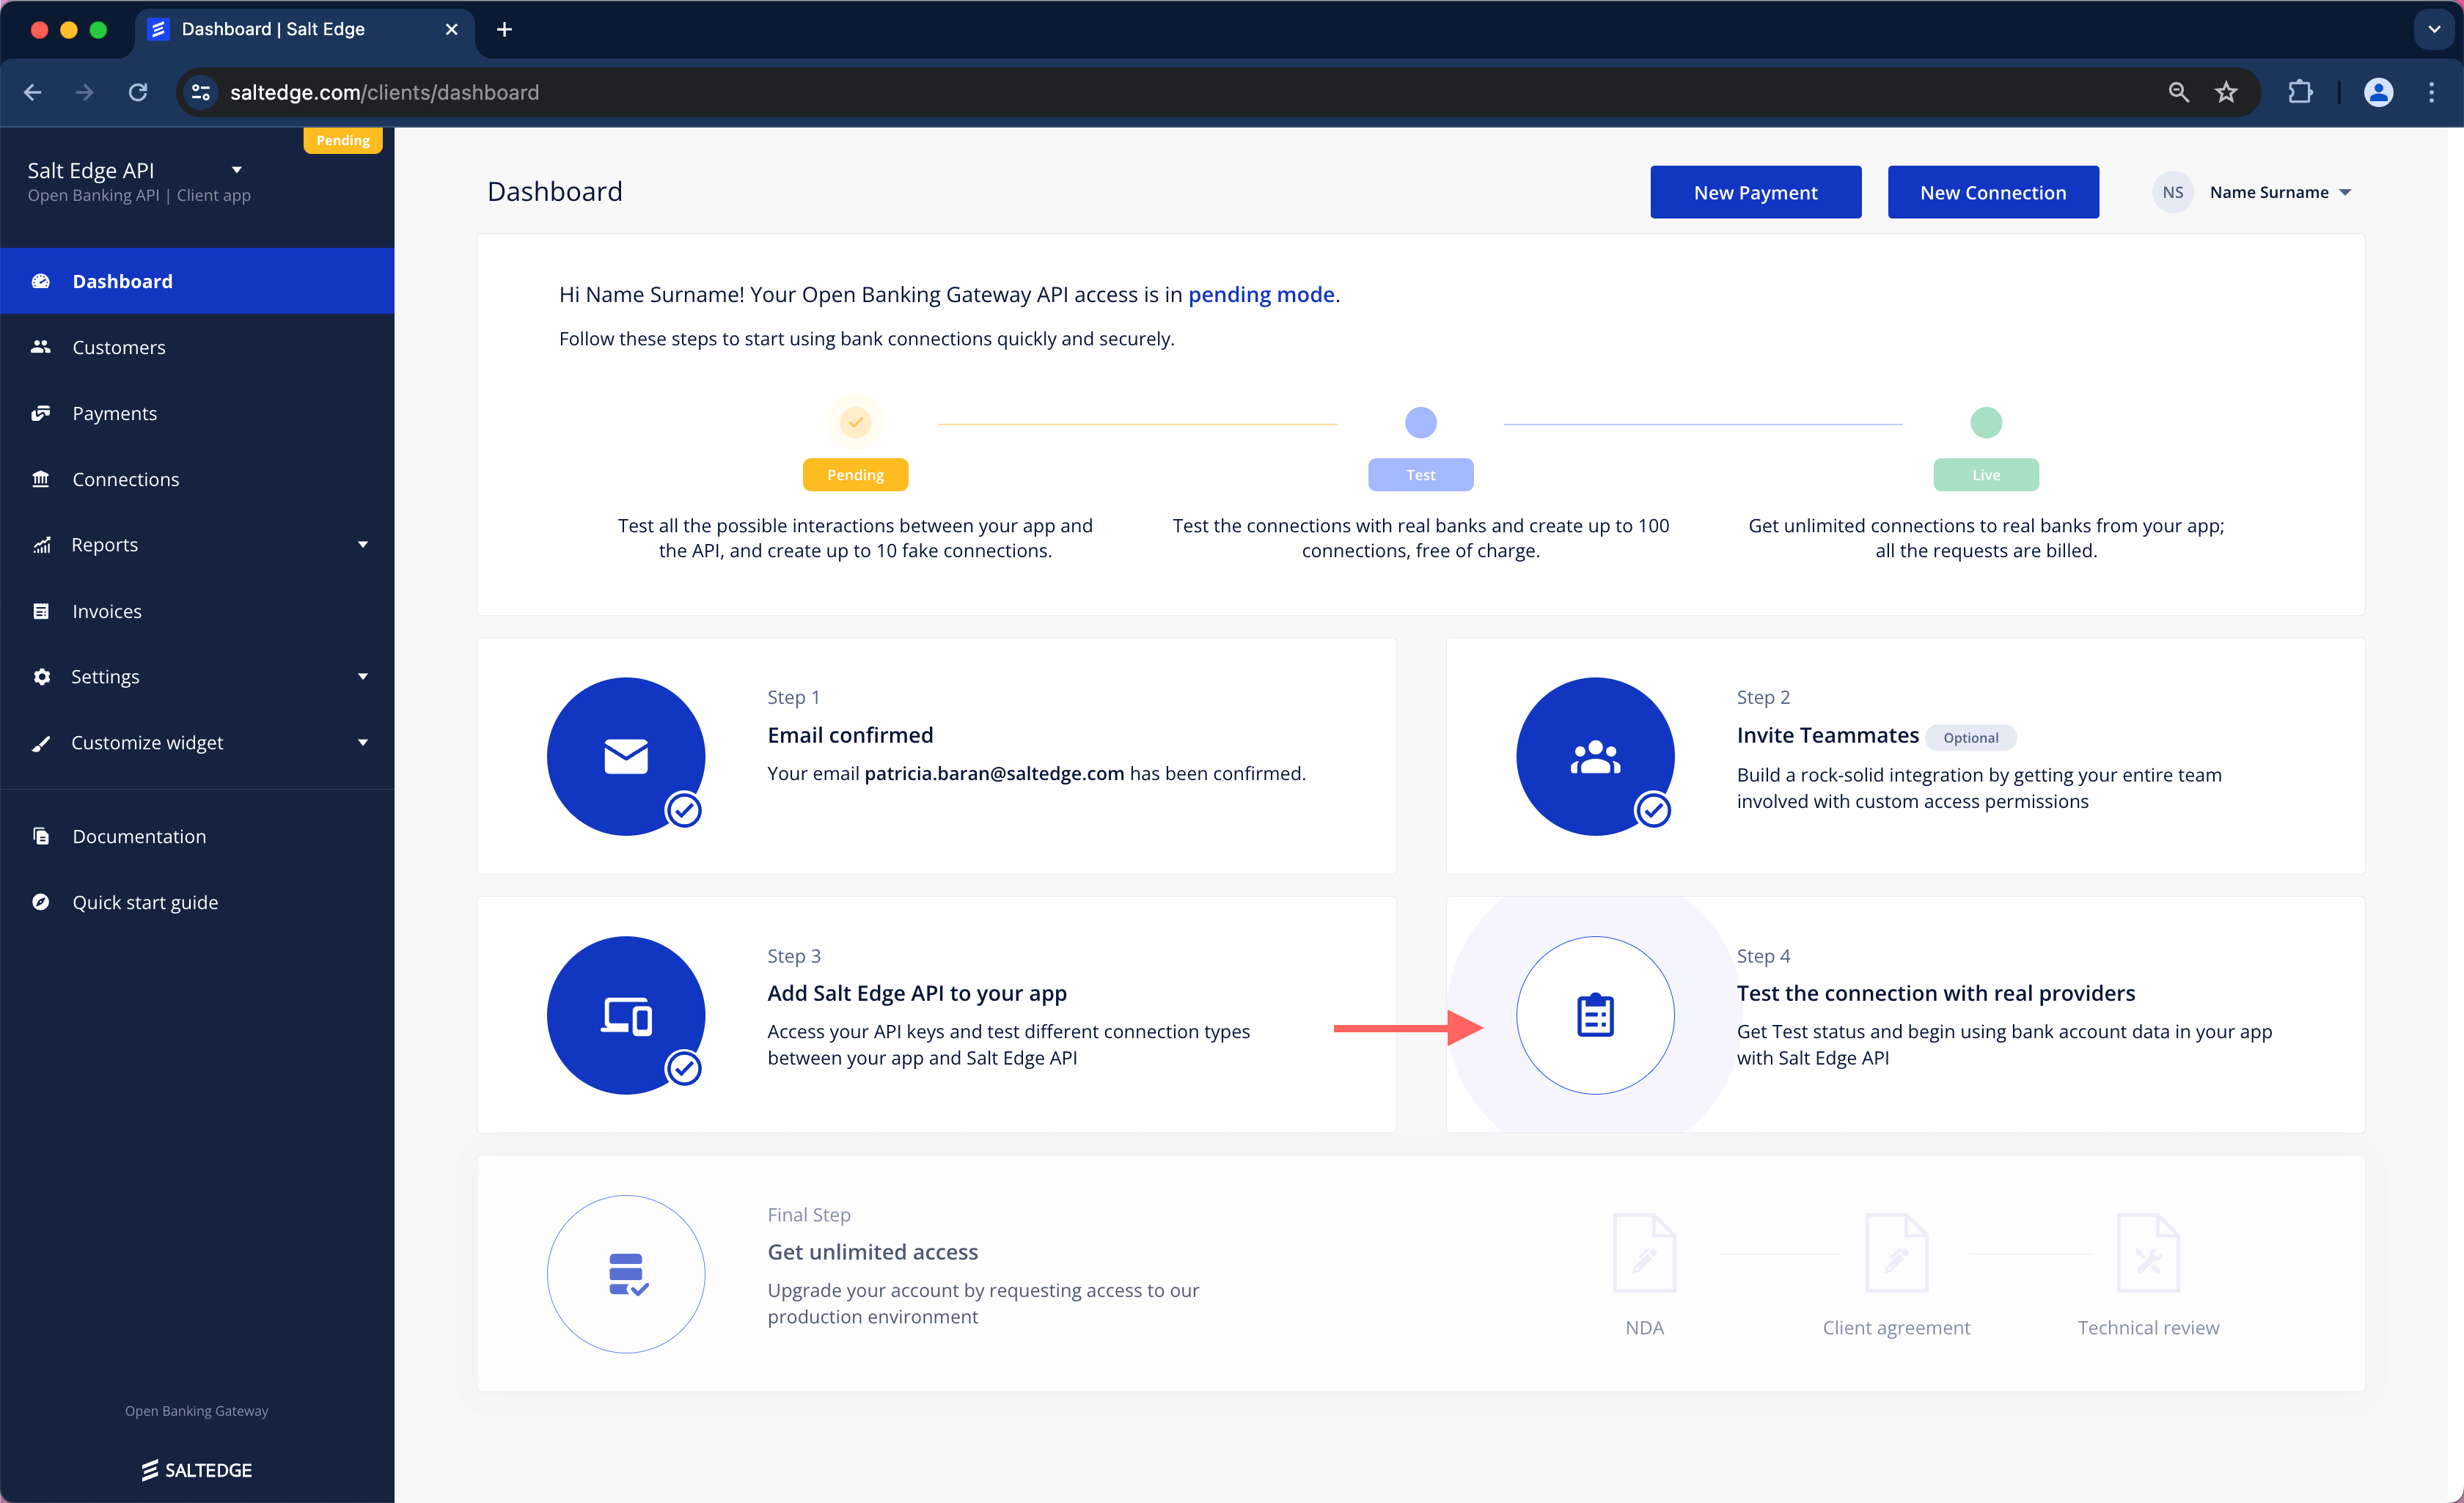
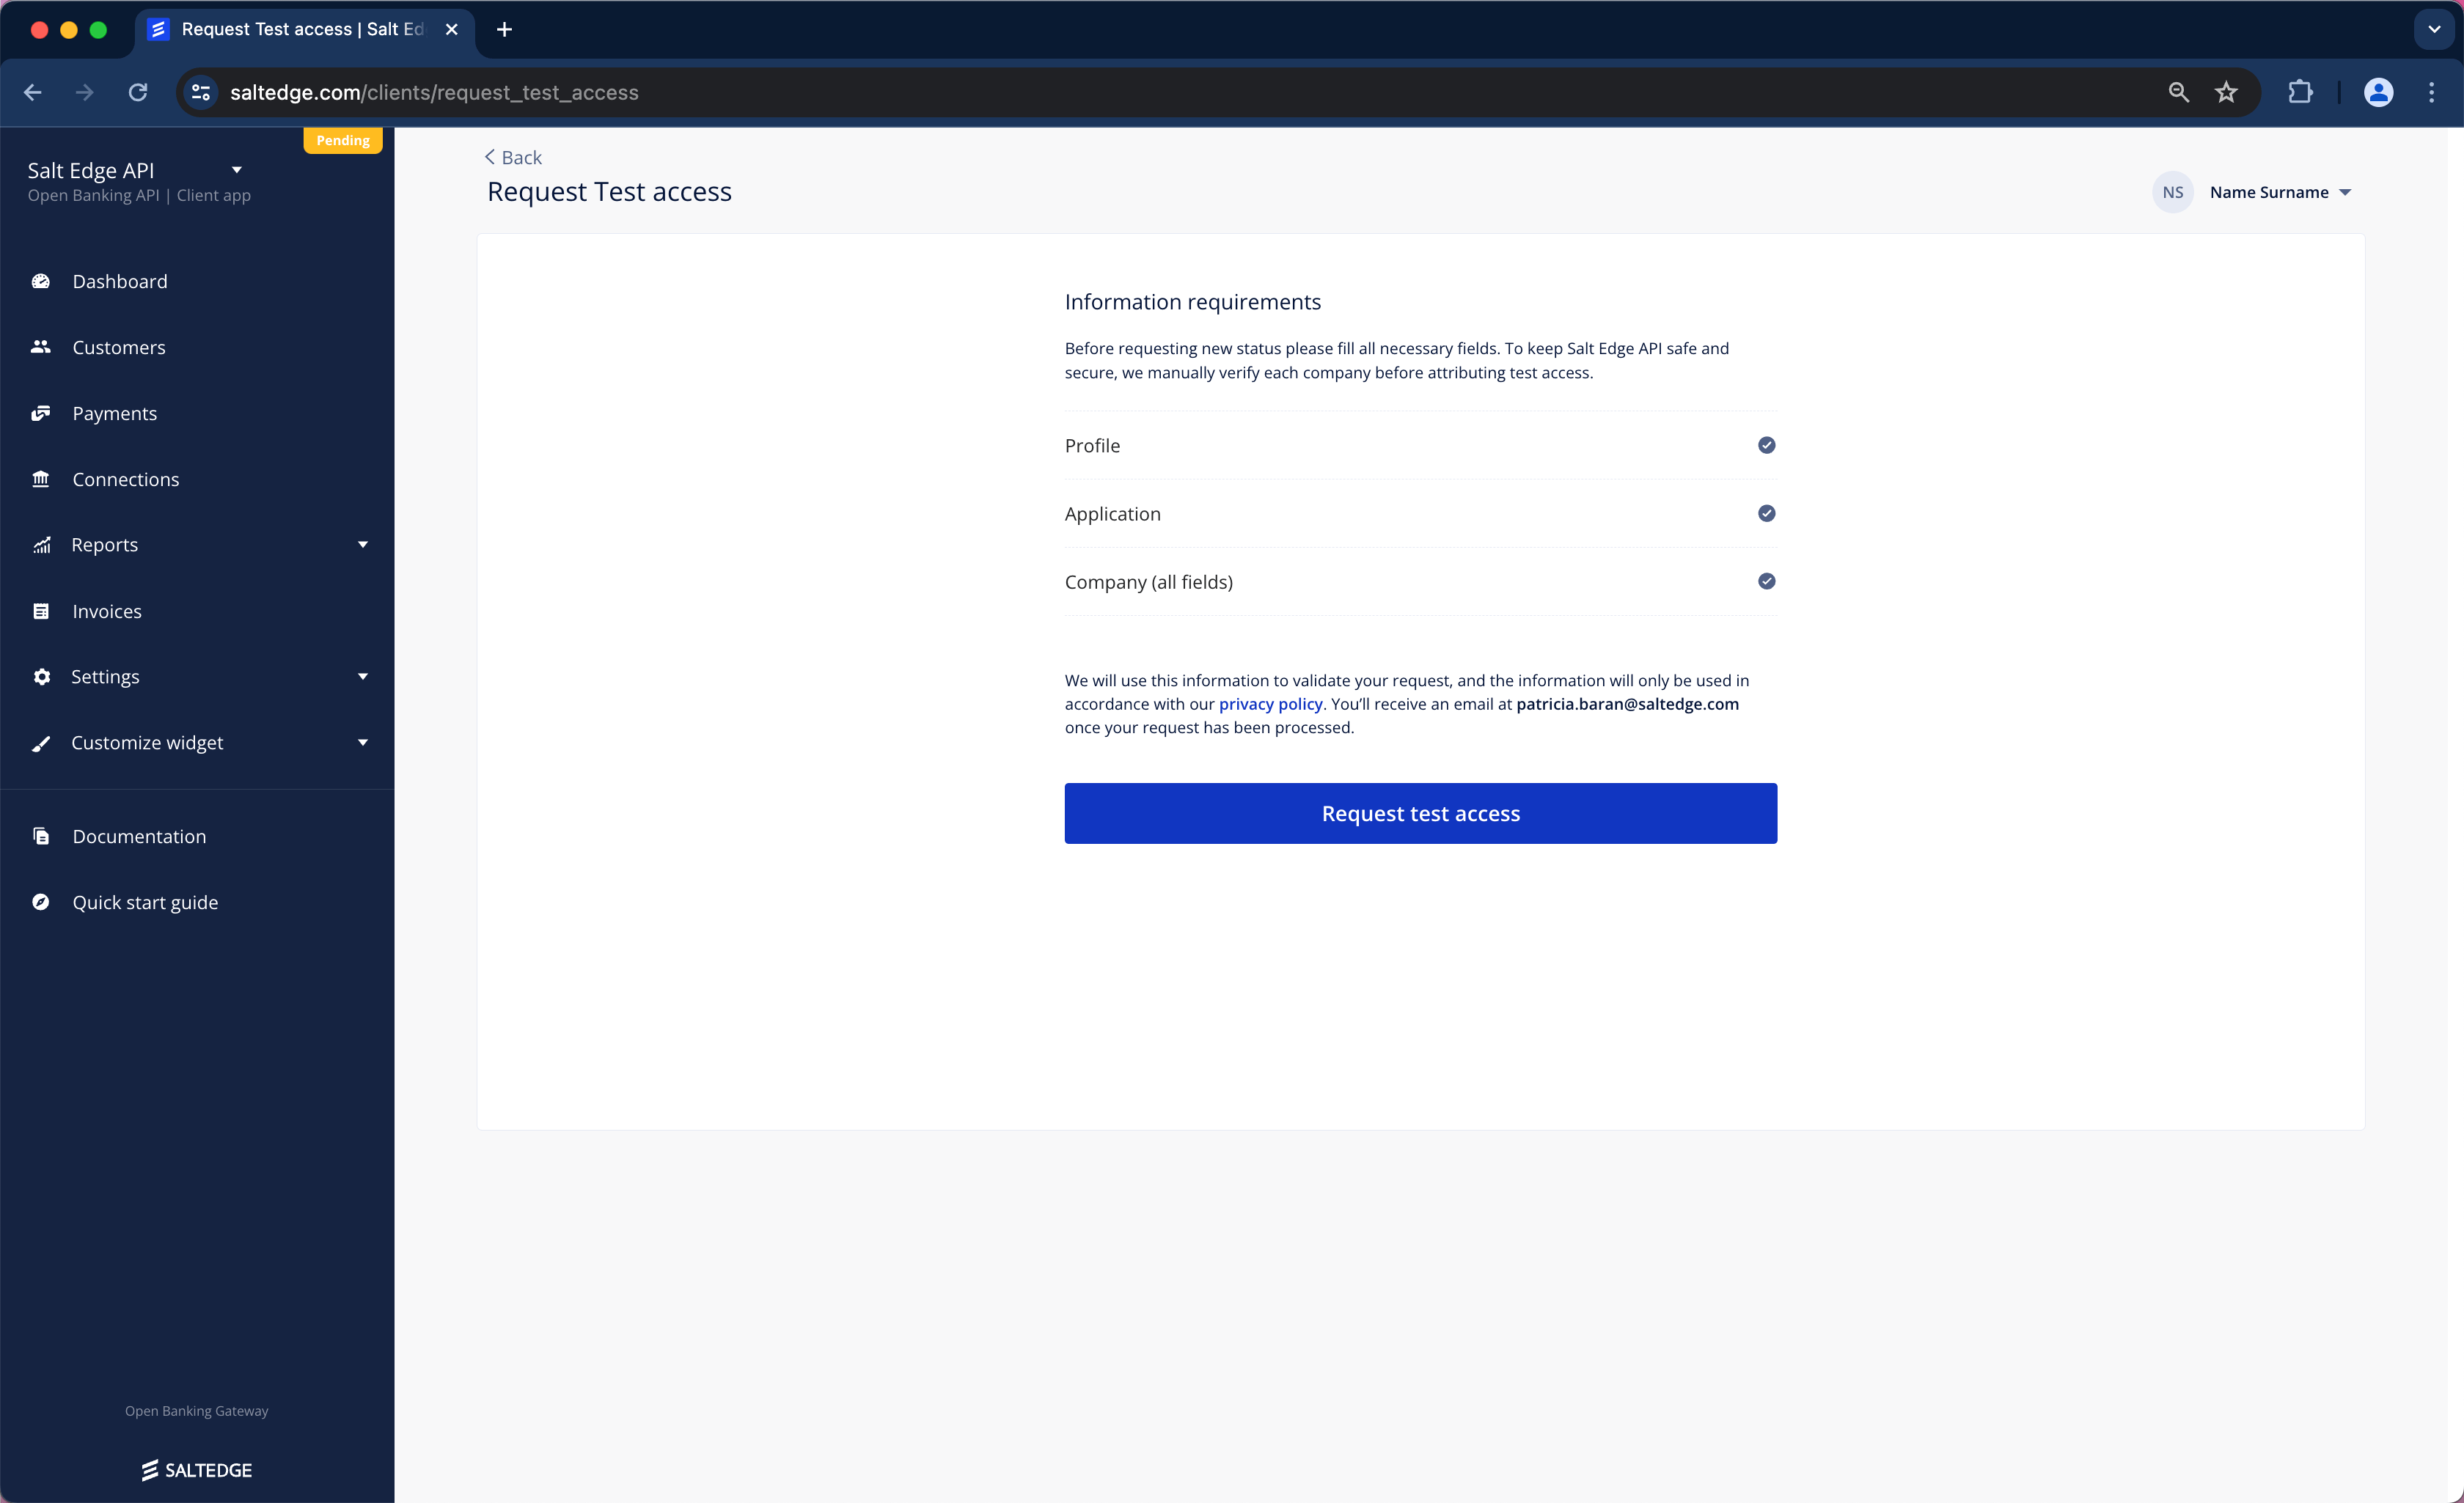
When readiness for a transition to limitless usage is achieved, follow the instructions provided in the Live section below. It is important to note that all data will be preserved, but it can also be destroyed if a clean slate is desired.
Note
To become Live, HTTPS should be used for all API callbacks by the Client application.
Live
a. The evaluation of Open Banking Gateway integration on the Client’s side for all the platforms where the Salt Edge service will be available (e.g. web, Android, iOS etc.) will need to be conducted. Referring to the AIS Before going Live guide, PIS Before going Live guide and the Development Requirements and Guidelines is suggested.
b. Submission of the implementation for review is recommended at least 7 days before the planned production release date.
c. Upon achieving compliance from both Legal and Technical perspectives, Live access can be requested.
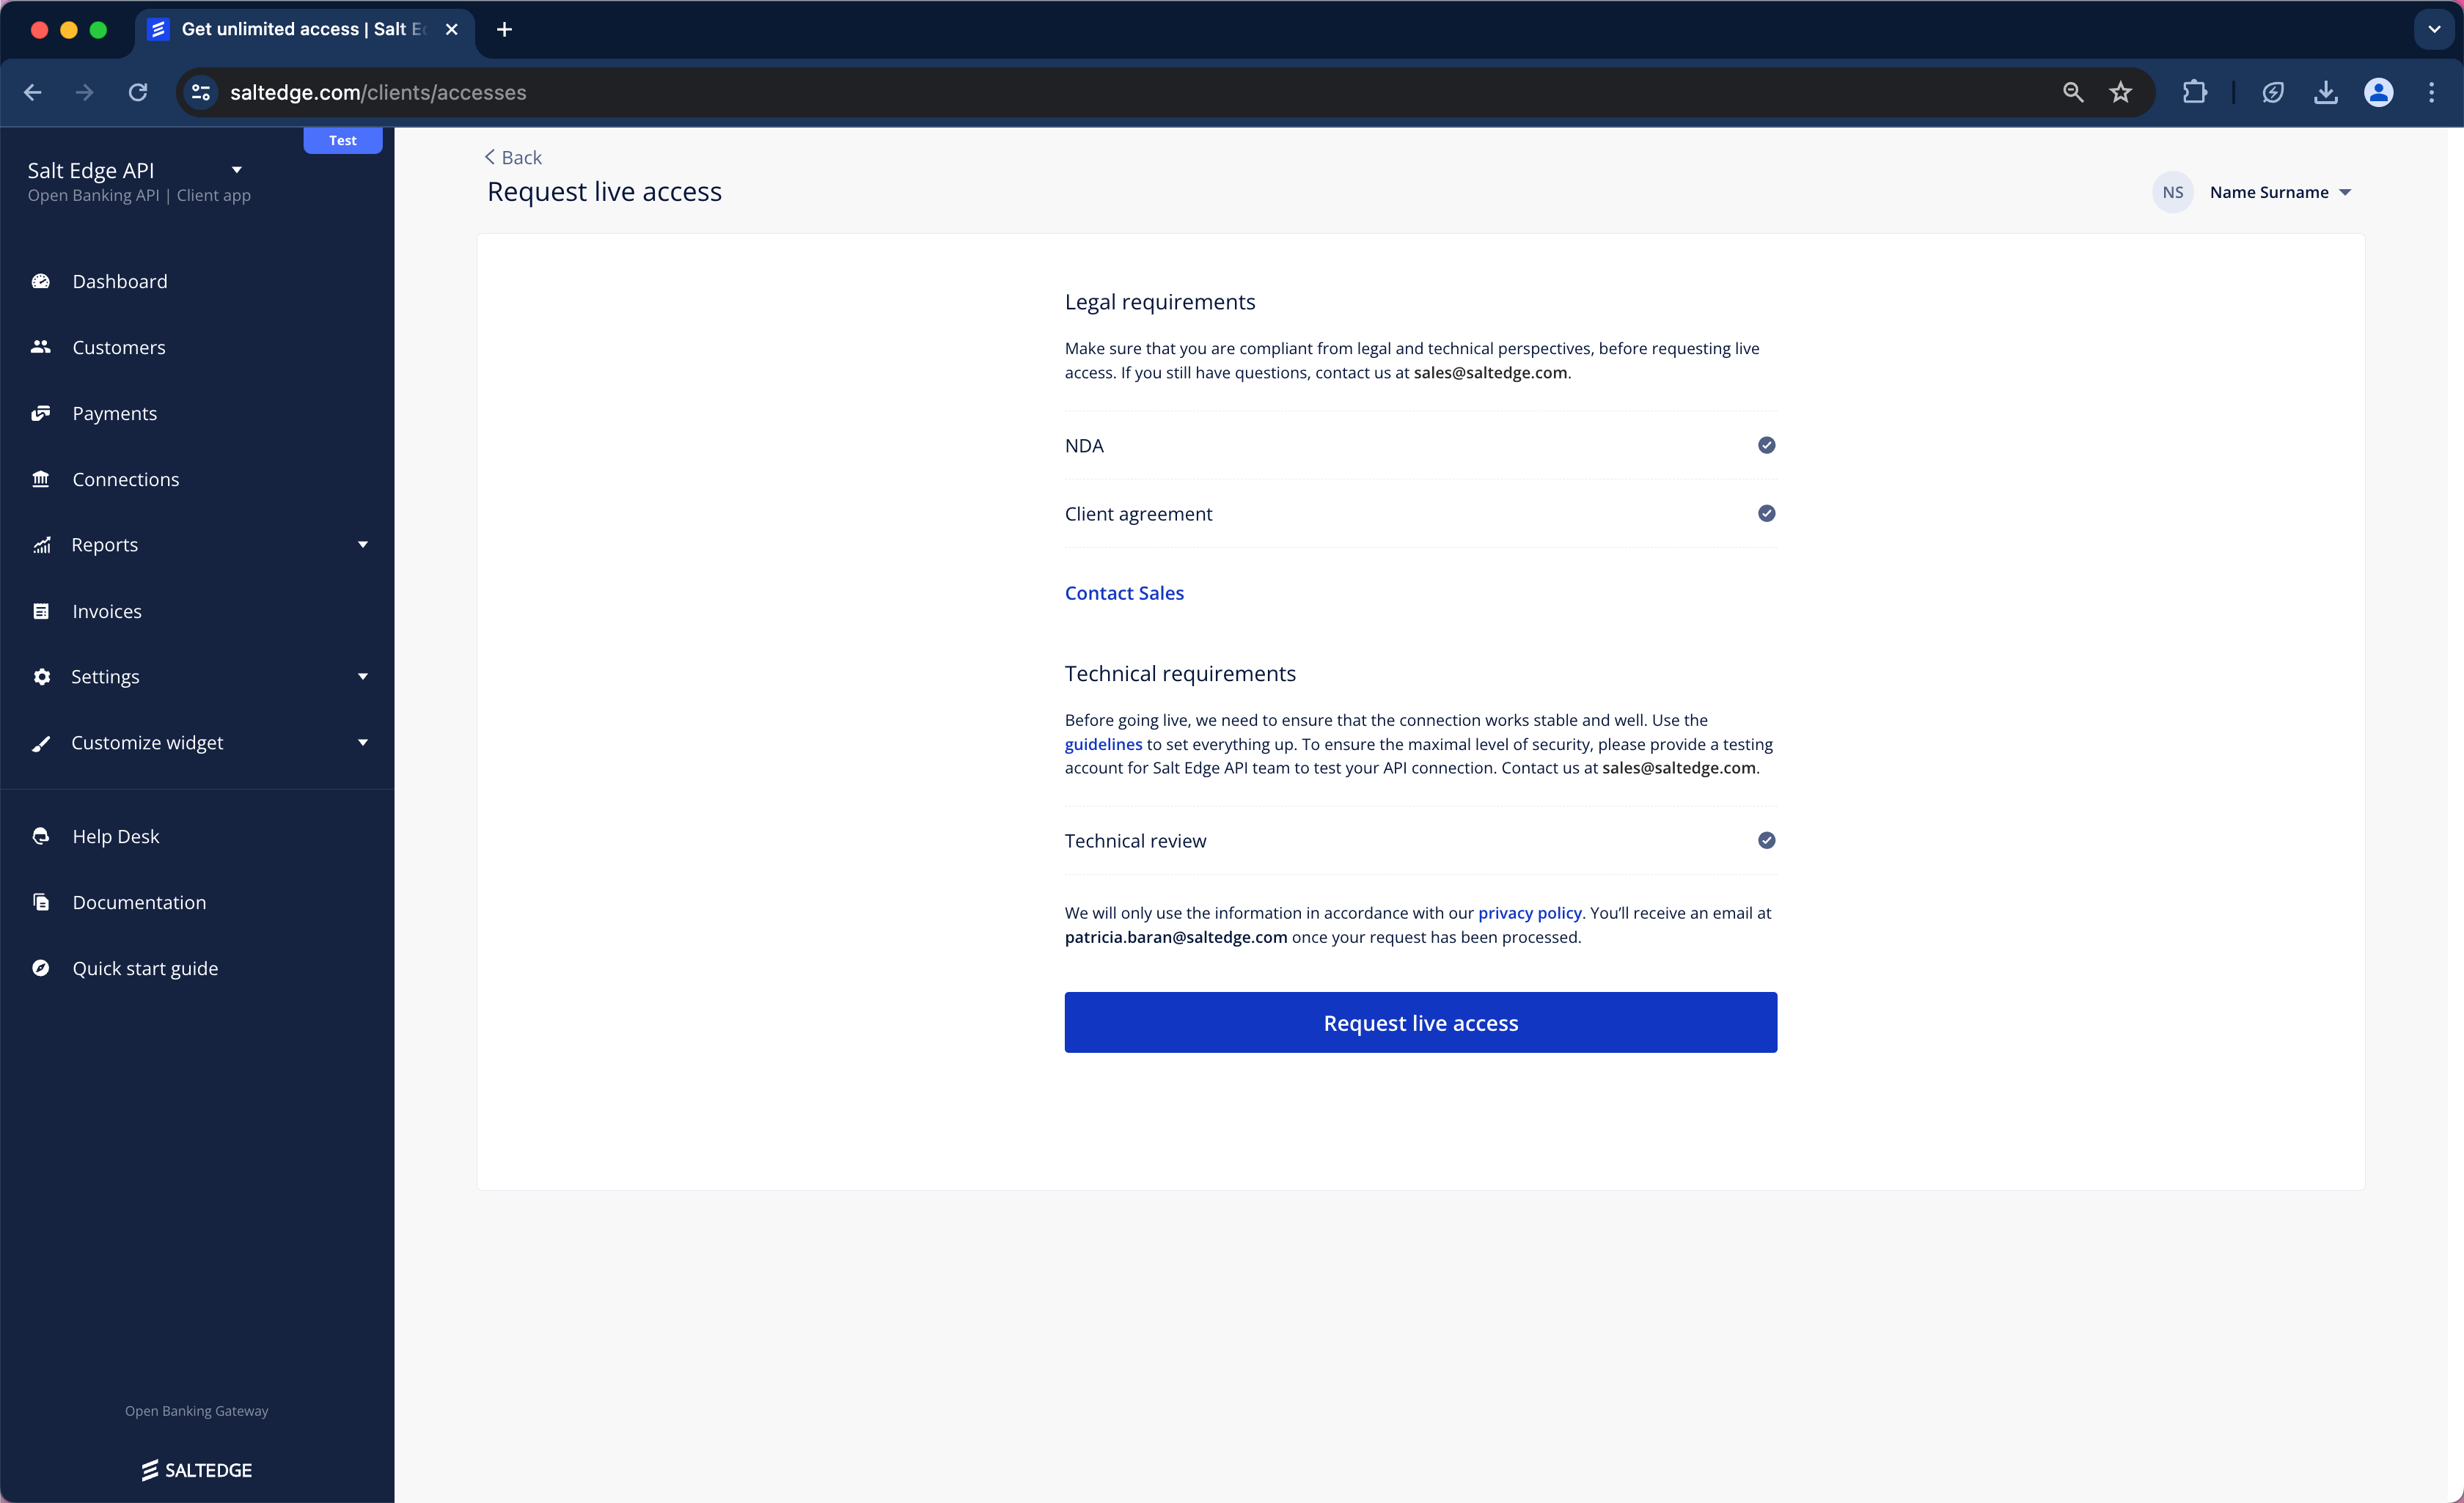
d. Teammates, such as the Finance team for invoicing purposes or the Support team to access the Dashboard, should be reviewed and added if missing.
The Live status enables the application to use Open Banking Gateway without any restrictions.
Note
In the Live status, all details of the accounts and transactions will not be visible in the Client’s Dashboard.
Restricted
The Restricted status will be assigned to Client’s application if:
1. The payment has not been received. While in this status, Client’s application is placed in a read-only state, and, as a result, it cannot initiate Payments, create or reconnect Connections, refresh them.
2. In the event of non-compliance with the Terms of Service or the Before Going LIVE guide, we will get in contact with the Client to solve the issues. If multiple attempts to contact the Client fail or if any of the non-compliances remain unresolved within two days, the application will be transitioned to the Disabled status. In this status, all API requests will result in a ClientDisabled error.
Roles
Salt Edge offers various roles for the Client Dashboard to align with the business needs of the Client.
Client user roles:
Custom- a function with that offers the possibility to assign custom Access and Management roles to a teammate is offered;Finance- a predefined role, ideal for Accounting professionals who can access and manage billing information and invoices;Support- a predefined role, ideal for employees who routinely respond to end-customers' queries related to Provider Connections;Developer- a predefined role, ideal for Developers or Individuals using the Salt Edge API firsthand;Administrator- a predefined role, ideal for Business Owners and company Administrators;Owner- a predefined role, possesses access to all available roles within the system.
When a Client is created, only the cancellation of the Client profile and data destruction can be carried out by the Account Owner.
eIDAS certificates
Note
The Open Banking Gateway supports only soft-issued eIDAS certificates and Open Banking UK certificates.
For the purpose of identification, ASPSPs and TPPs shall use eIDAS certificates for electronic seal (QSEAL) and/ or for website authentication (QWAC). It is mandatory for all TPPs that wish to access ASPSP’s Sandboxes, live API, and/ or non-dedicated channels to identify themselves.
eIDAS Certificates are issued by QTSPs who are responsible for assuring the electronic identification of signatories and services by using strong mechanisms for authentication, digital certificates, and electronic signatures.
To obtain an eIDAS certificate (QWAC, QSEAL, or both) from the QTSP, a CSR must be generated in the Salt Edge Dashboard. Consequently, a CSR is generated in a secure manner within the Salt Edge system, comprising a Private and Public key.
To initiate an eIDAS certificate process, the following steps should be accomplished:
- Qualified Website Authentication Certificates (QWAC) - identification at the transport layer. QWAC is similar to SSL/ TLS with Extended Validation used on the Internet for the same purpose. It is employed for website authentication, ensuring that ASPSPs and TPPs can confidently verify each other's identity, thereby securing the transport layer. A TPP should present its QWAC client certificate to an ASPSP. The ASPSP has the option to use either the ASPSP QWAC server certificate or an existing SSL/ TLS certificate to receive the TPP’s identification request.
- Qualified Certificate for Electronic Seals (QSEAL) - identification at the application layer. QSEAL is used for identity verification, safeguarding transaction information from potential attacks during or after communication. This ensures that the recipient of digitally signed data can ascertain the identity of the signer and confirm that the data has not been altered.
To initiate an eIDAS certificate process, the following steps should be accomplished:
a. Go to the Client Dashboard
b. Go to Settings > eIDAS Certificates
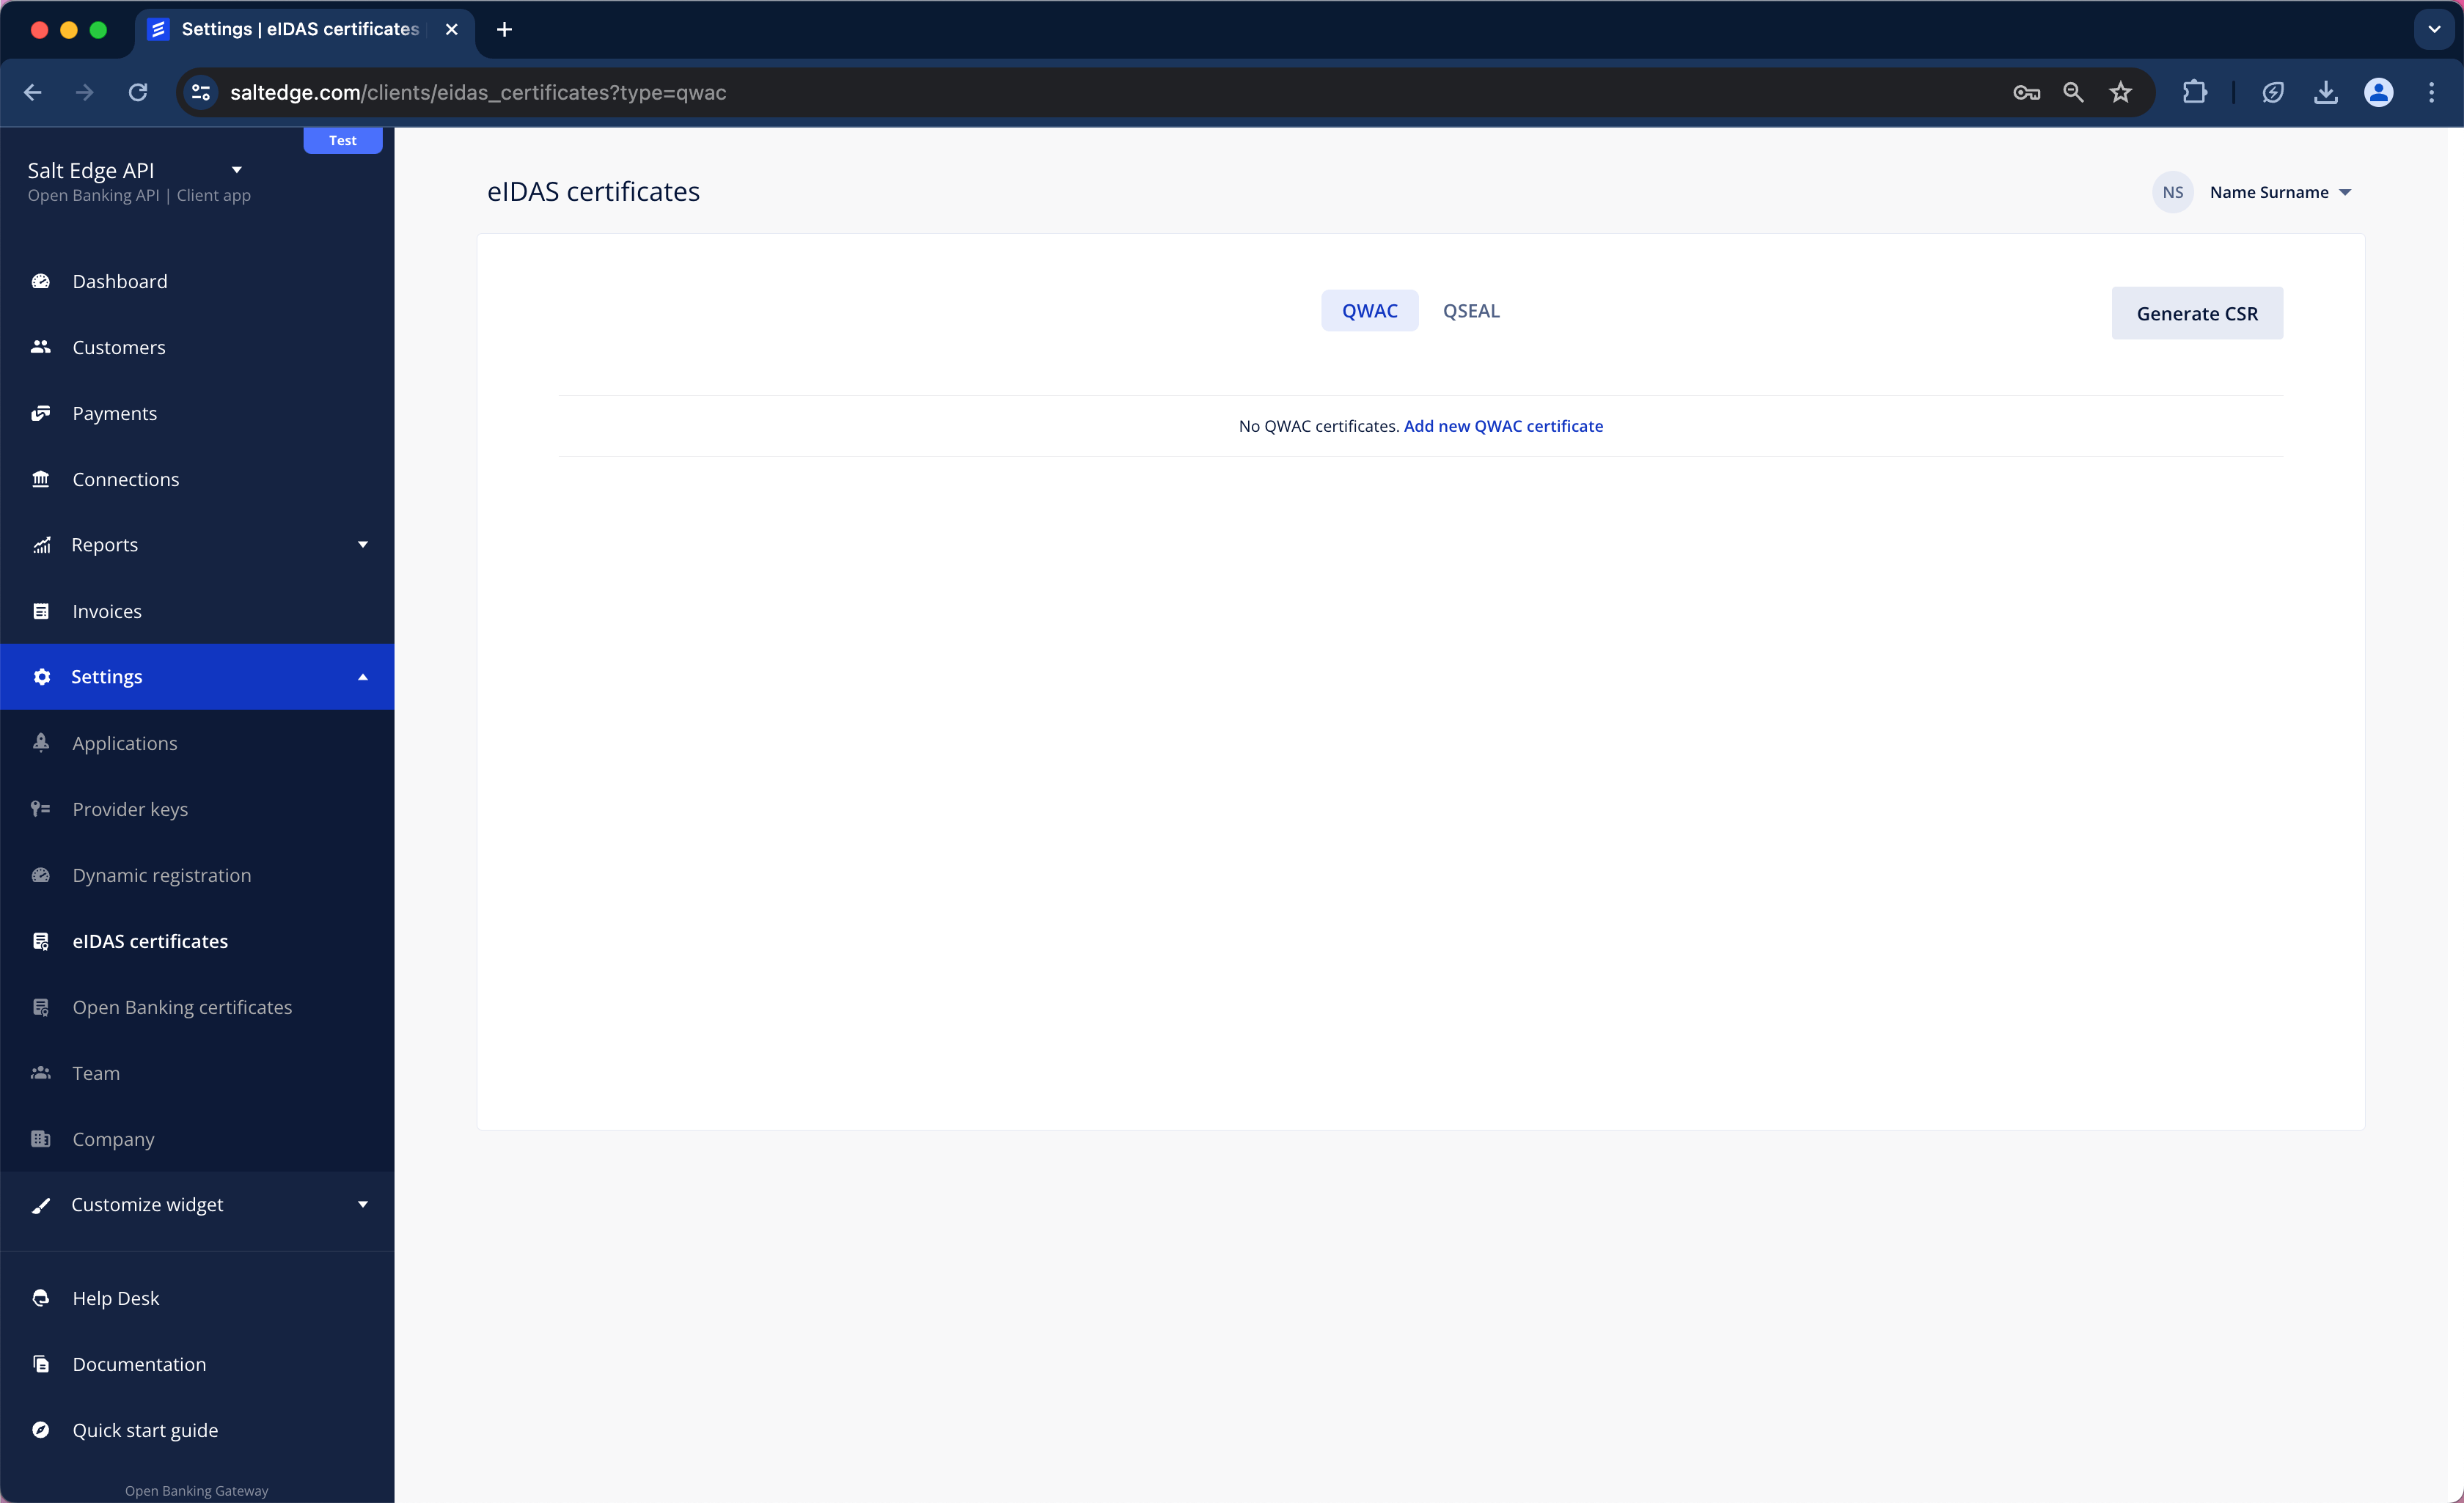
c. Choose the type of certificate necessary to be generated (QWAC or QSEAL), fill in the fields and press Generate CSR.
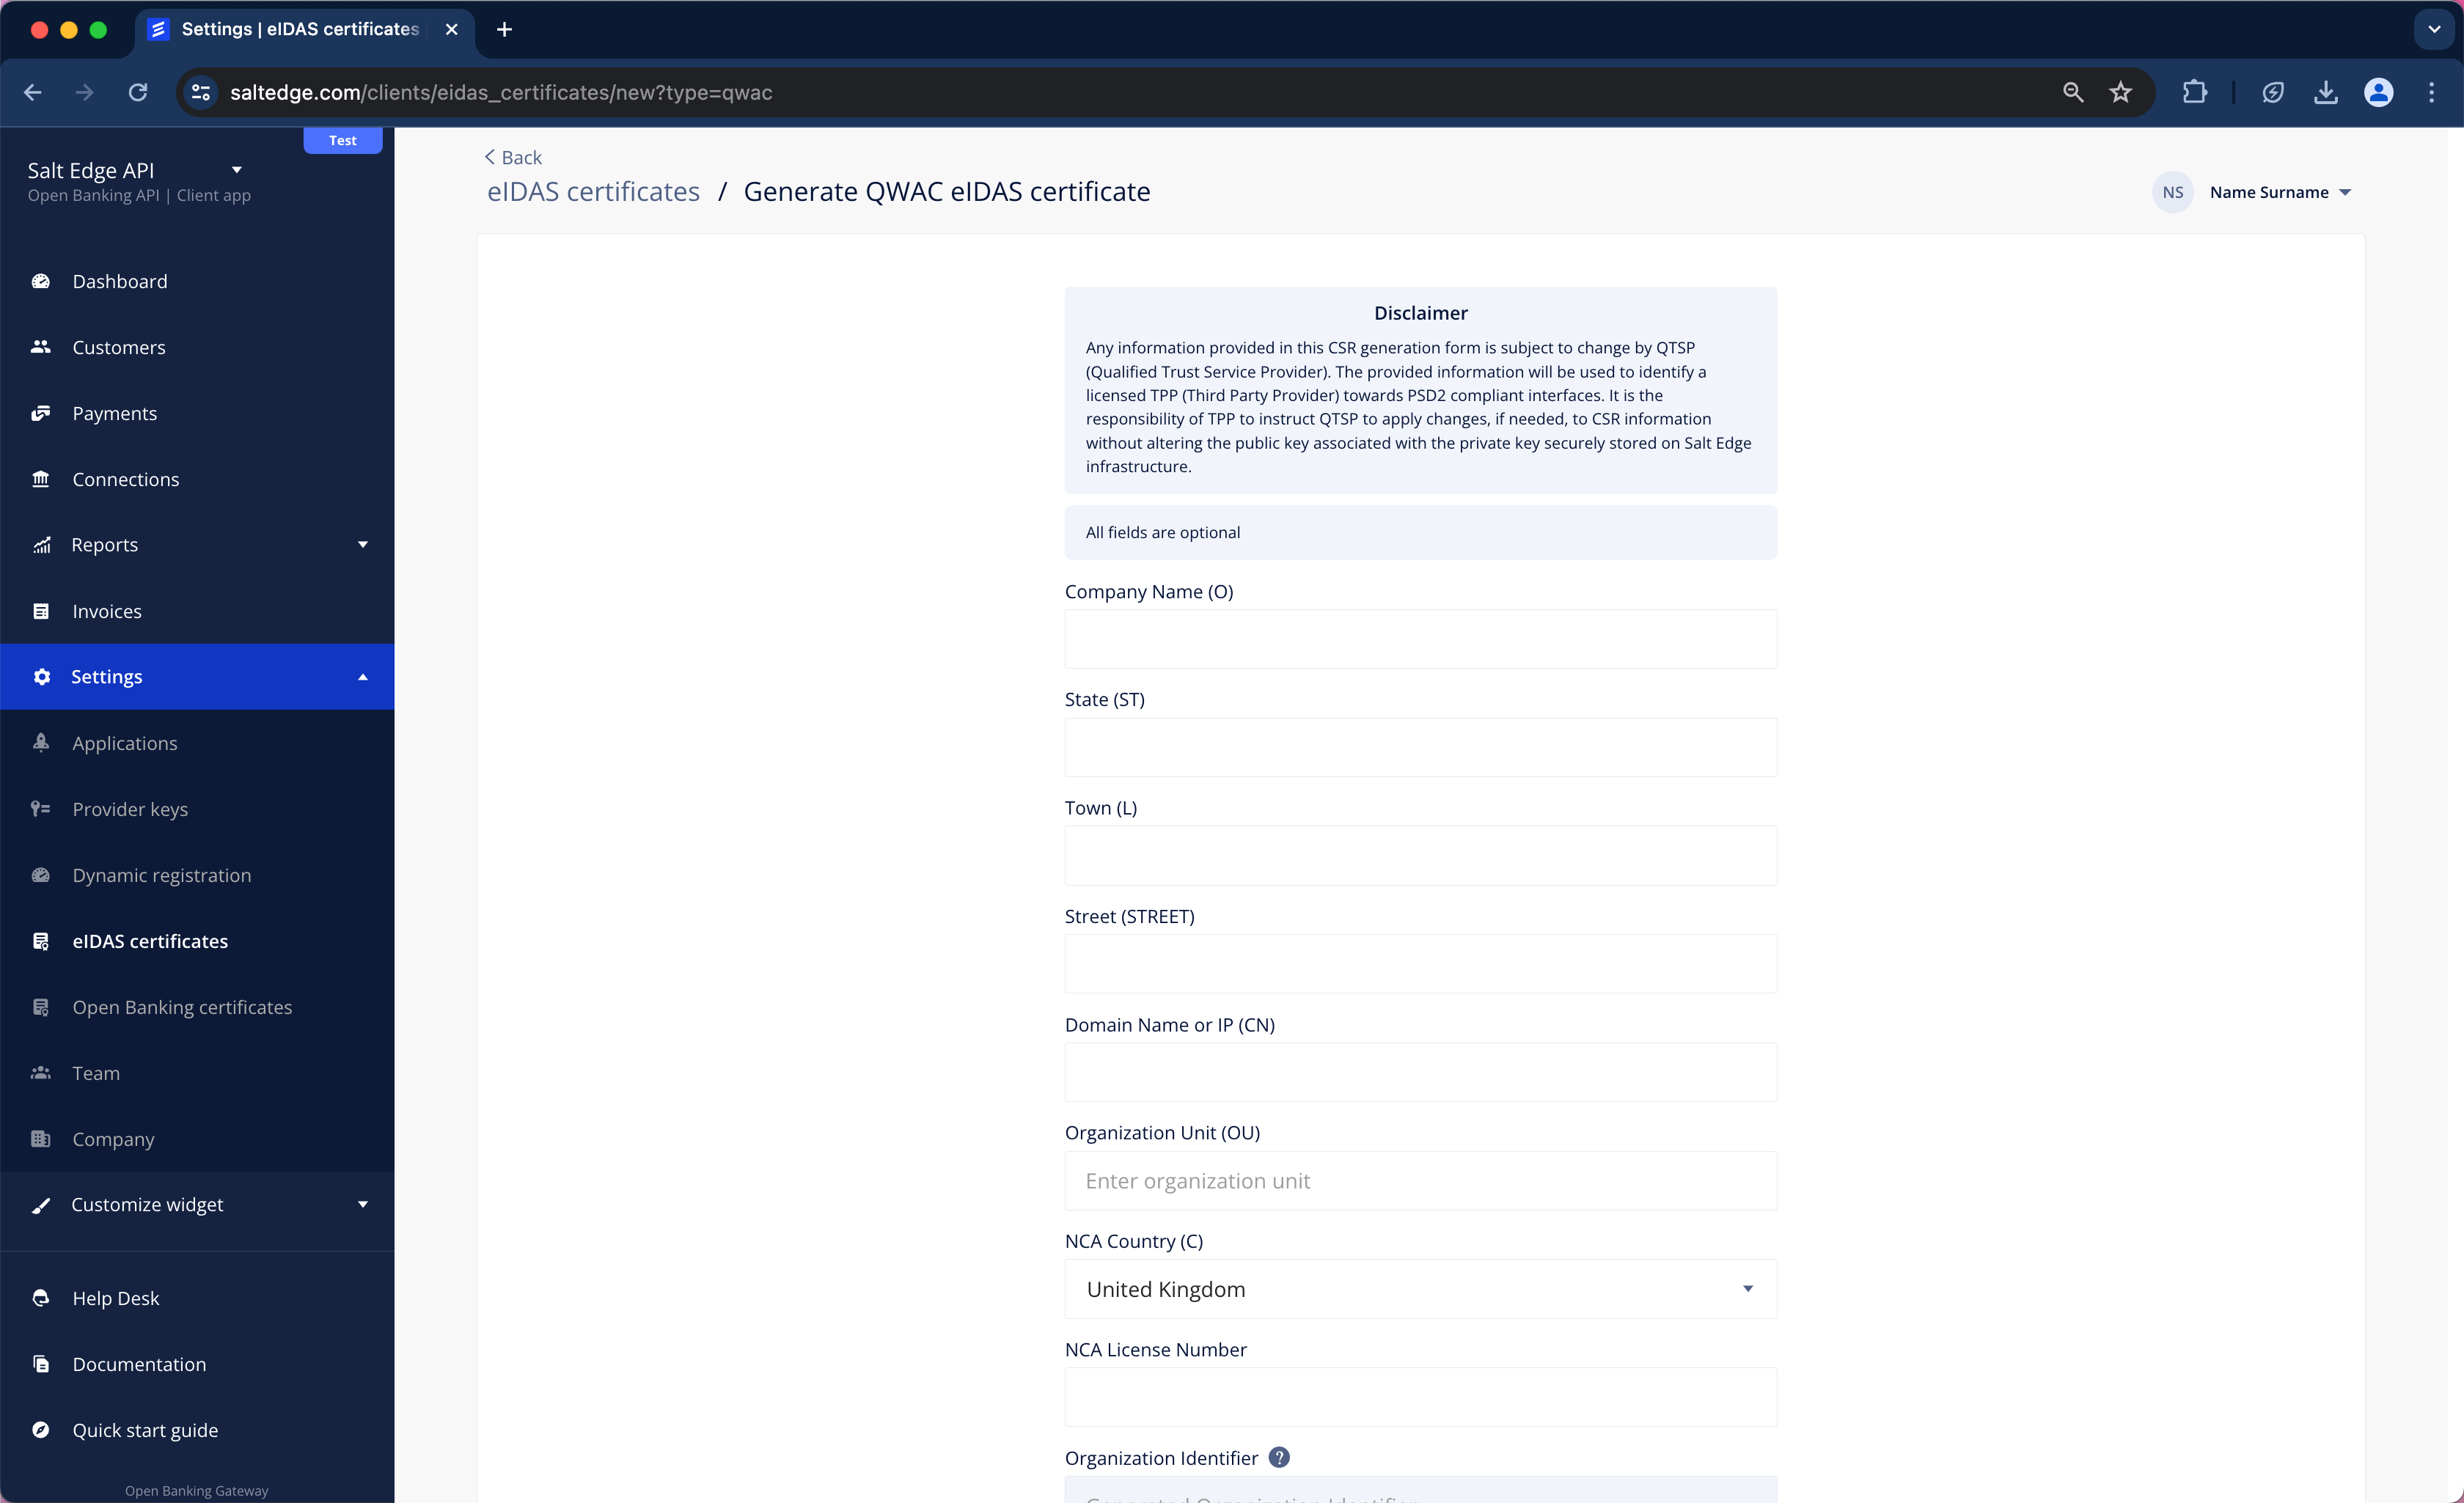
d. Send the CSR (public key) to the QTSP (a test certificate can be obtained, or a production certificate can be purchased) for obtaining the eIDAS certificates.
e. Get a signed certificate from the QTSP.
f. Go to Settings > eIDAS Certificates and press edit on previously created record.
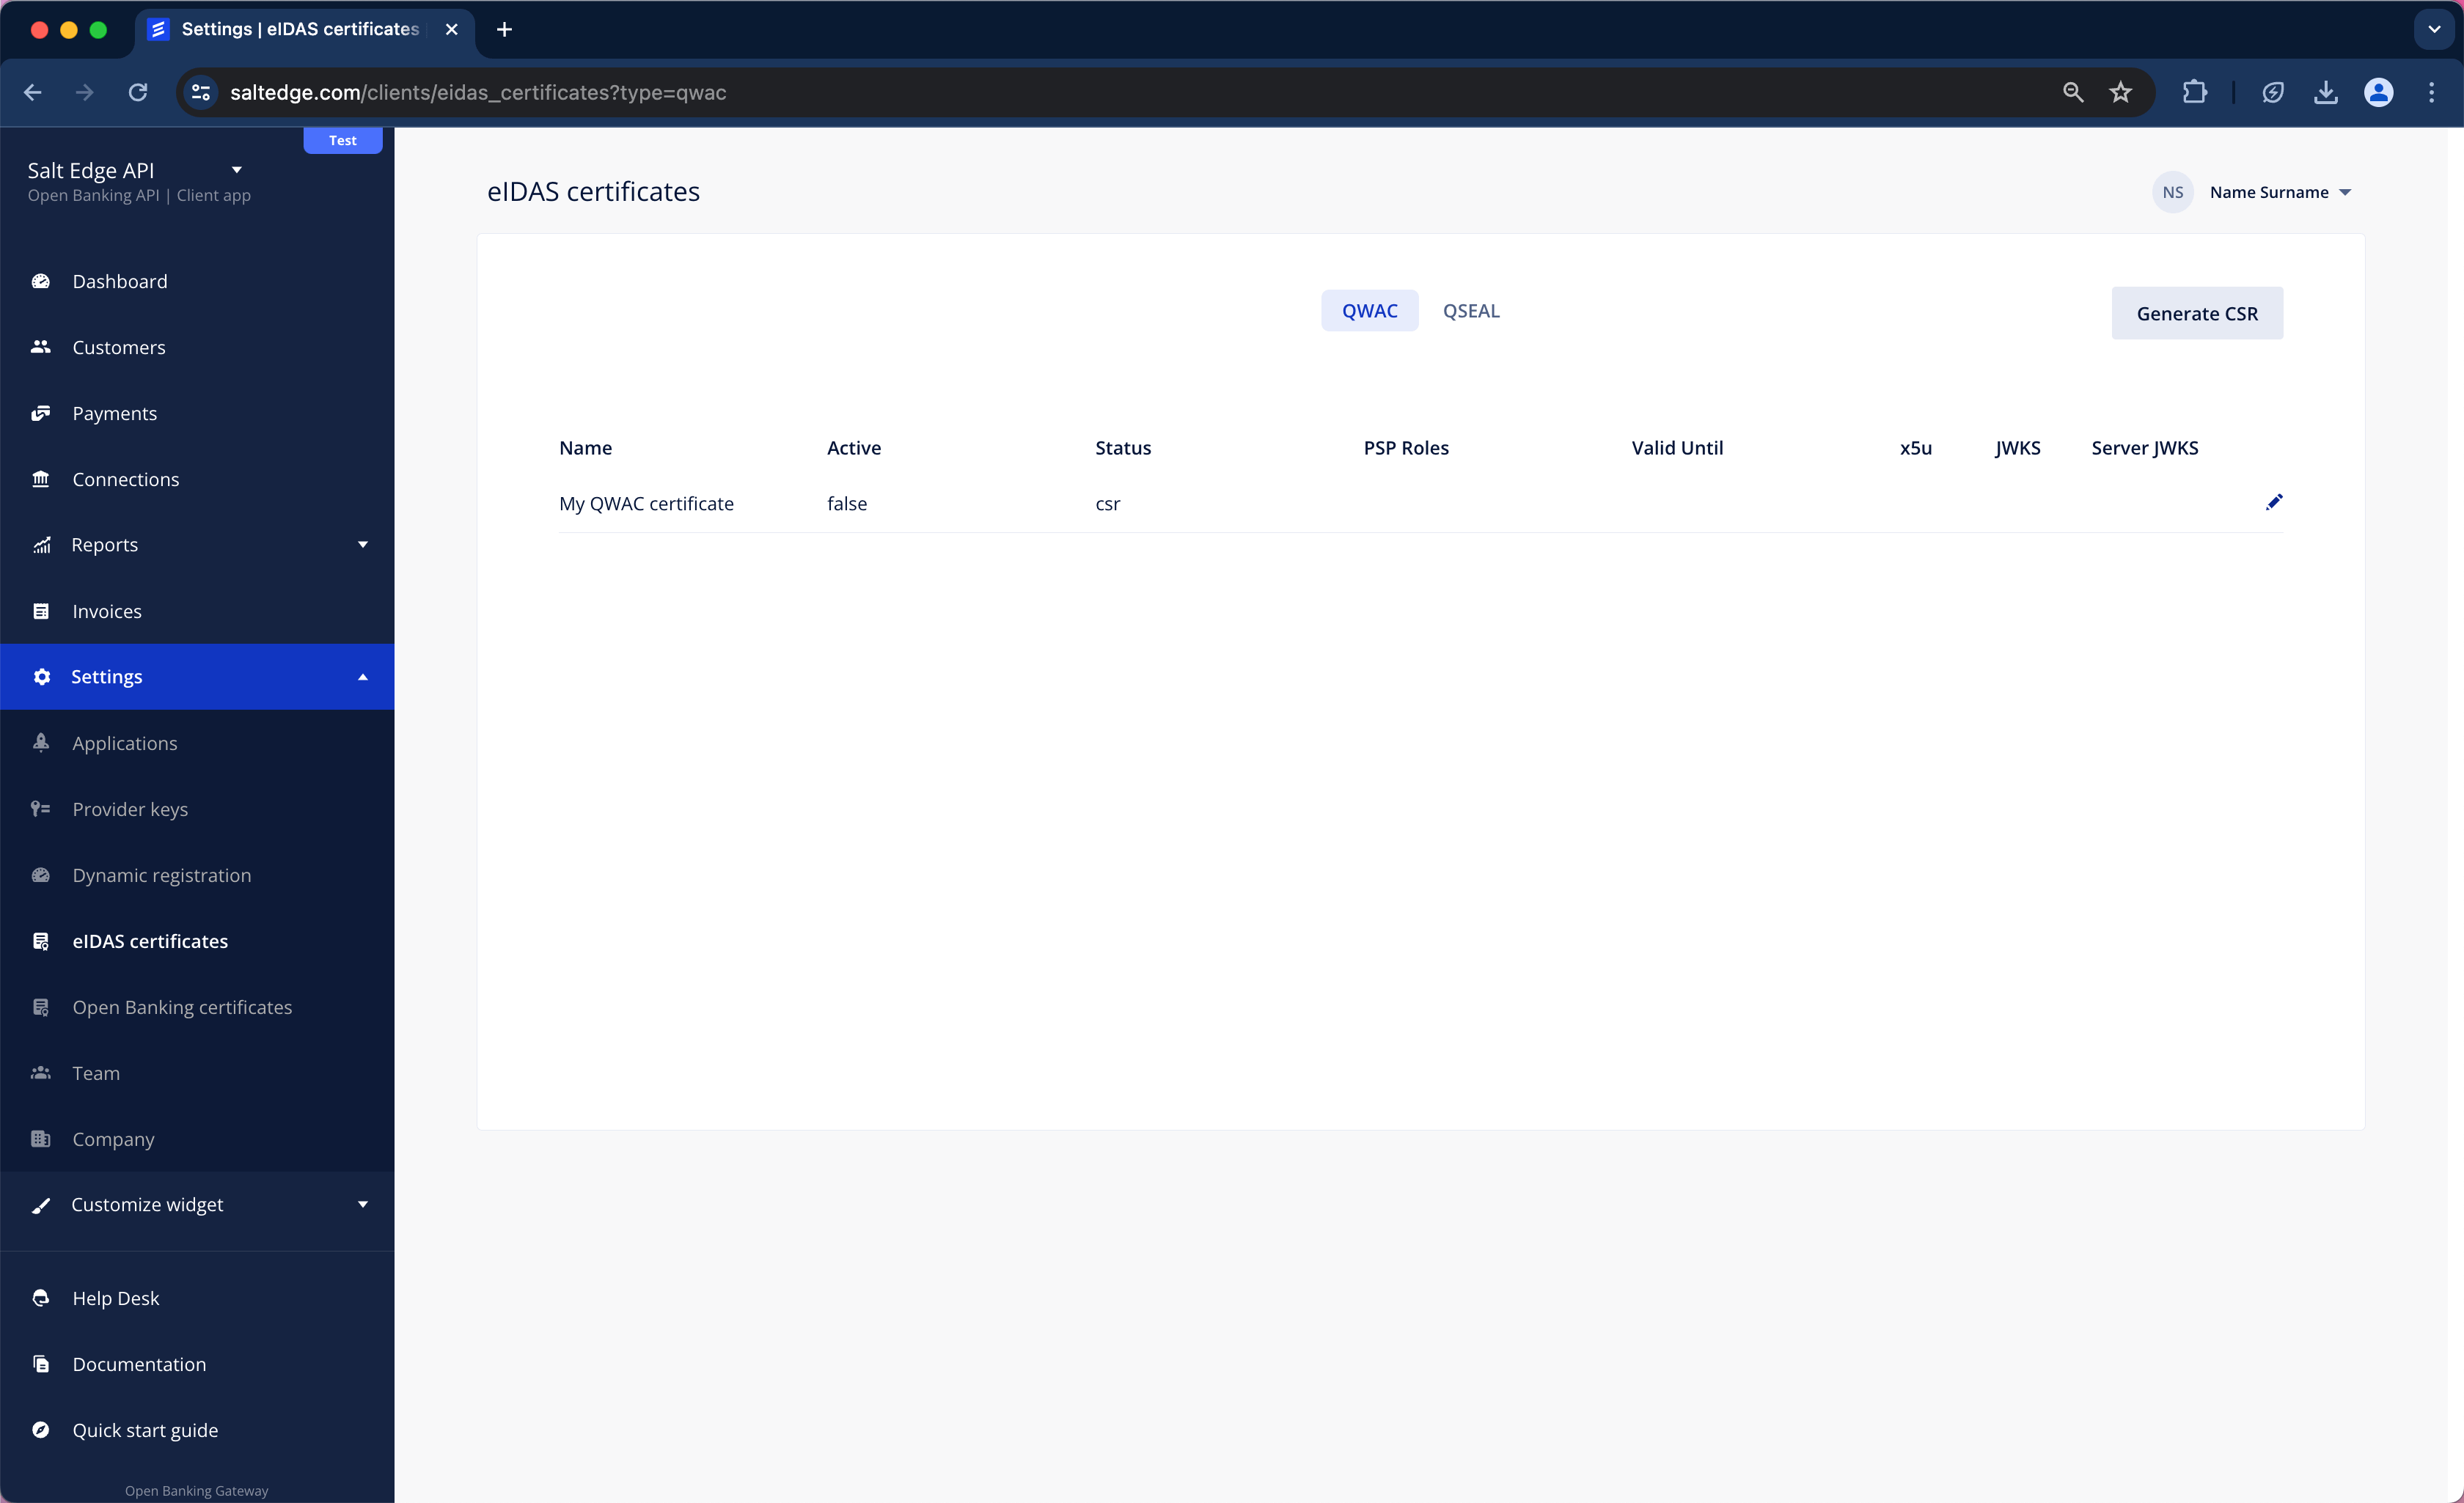
g. Insert the received certificate in PEM format into the form and press update.
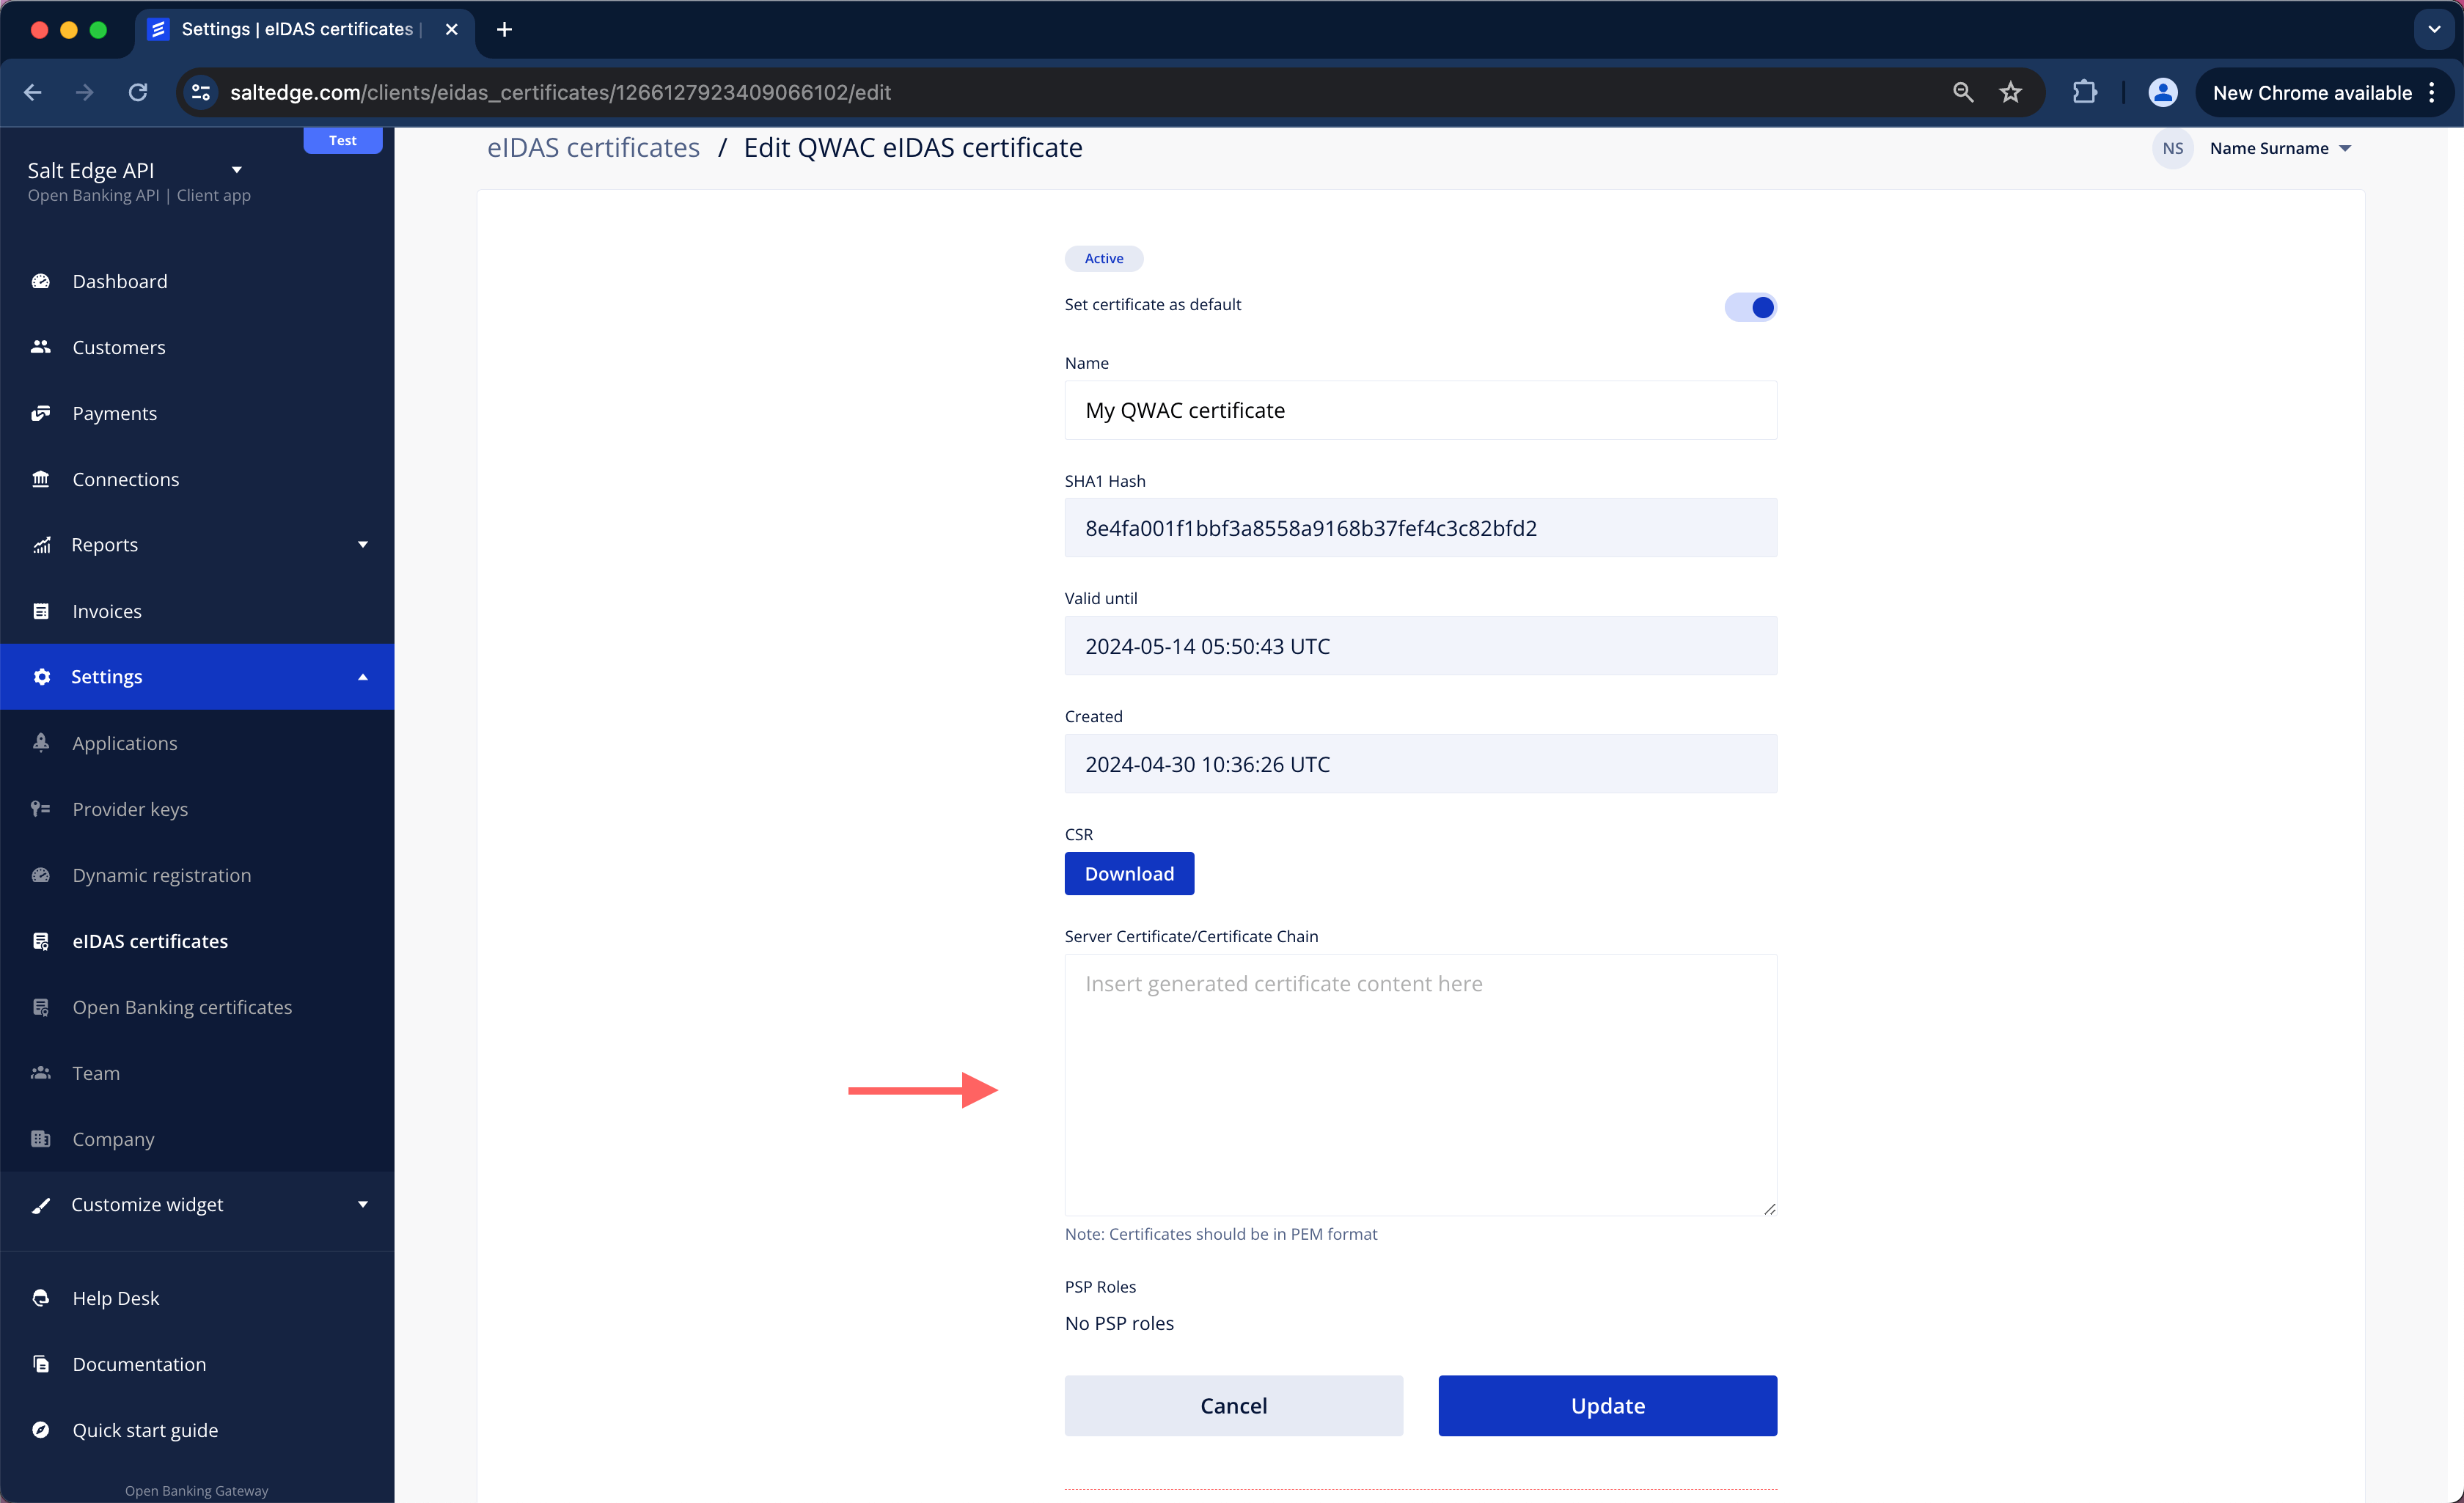
h. Choose a certificate used for identification, press “Edit” and mark it as active.
Client Provider Keys
The Open Banking Gateway supports AIS and PIS channels, which can be used with PSD2 and Open Banking compliant APIs. Establishing a Connection with a Provider is feasible only by generating a Provider Key (a set of credentials) for it. In this scenario, the API keys for Providers are provided and managed by the Client.
The allocation of keys is limited to one per Provider.
Once the key is generated, the Provider will be accessible as a regular one.
Integration
To integrate the app's individual keys with a Provider, follow these steps:
a. The Provider Keys page can be visited via the Client Dashboard, selecting the Provider for which the Client keys have to be added, read the instructions, and complete the form. The already onboarded Providers are listed in the Activated Providers section.
Please consult the Dynamic Registration section for Providers that can be onboarded hassle-free.
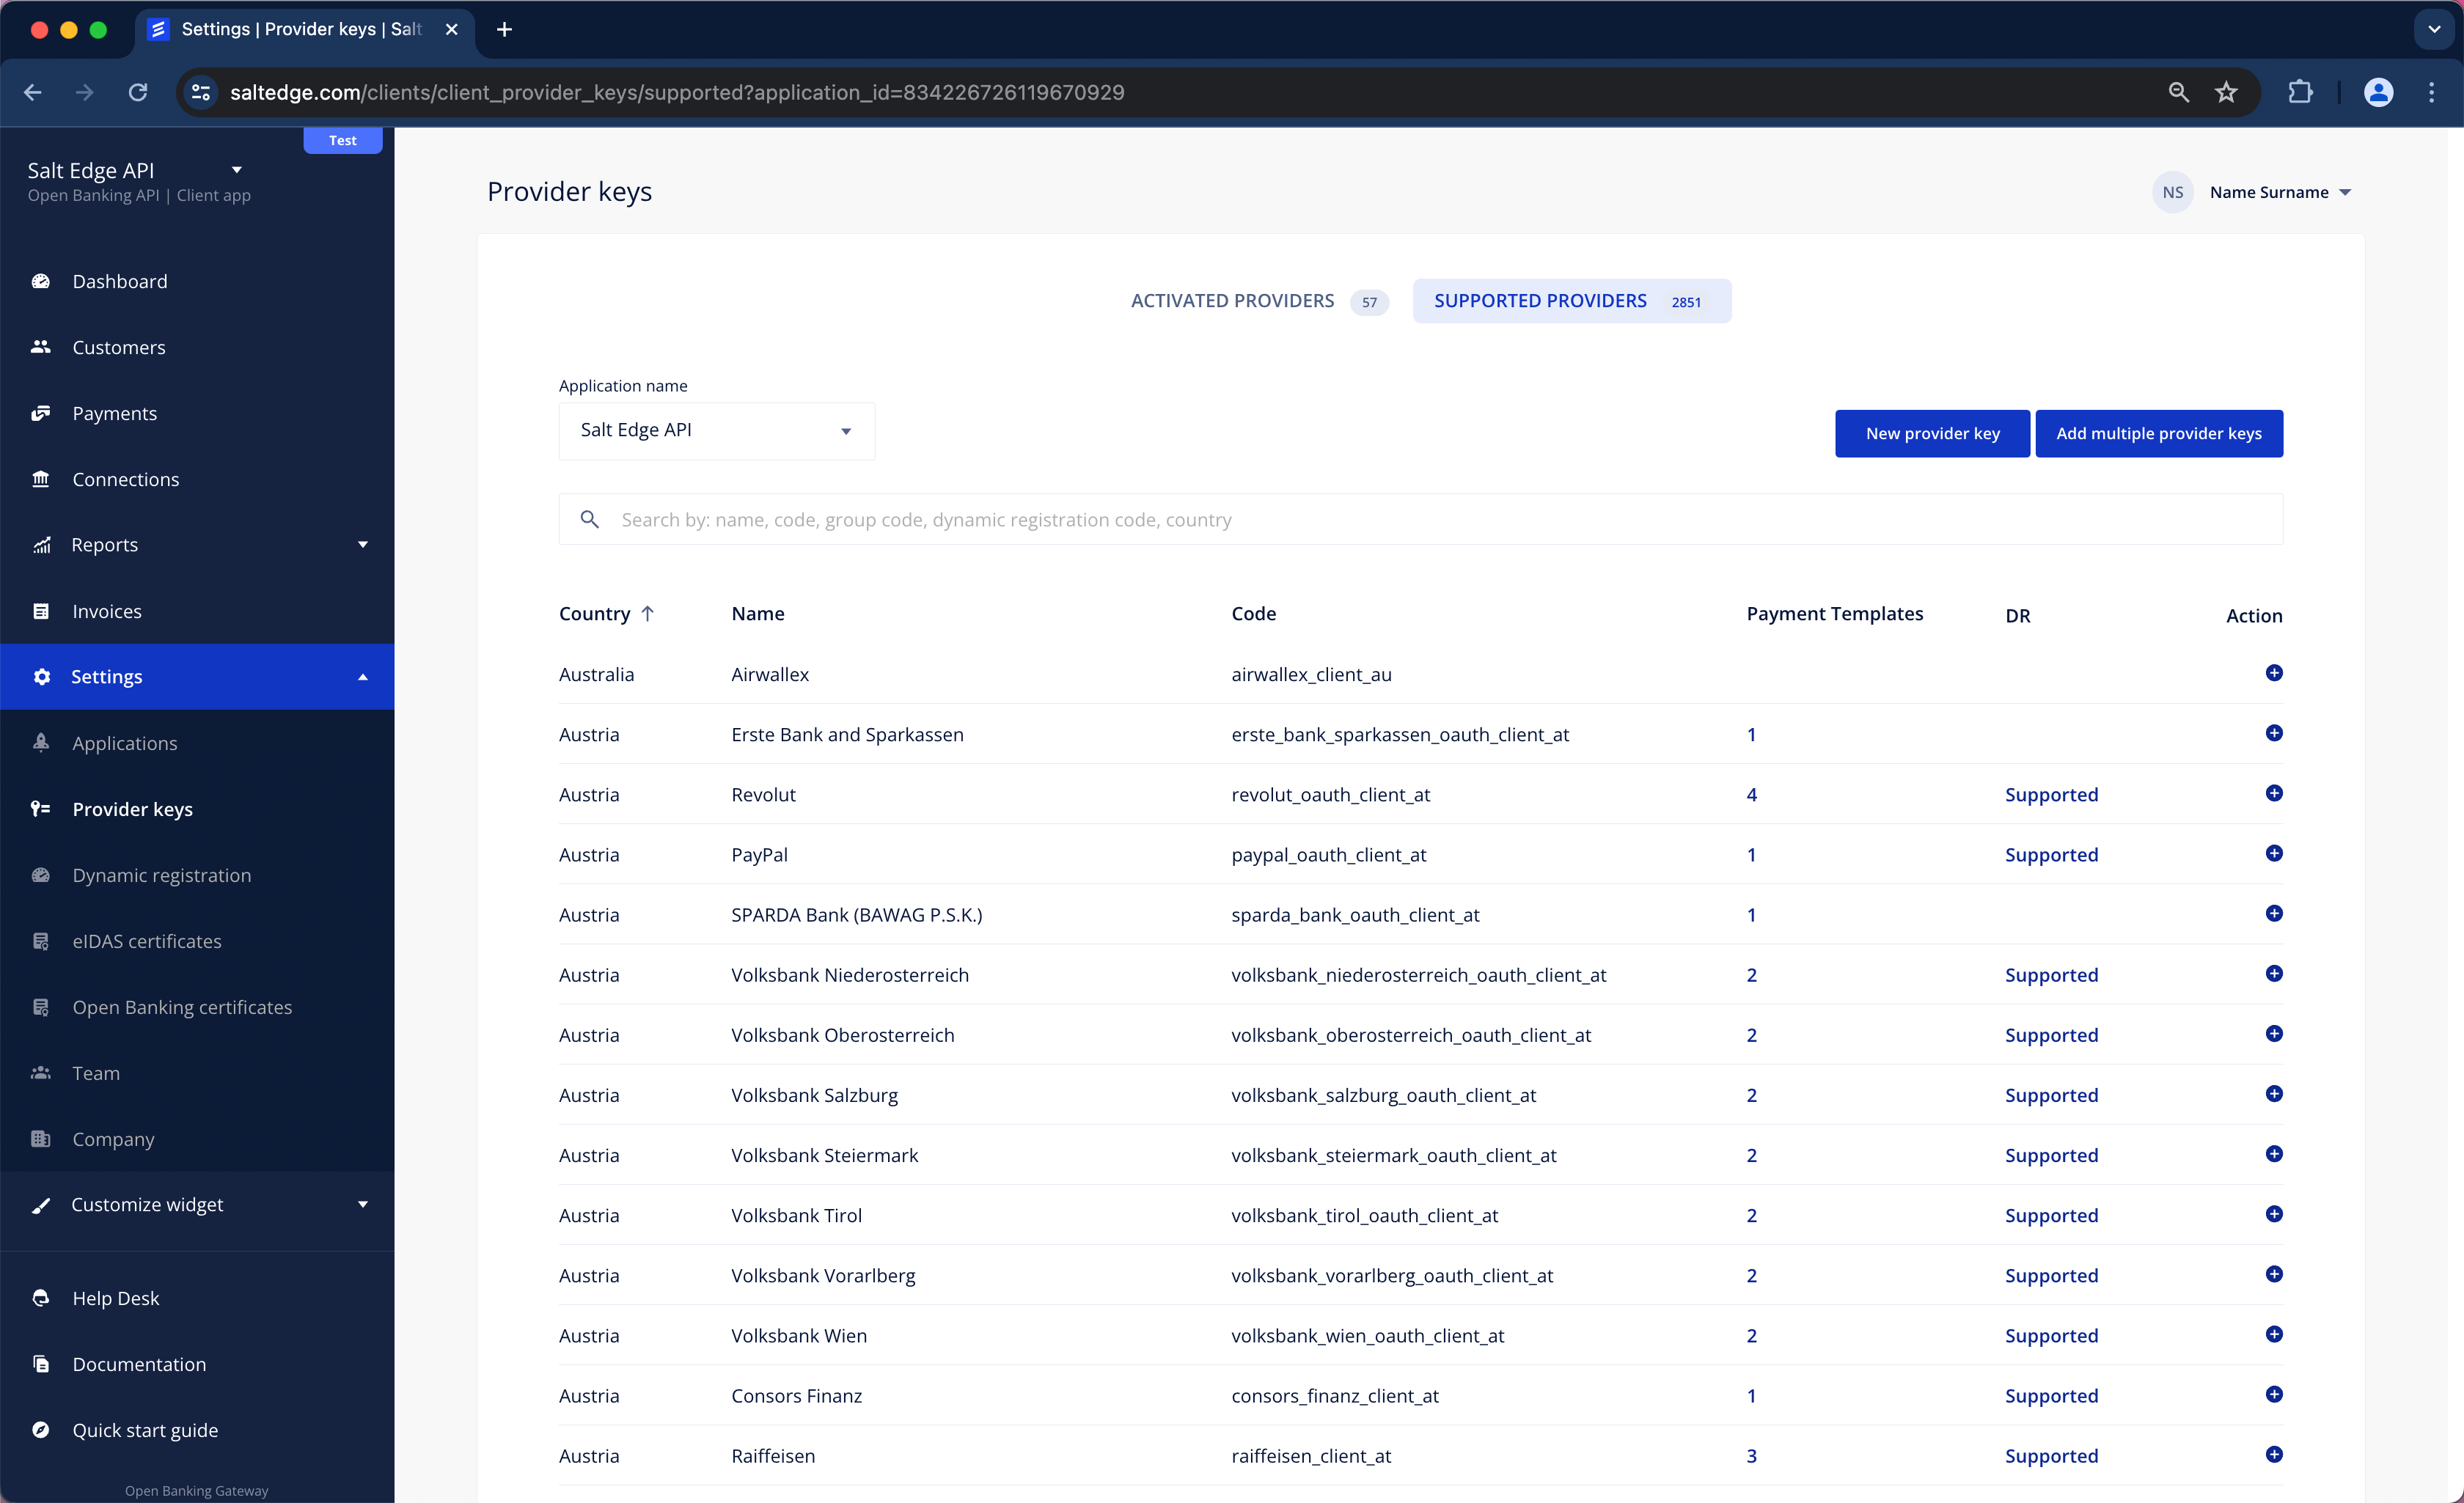
b. Proceed by visiting the Widget (Dashboard/ Home page/ “New connection” button) and searching for the Provider for which the key has just been created. It will have a small subscript below the Provider name stating that this Provider is accessed via YOUR_CLIENT_NAME or Salt Edge if the Client uses Salt Edge’s License.
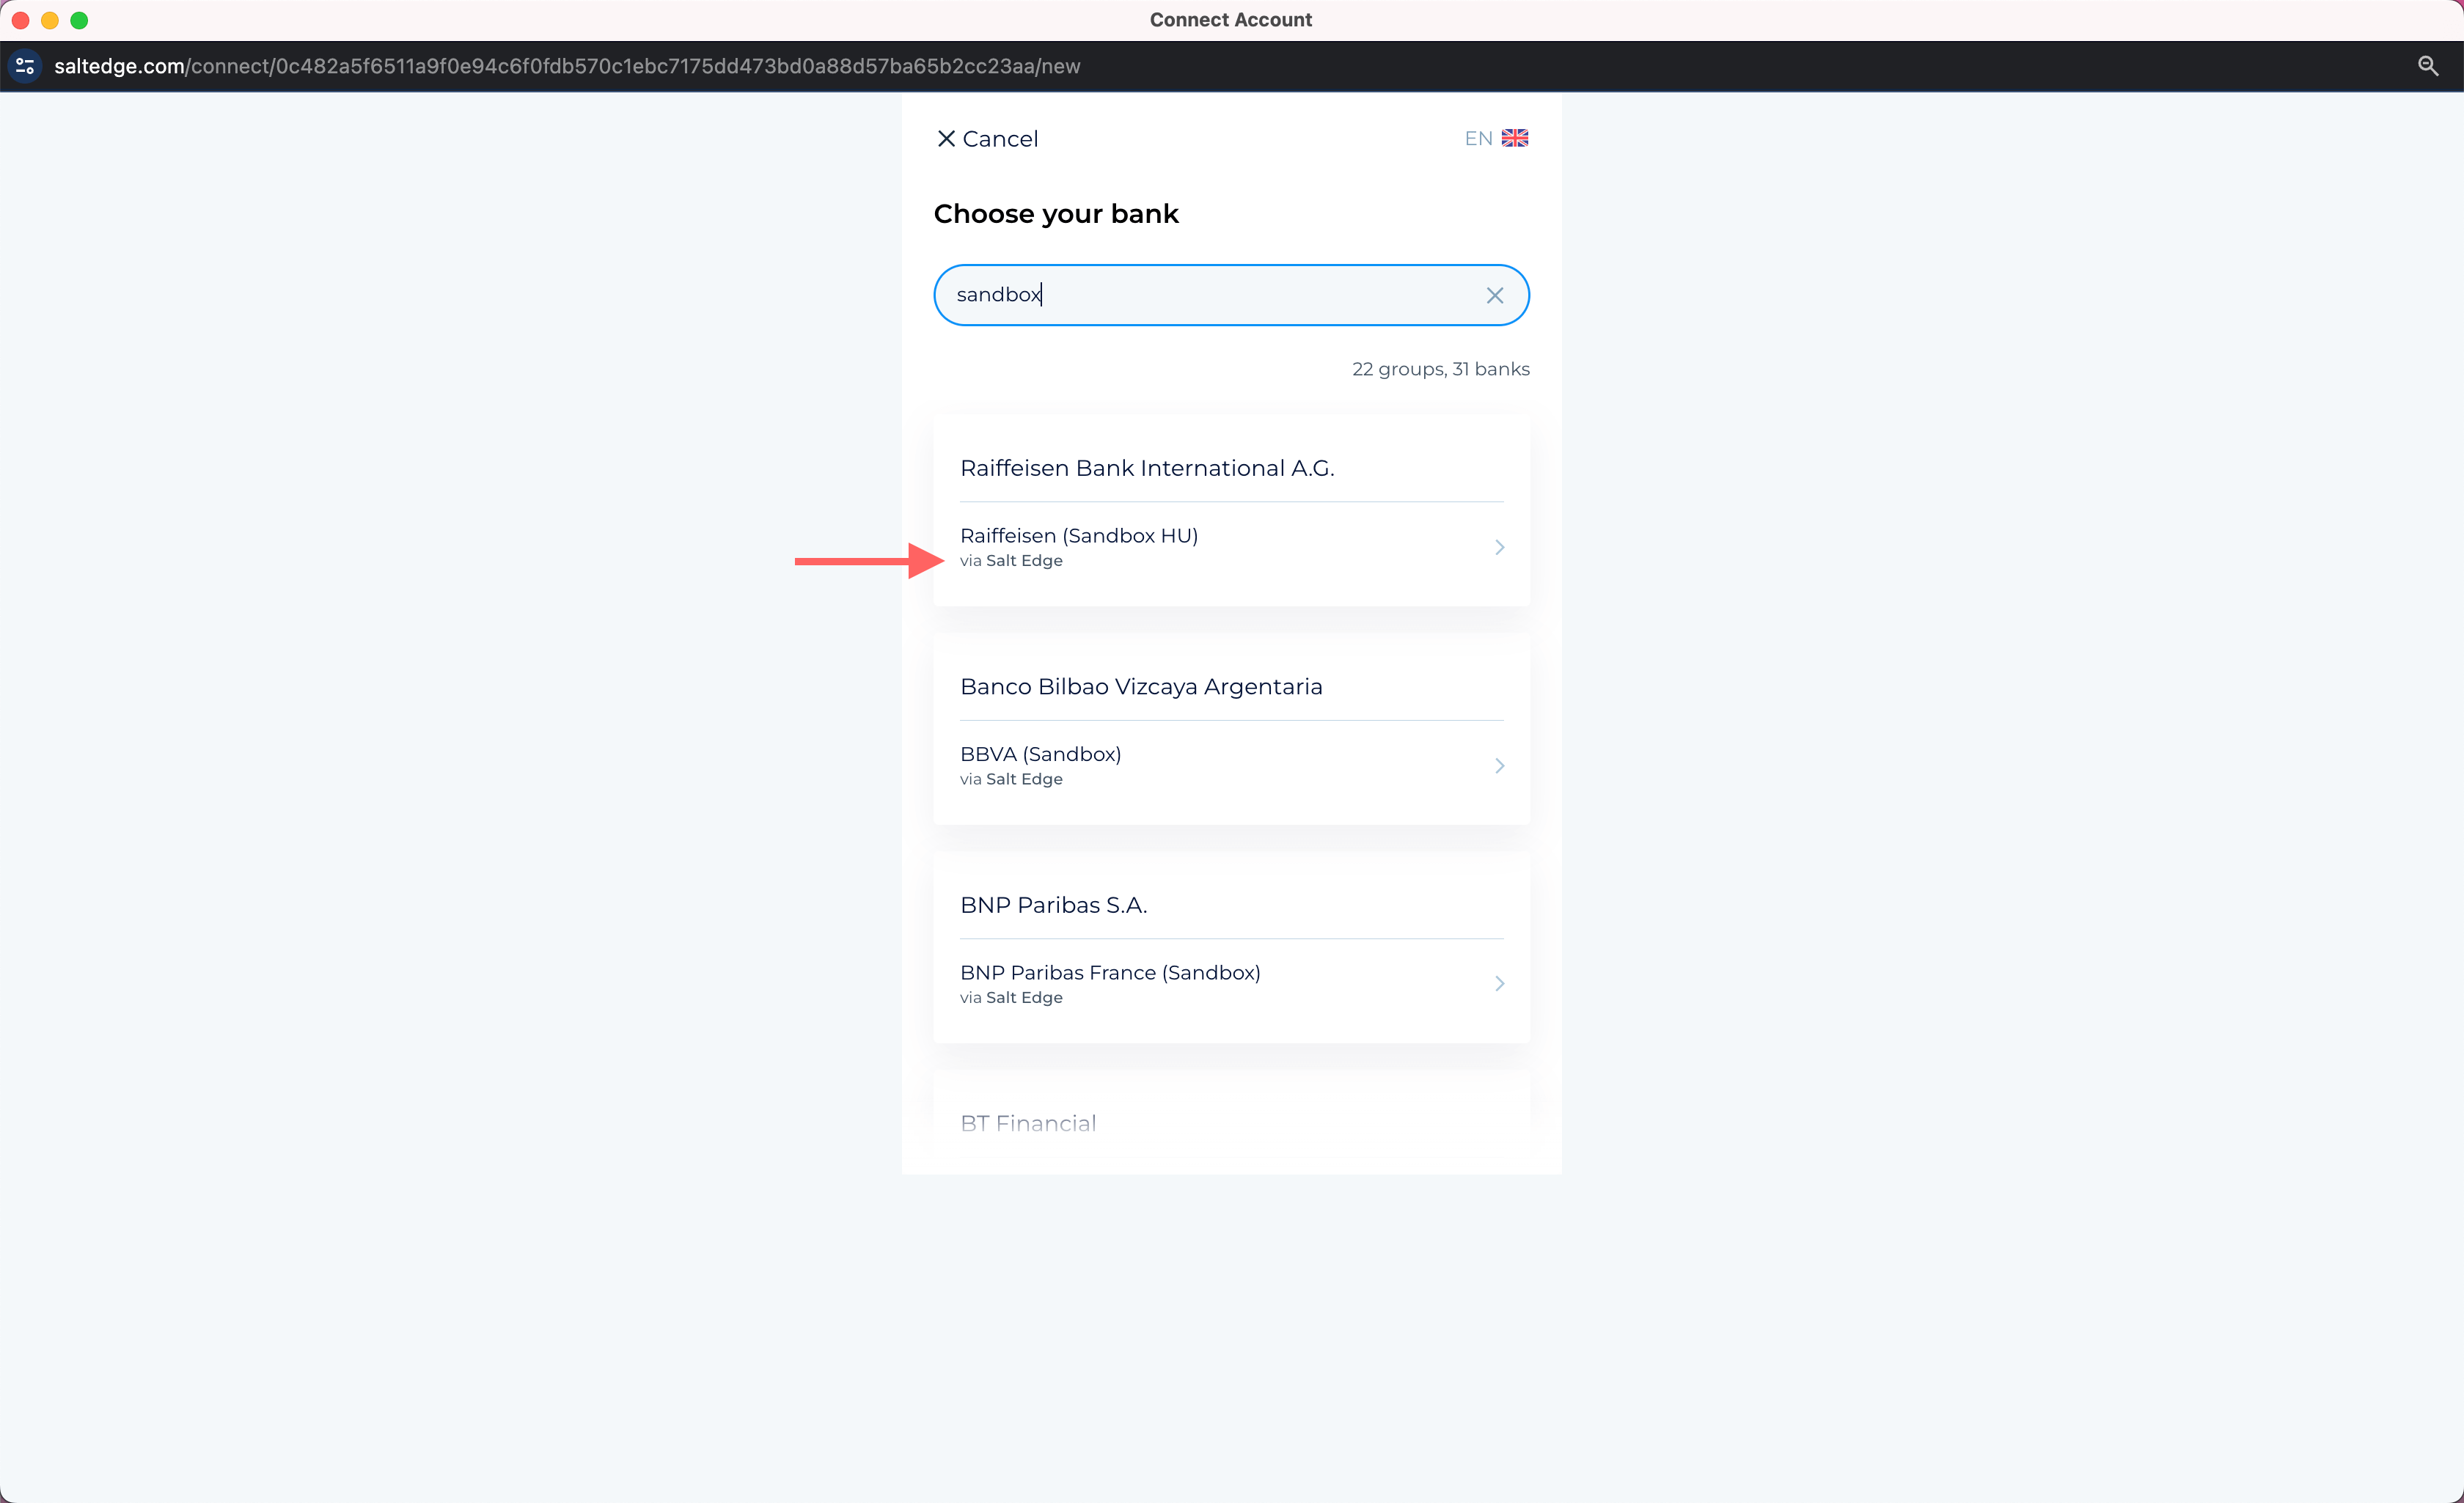
c. The remaining steps of the process are identical to those for typical Providers.
Dynamic registrationClient
Many banks offer the option for dynamic onboarding through their API. In this context, Salt Edge provides a self-service tool called Dynamic Registration that assists Clients in registering more quickly with the desired Providers’ PSD2 and Open Banking channels.
This registration method can eliminate manual processes, including the need to manually create an Account in the bank’s Developer Portal, fill out data forms, and engage in lengthy email exchanges with the bank.
To determine if a Provider supports Dynamic Registration on Salt Edge’s platform, please follow these steps:
a. Sign in to the Client Dashboard
b. Navigate to Settings > Dynamic Registrations
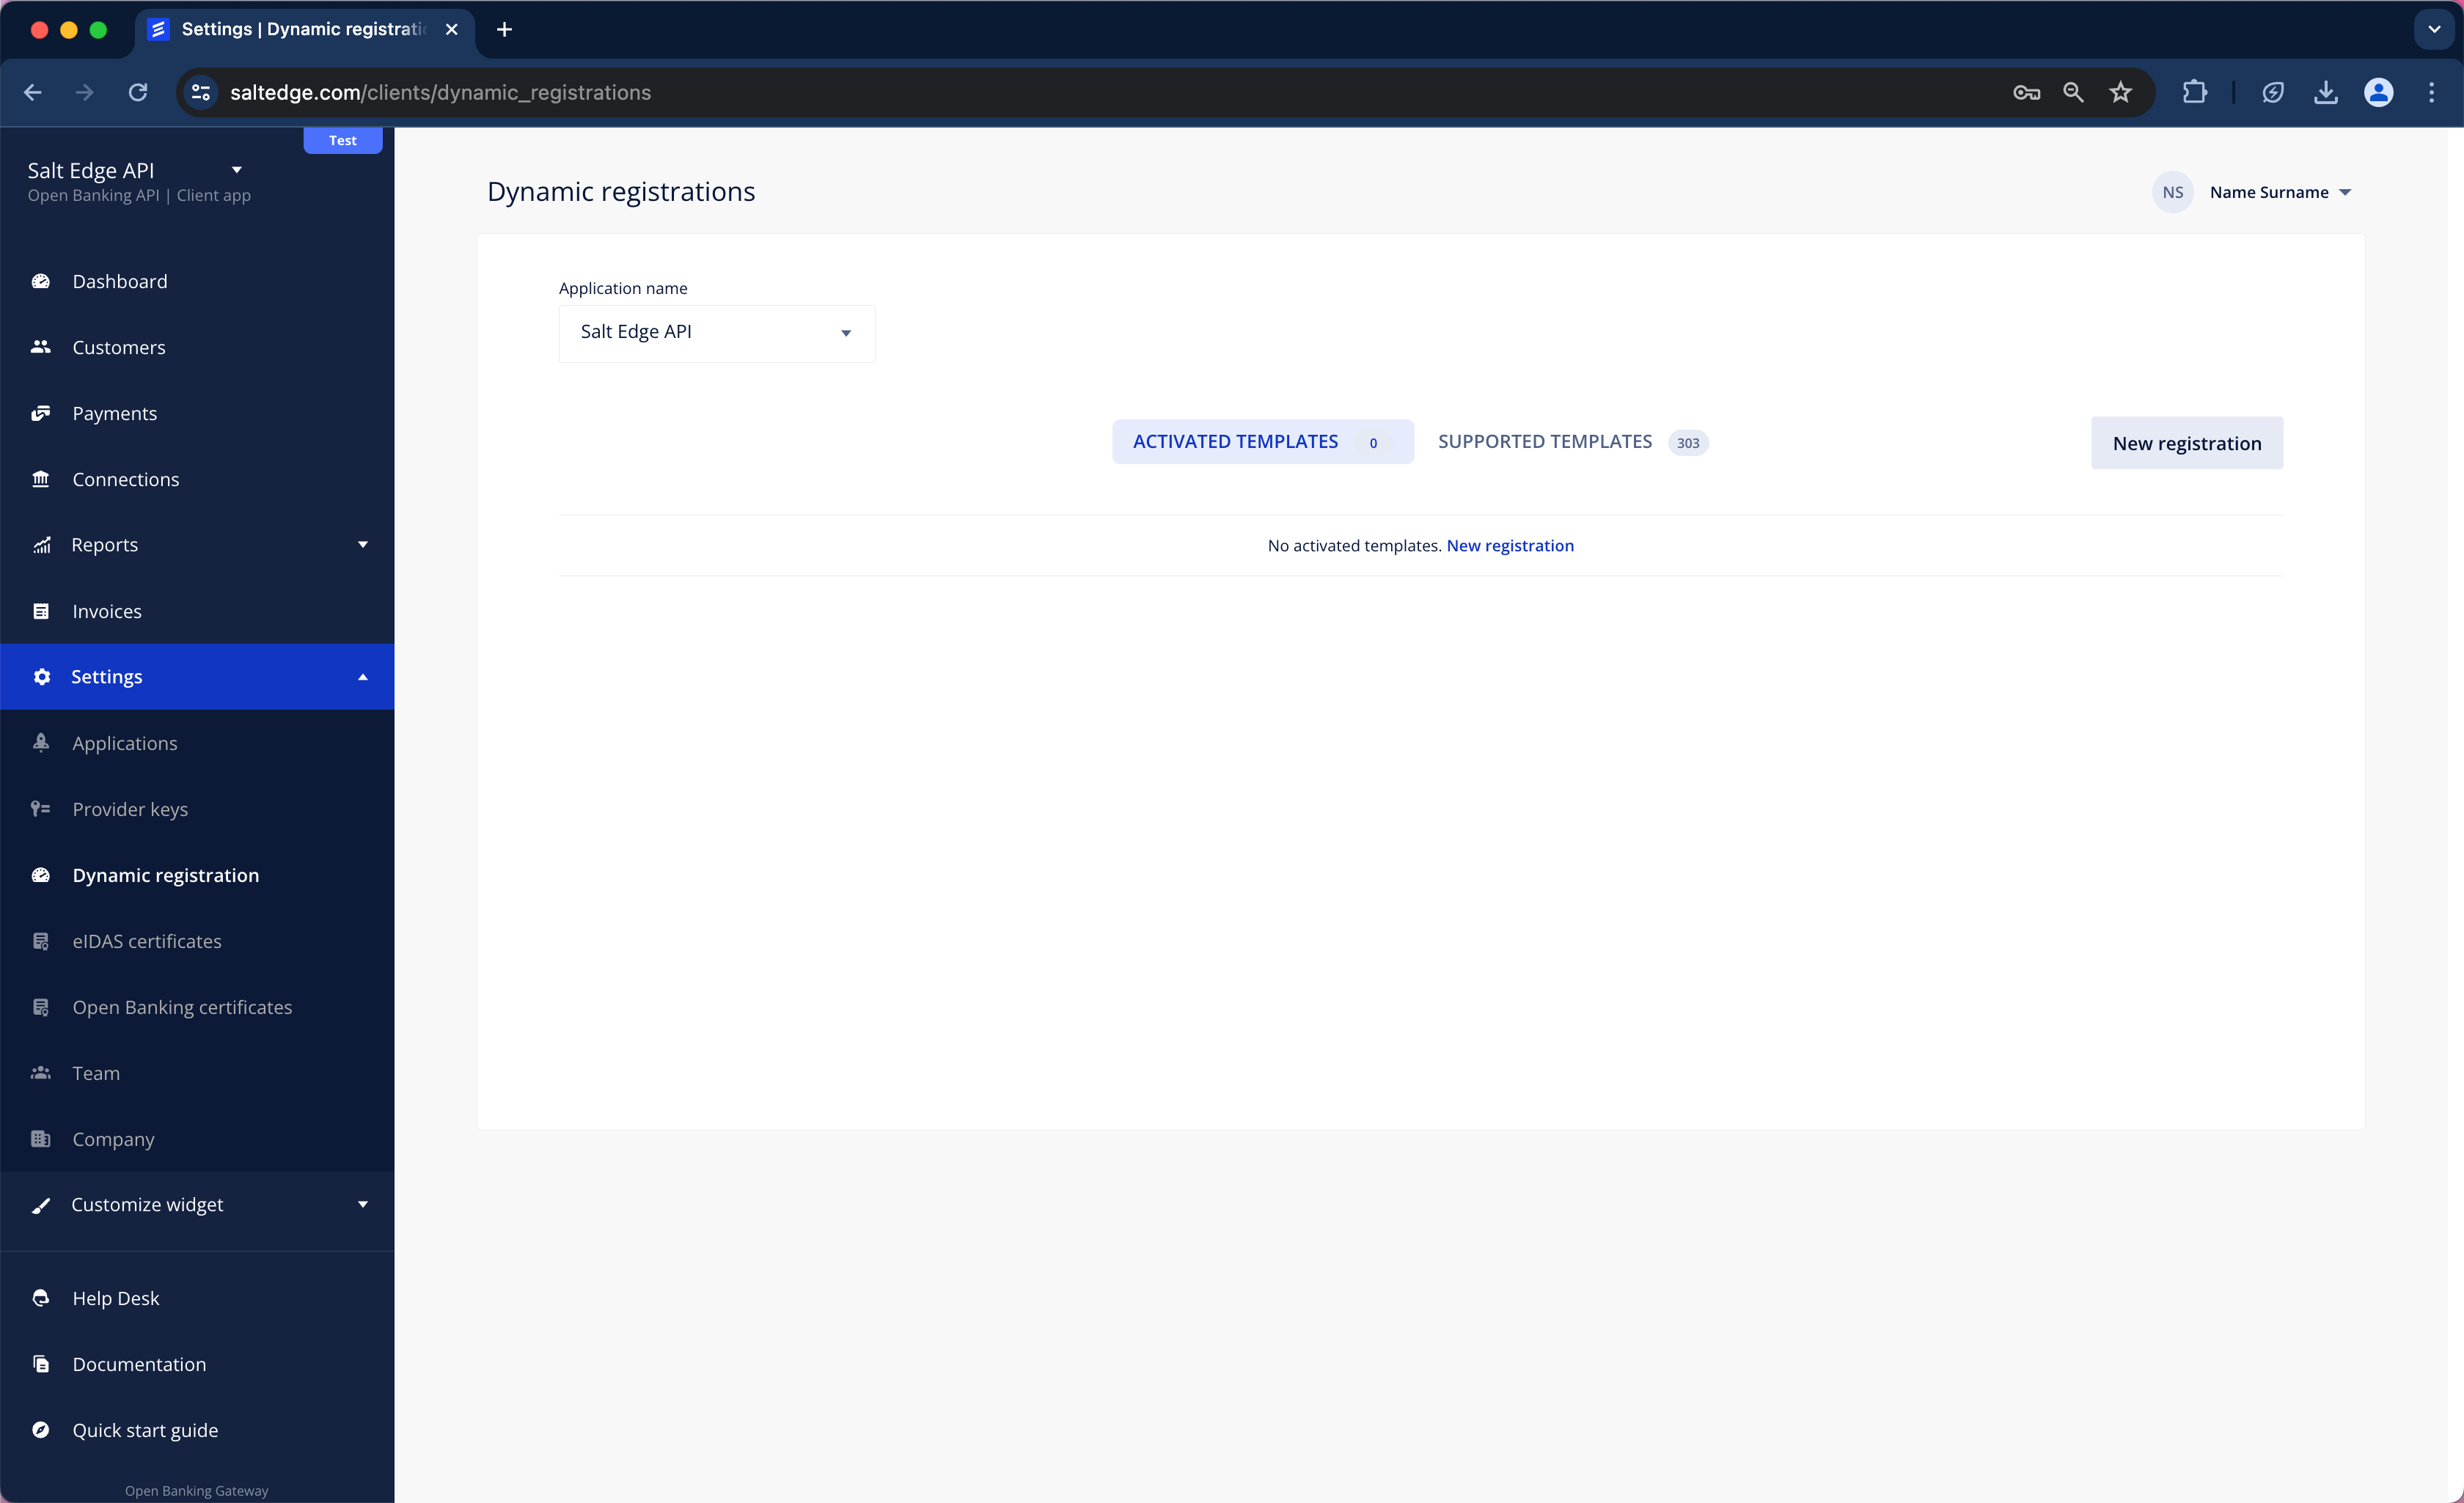
c. Click on New Registration and enter the desired bank/ Group name, then complete the form.

d. Consequently, a message indicating the status of Dynamic Registration will be received.

e. On the Provider Keys page, Activated Providers section all the Providers related to that Dynamic Registration will now be visible. It will also be observed that they are categorized as Dynamic Registration type.

Salt Edge supports the following types of dynamic registration:
1. Dynamic Registration that EXECUTES an API Request:
This is the foundational Dynamic Registration designed to interact with the bank's registration API. Currently, this Dynamic Registration is divided into three subtypes:
- A registration endpoint that creates a new Client and/ or Application on the Provider’s side.
- An API endpoint that updates the eIDAS certificates associated with an already registered TPP.
- A validation endpoint that solely verifies the validity of the eIDAS certificate.
2. Dynamic Registration that DOESN’T EXECUTE an API Request:
This type of Dynamic Registration does not involve any requests to be sent to the Provider. Its sole purpose is to assist Salt Edge’s Clients in adding multiple Client Provider keys simultaneously without the need for manual intervention.
For instance, the Dynamic Registration CBI Globe adds the Client Provider keys to 300+ Providers, eliminating the need for Salt Edge’s Clients to do it manually for each Provider separately.
Every Dynamic Registration template contains instructions that provide more details about its purpose and outline any additional steps that must be taken.

Any Dynamic Registration attempt will result in one of the following:
Successful Registration:
A pop-up window with a confirmation message will be displayed. The Client should save the displayed result for future reference and use.

The Client Provider Keys will be automatically added to all the associated Providers.
Success
Sometimes, Clients may be required to perform additional steps after a successful registration. All additional information will be displayed in the pop-up window or in the initial instructions.
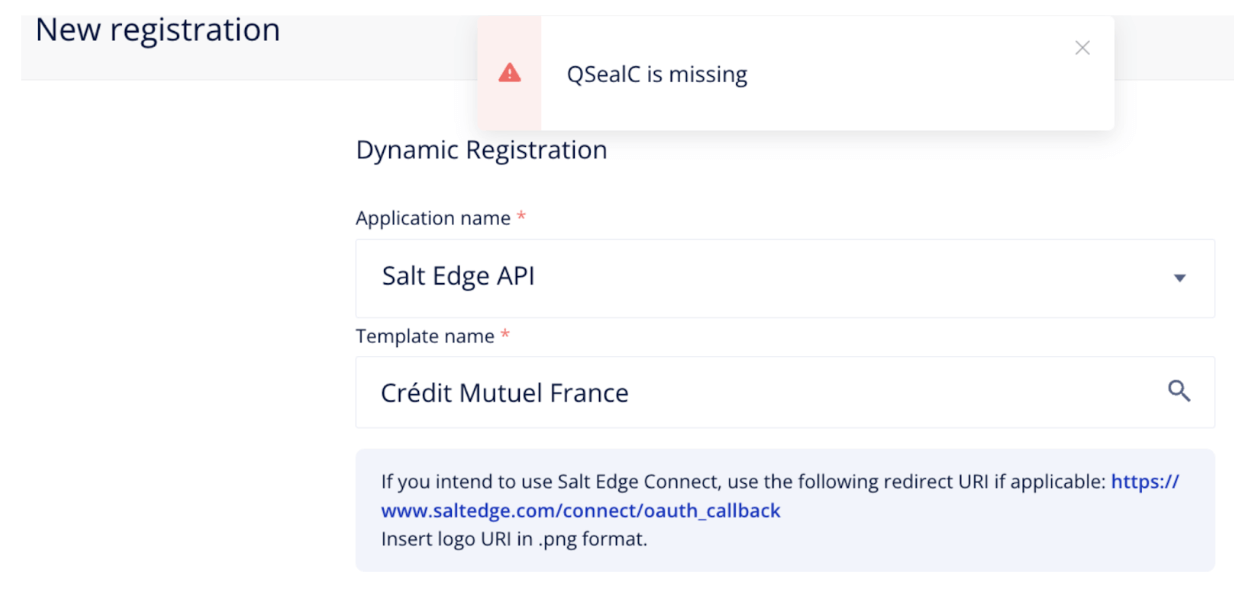
Failed Registration:
A pop-up window with the error details will be displayed.
If the error was raised by the bank and Salt Edge hasn’t handled this error yet, the pop-up window will also contain the date of the request and the response Salt Edge received from the bank.
Depending on the nature of the error, Salt Edge’s clients will have to:
- Adjust some of the information they input in the required Dynamic Registration fields.
- Address the issue with their Salt Edge representative.
- Contact the bank directly to report the problem.
Most Common Dynamic Registration errors:
- Validation of Certificates Failed, possible error messages:
- Validation of QWAC failed
- Validation of QSealC failed
- Check on EBA register failed
The bank didn’t accept the TPP’s eIDAS certificates, or the EBA register check has failed. Hence, the TPP should contact and ask the Provider to add their certificate to the Provider’s trust store. If this is not the case, the bank will investigate why the certificates were not accepted.
- TPP Already Registered, possible error messages:
- TPP Application was already registered
- Organization already exists
The TPP is already registered in the Provider’s system, either through a manual process or via Salt Edge. Therefore, the TPP should contact the Provider to clarify how to solve the encountered problem. The solution can differ depending on the bank.
AIS
The easiest path of integrating with the AIS API will be demonstrated in this quick start guide.
Get invitationPartner
Request an invitation to experience the Partner Program integration through the "Contact Us" section or reach out to our Sales Team.
Create an Account
a. Once the Partner has received an invitation to visit the Sign-Up page, they will be required to generate a secure password to confirm the creation of their Partner Account.
b. For Clients, just enter all the required information and create an Account on the exact Sign-Up page.
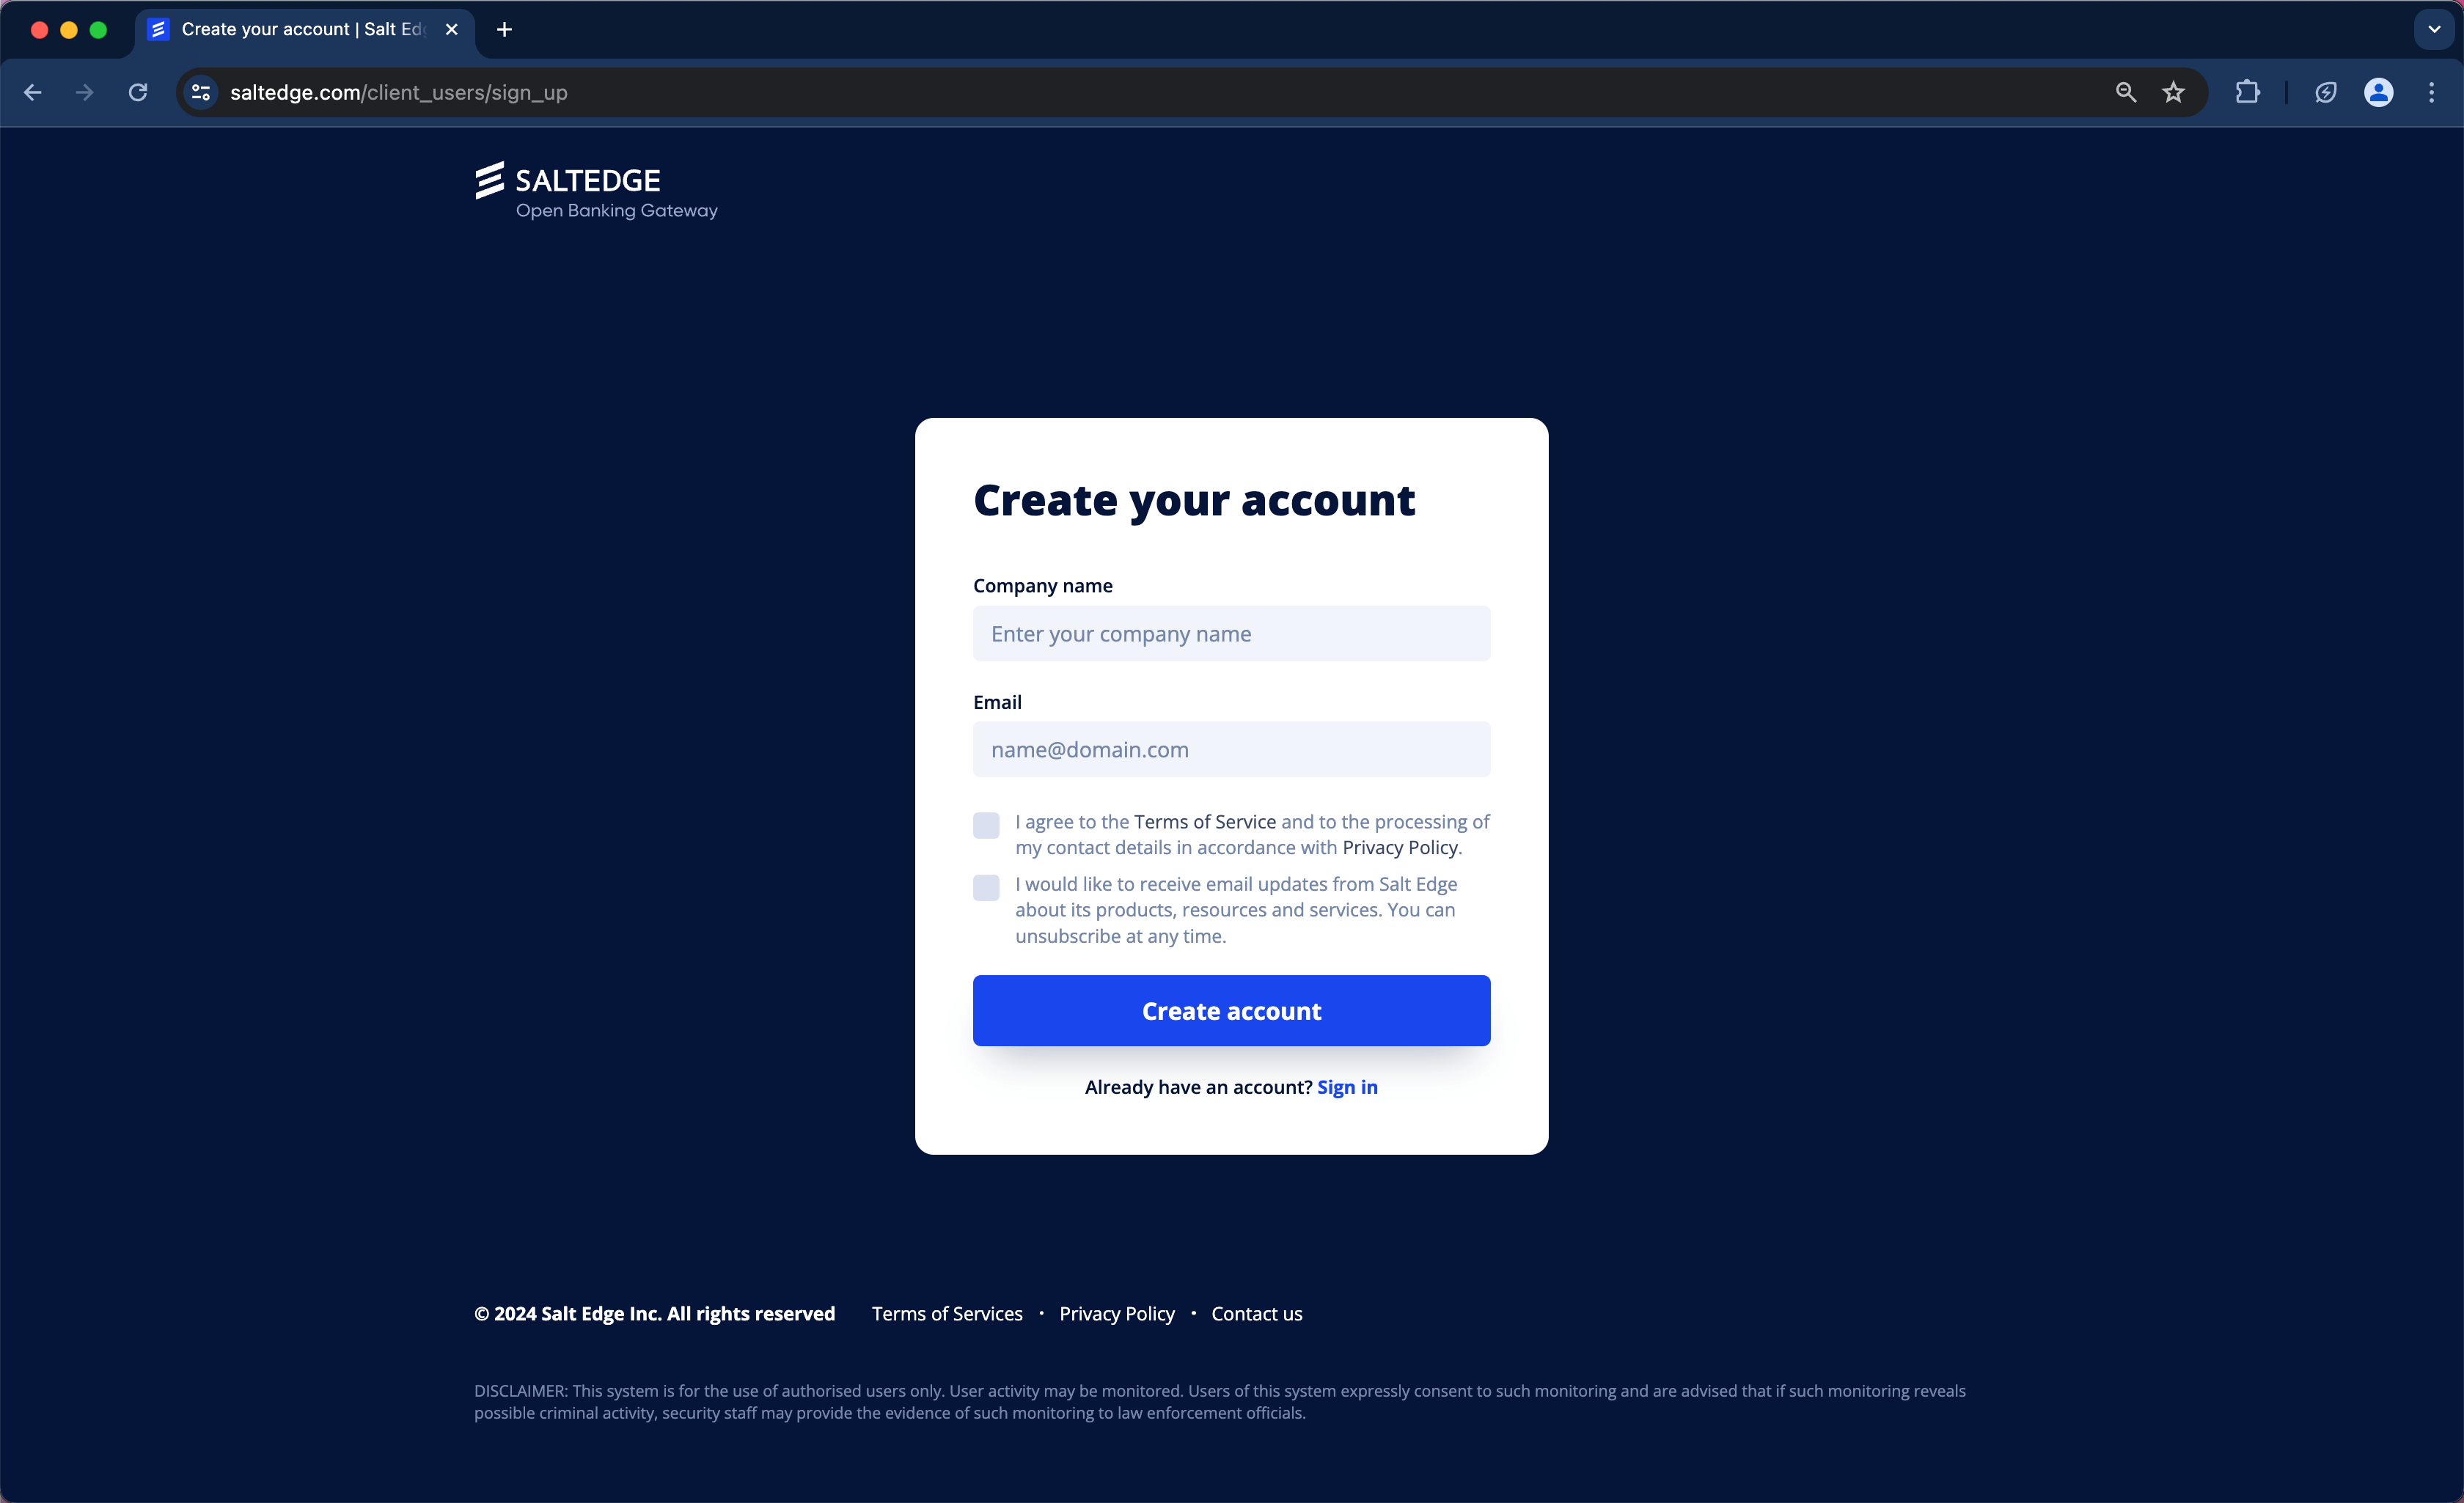
c. Confirm your e-mail.
d. Include the Technical Team members who will be involved in the next integration steps on the Team page and assign specific roles to them.
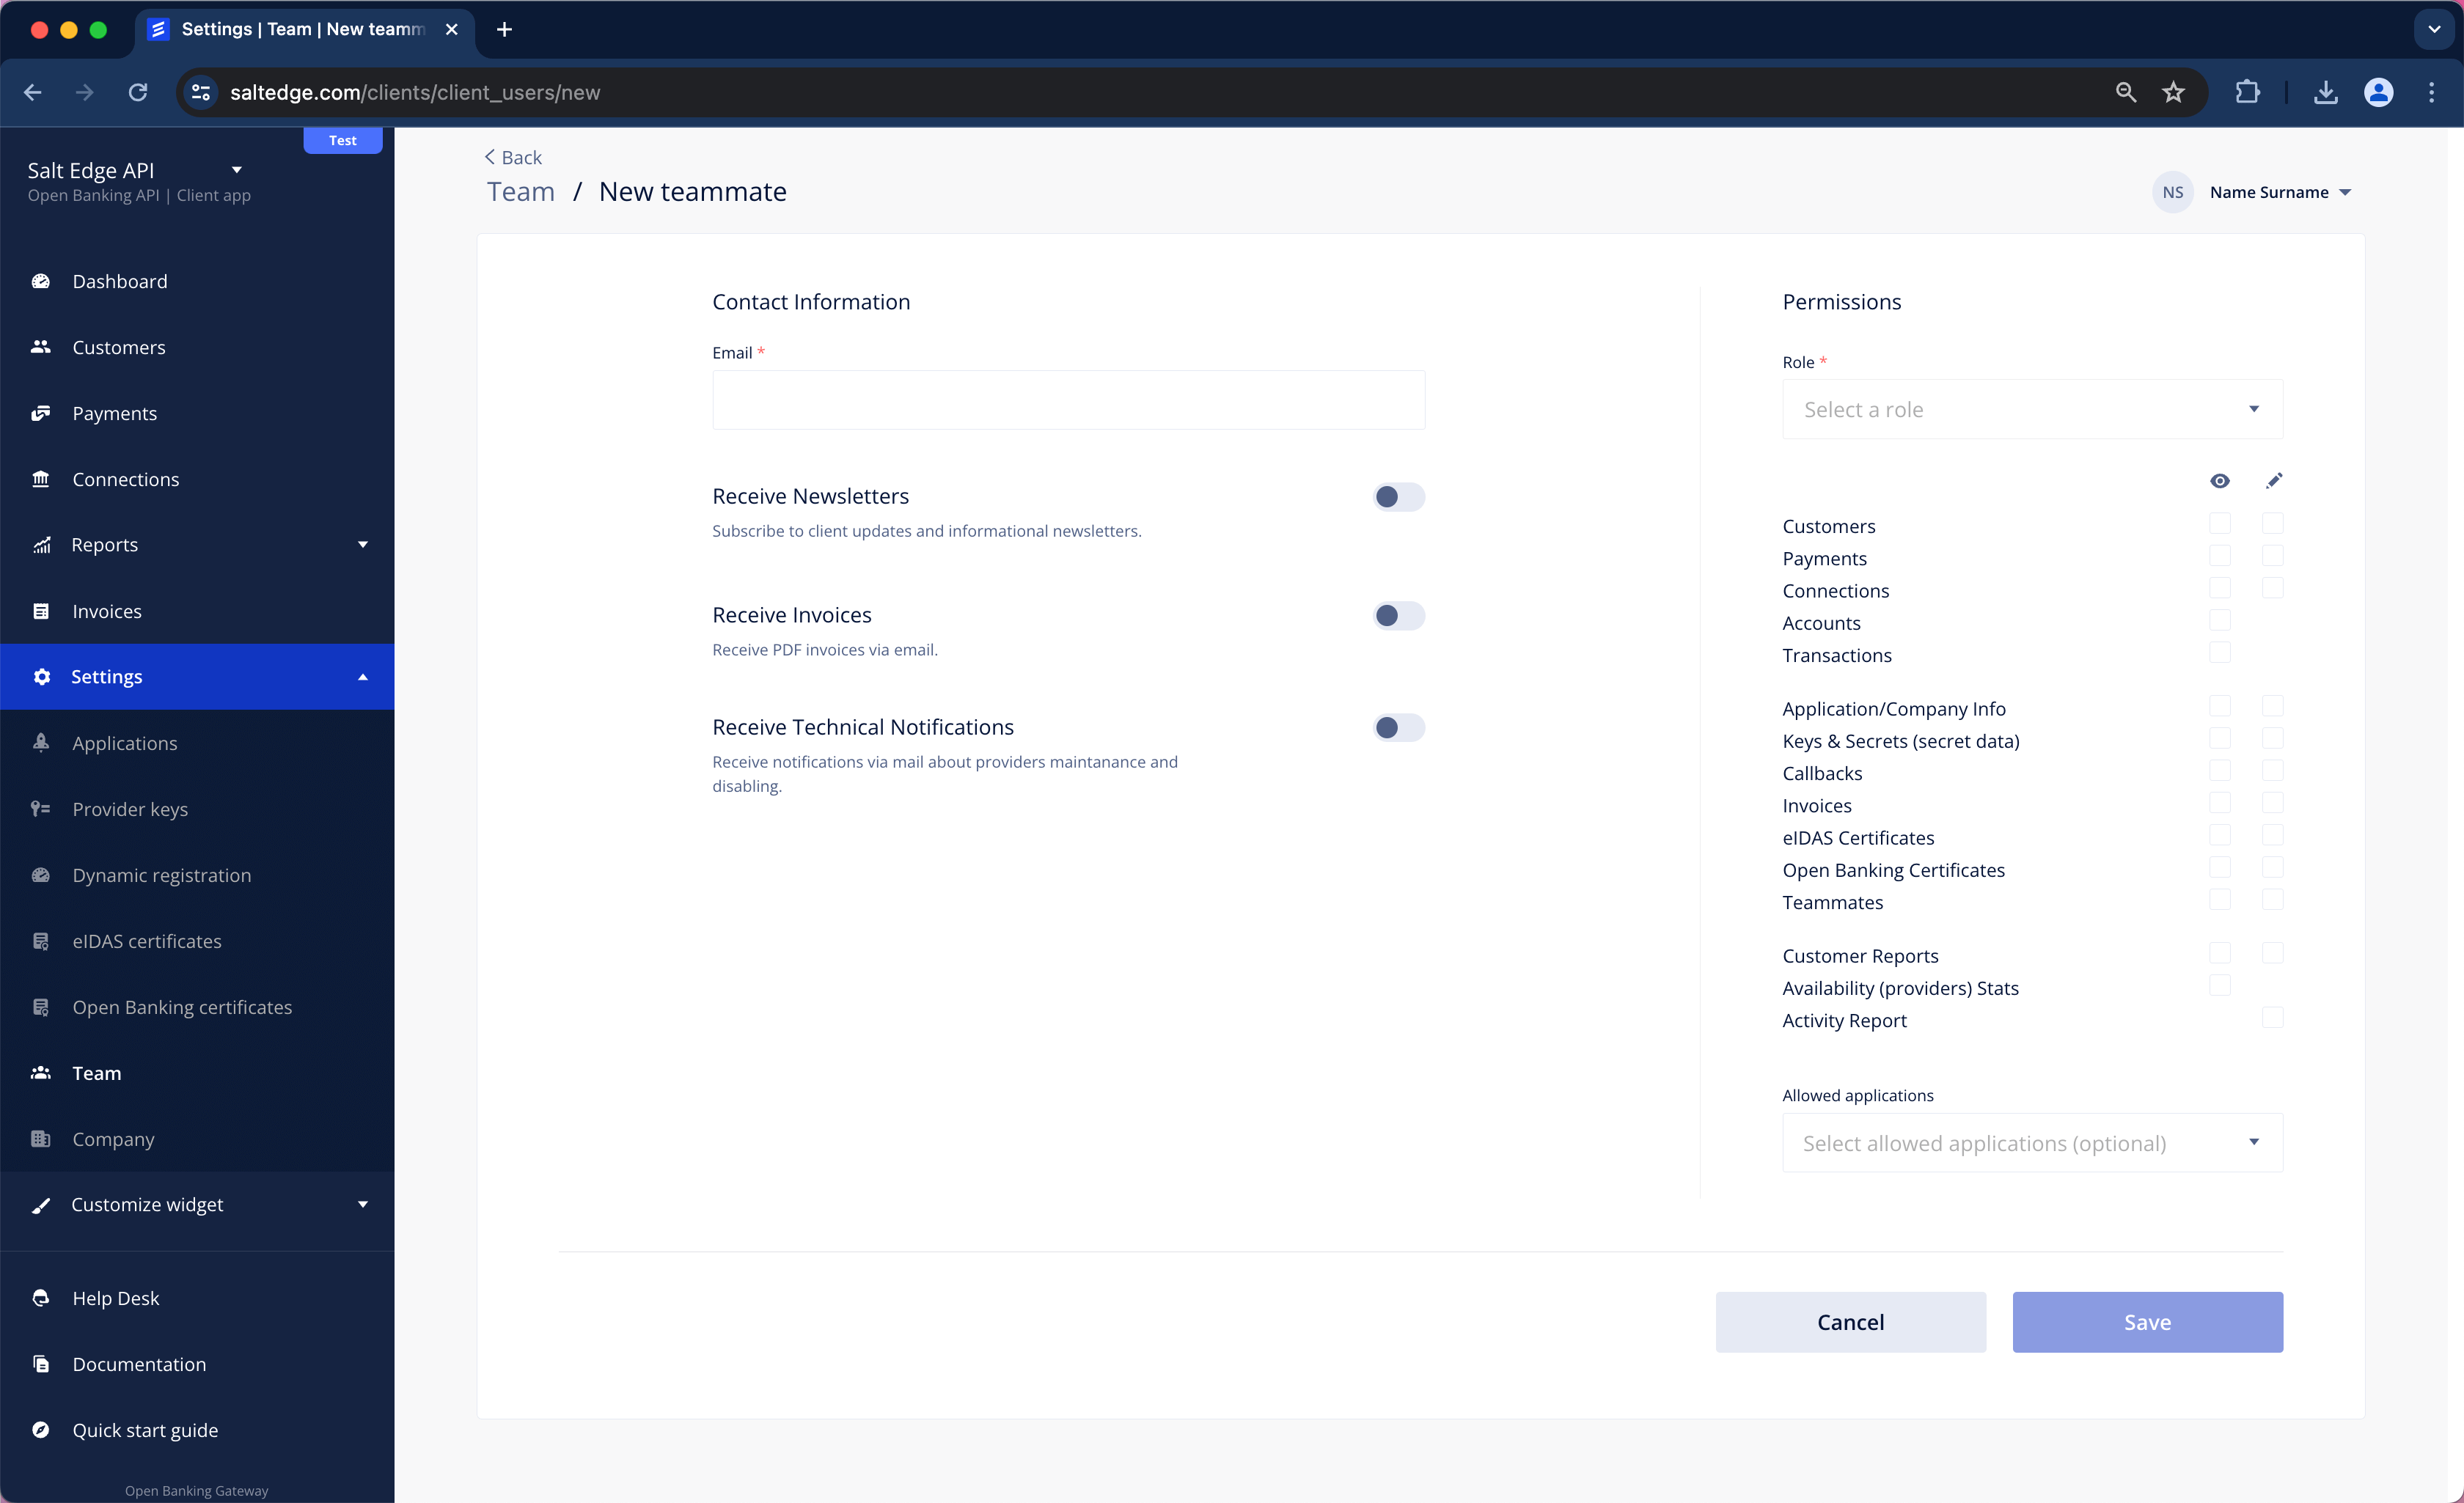
Create API keys
Any request to the Account Information API is authenticated, so before any data can be fetched, API keys need to be created.
To accomplish this, Applications page should be visited first.
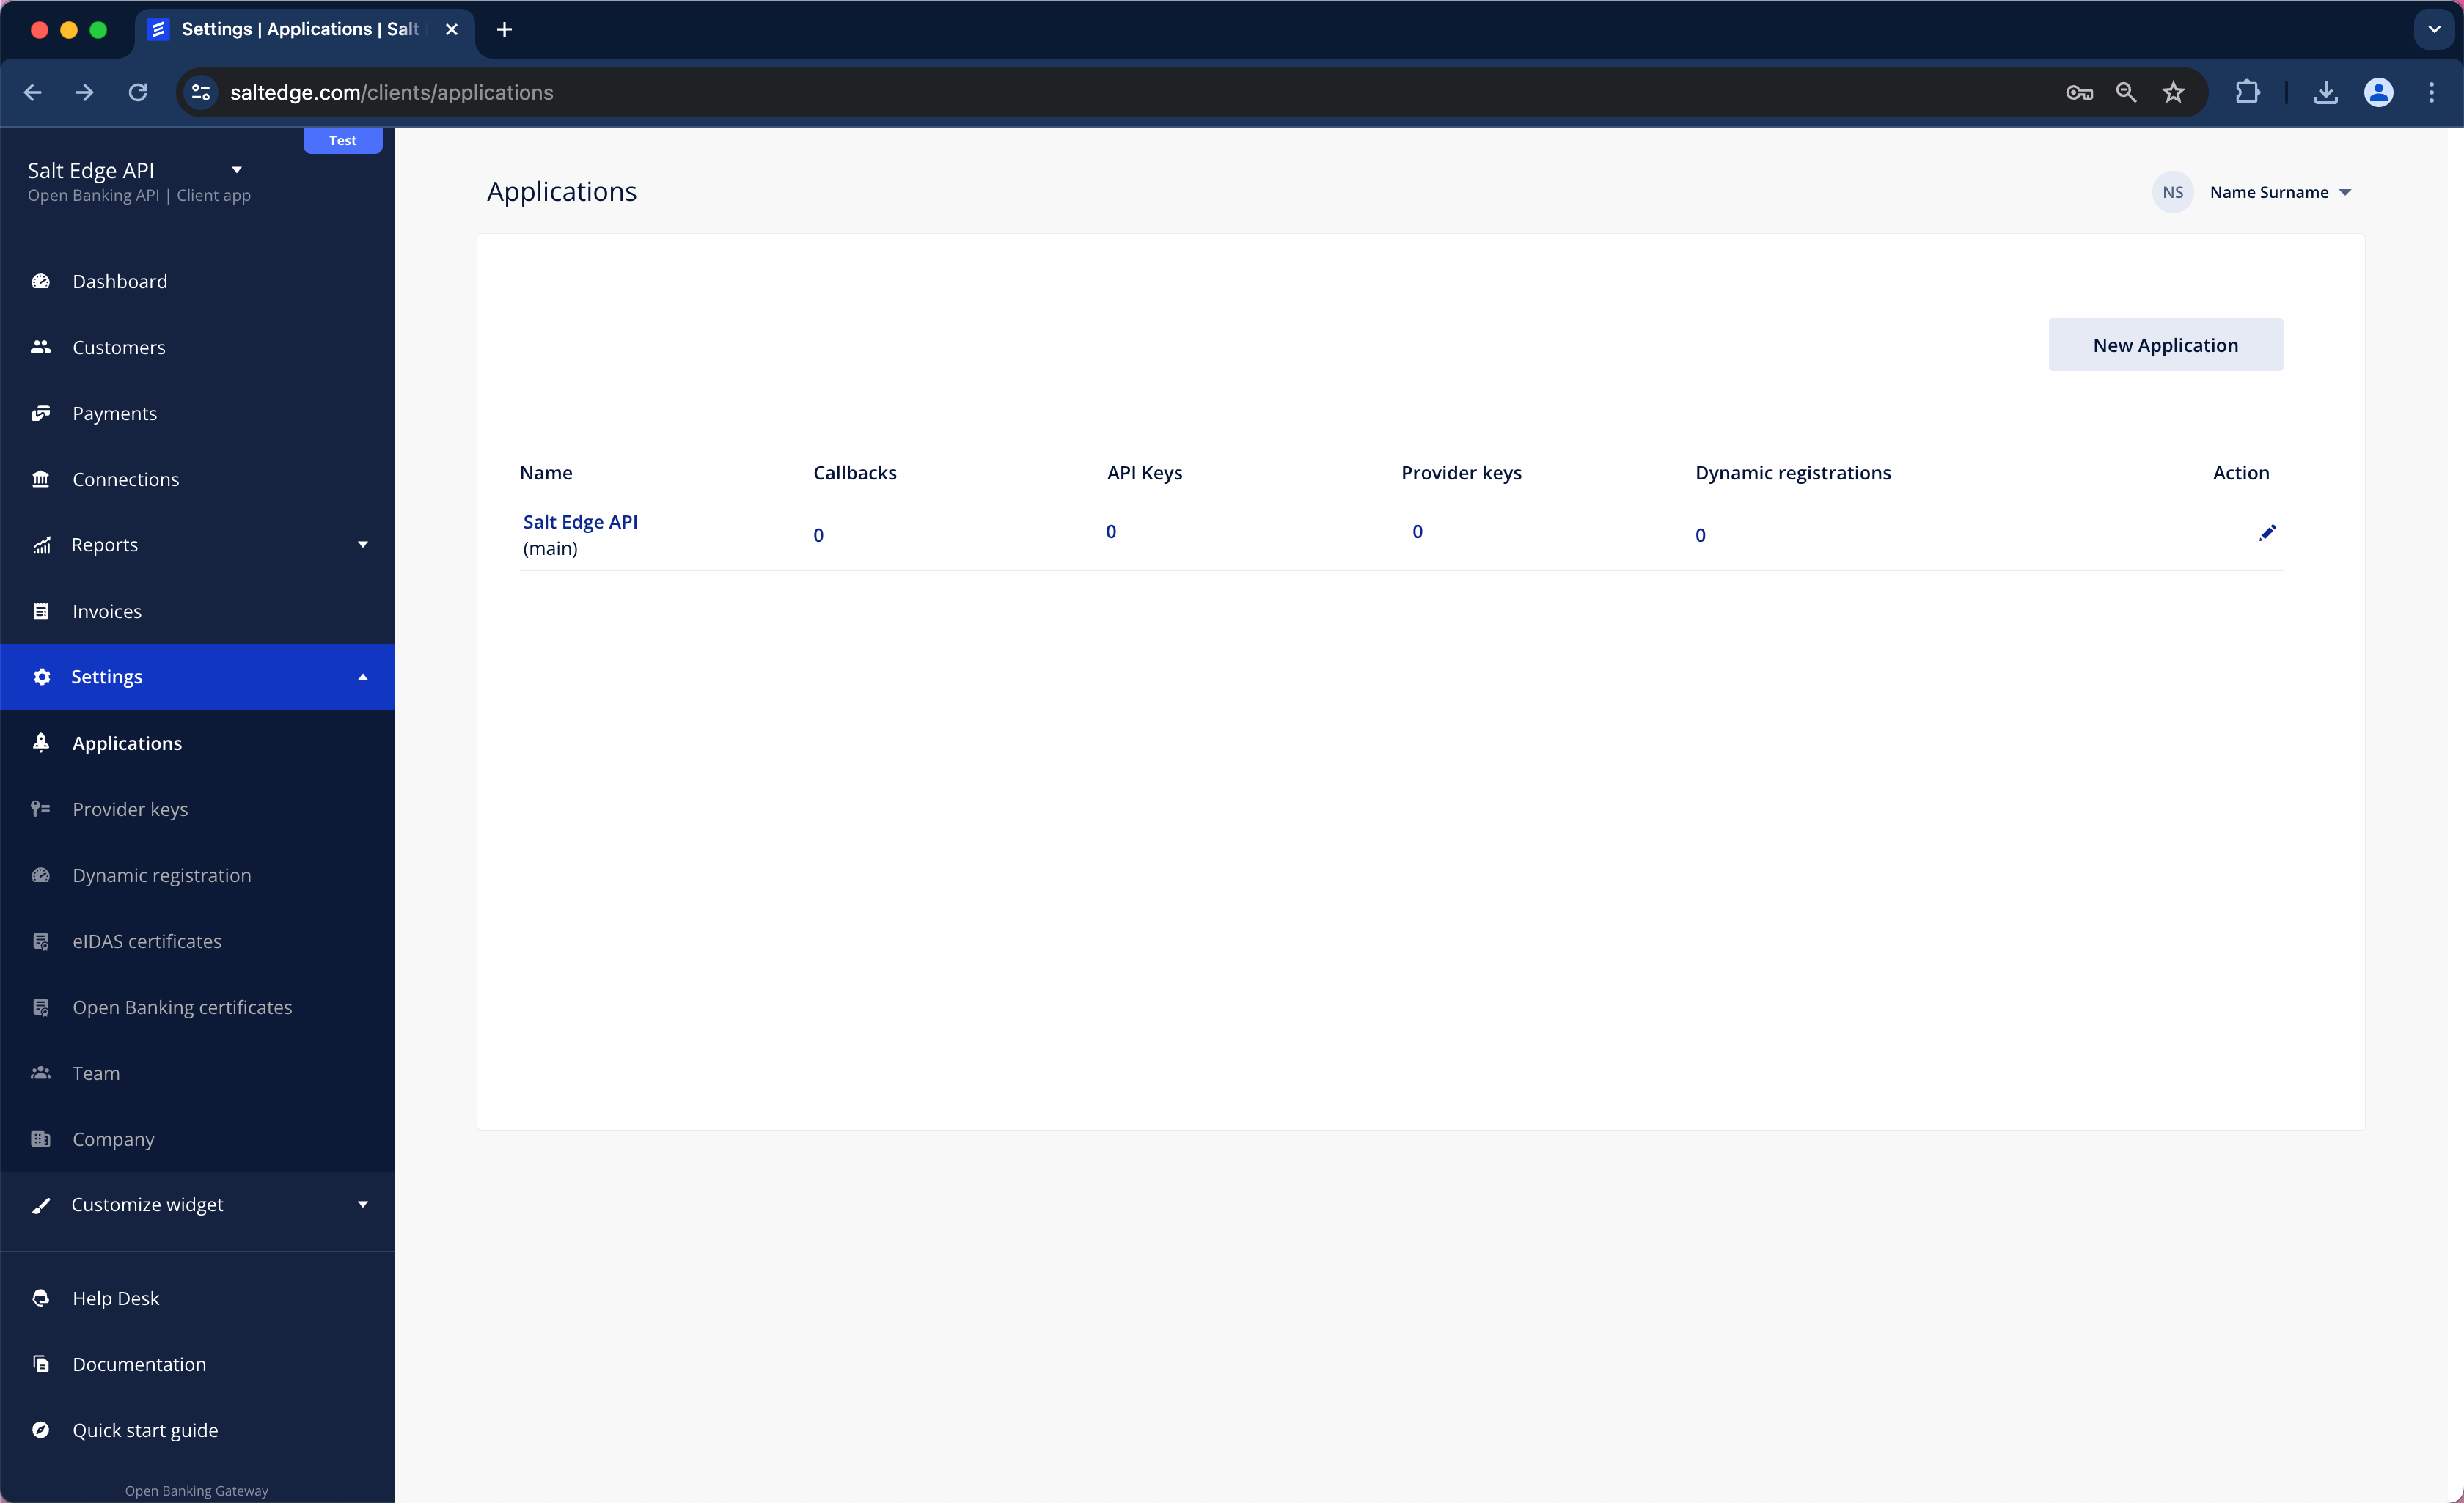
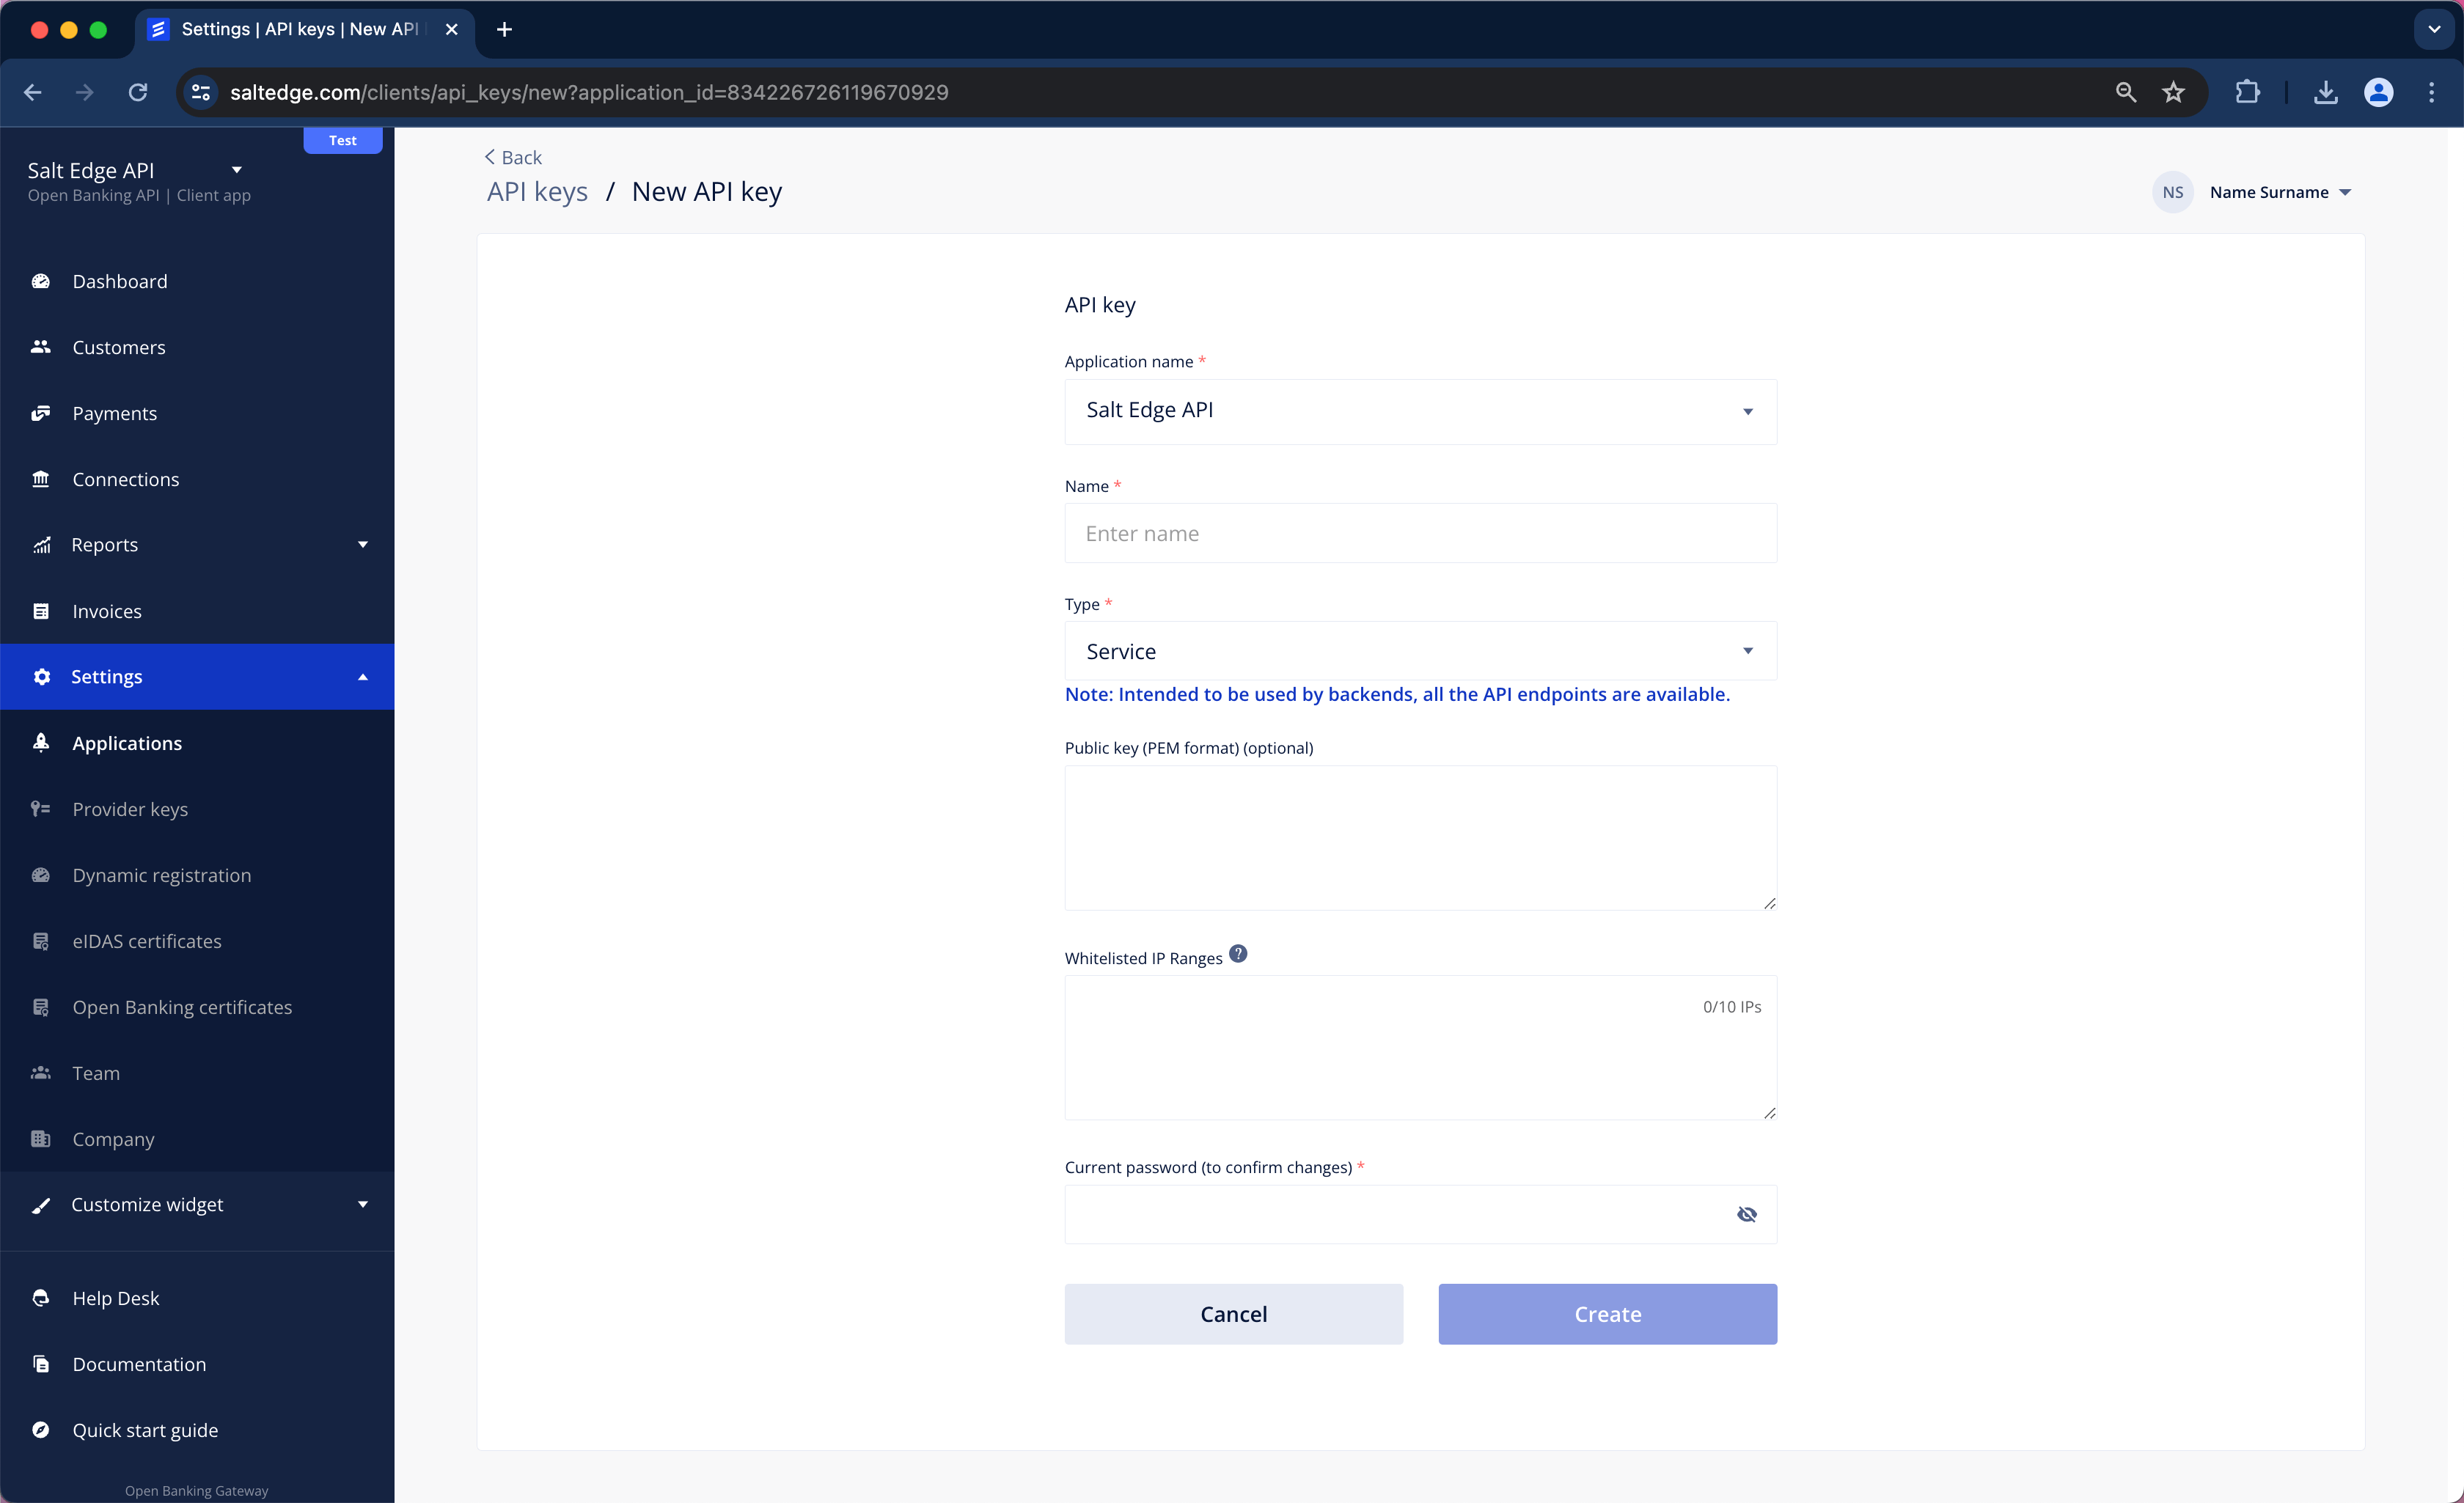
The “Public key” field can be left blank, but it becomes mandatory once the Client goes Live.
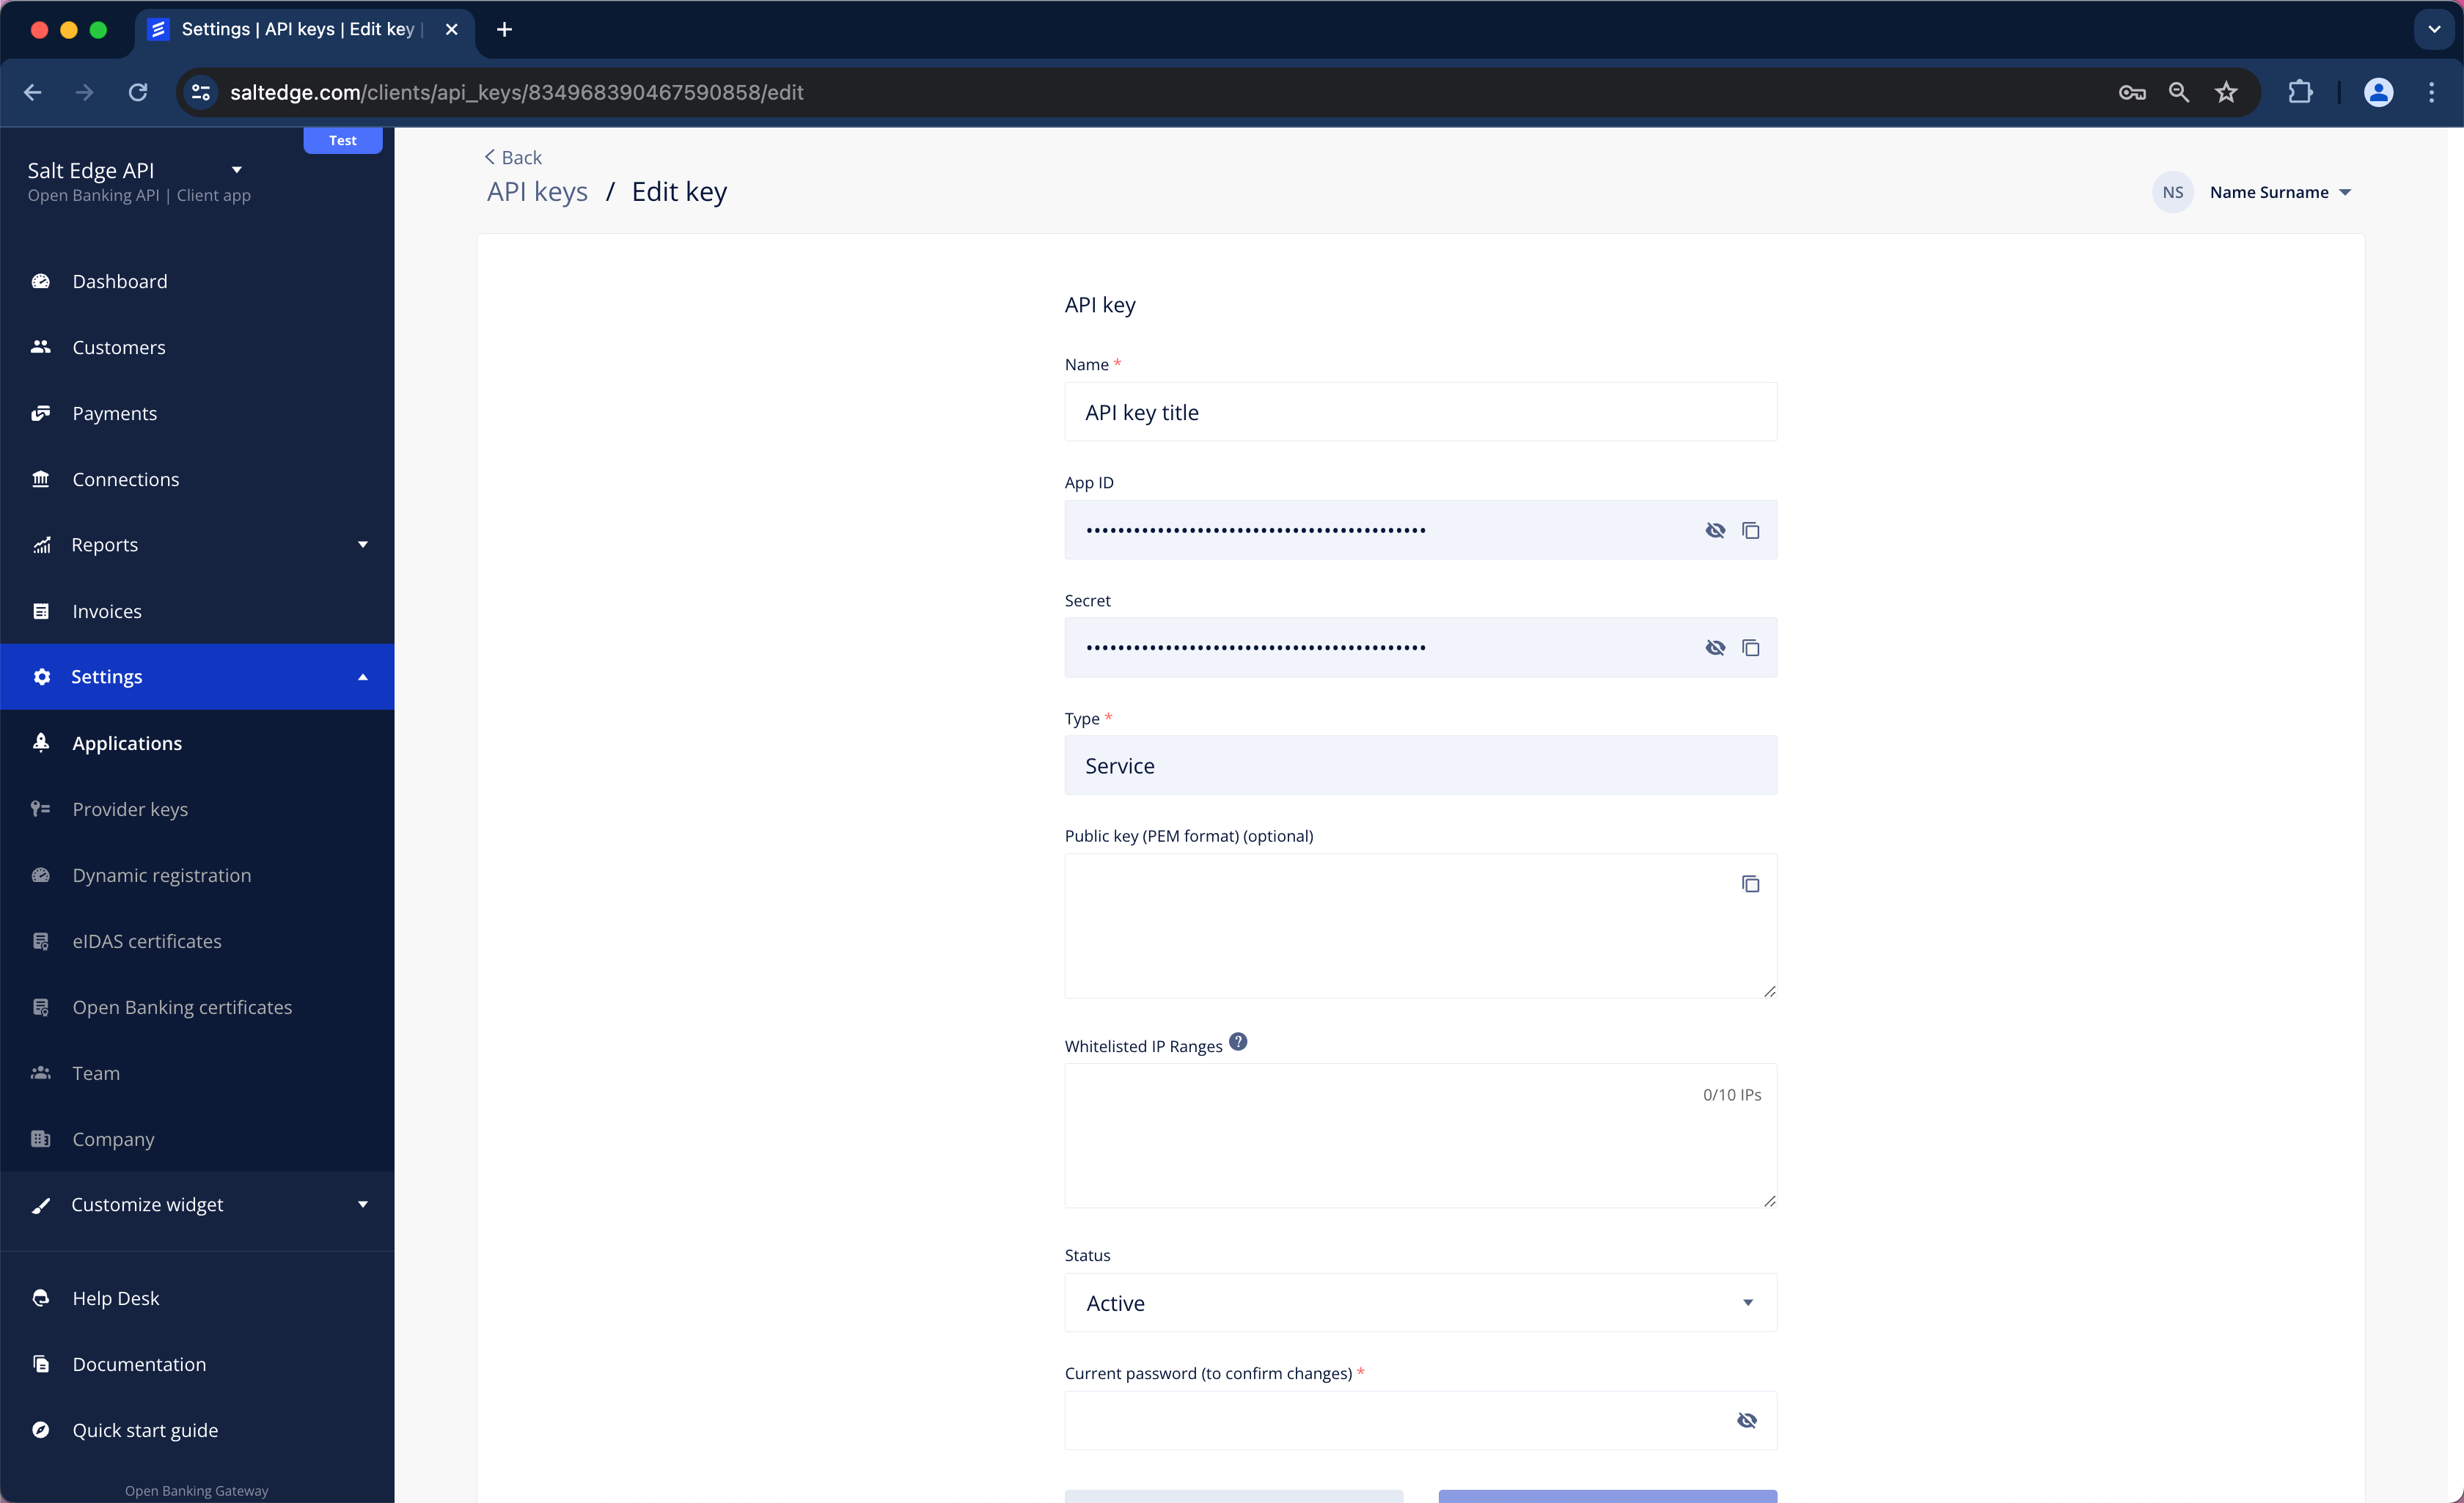
Each API request is authenticated using an App-id and a Secret. They should be stored as environment variables so that all subsequent requests are authenticated.
  $ export APP_ID=YOUR_APP_ID
  $ export SECRET=YOUR_APP_SECRET
Begin testing different Connection types by using Fake and Sandbox Providers to ensure that the application can handle any scenario that might occur with a real data Provider.
Try in Postman
a. Postman can be installed by visiting https://www.getpostman.com/apps.
b. The Postman collection can be imported by clicking the button below.
Run in Postmanc. The inclusion of APP_ID and SECRET headers is required for the Authentication of Clients no matter the API. If an API key has not been created yet, assistance can be sought from the Quick Start guide for the creation process. Once the API key is generated, its secrets can be added to Postman.
The selection of the "Add" option next to "Environments" should be made by clicking on the eye icon in the top right corner.
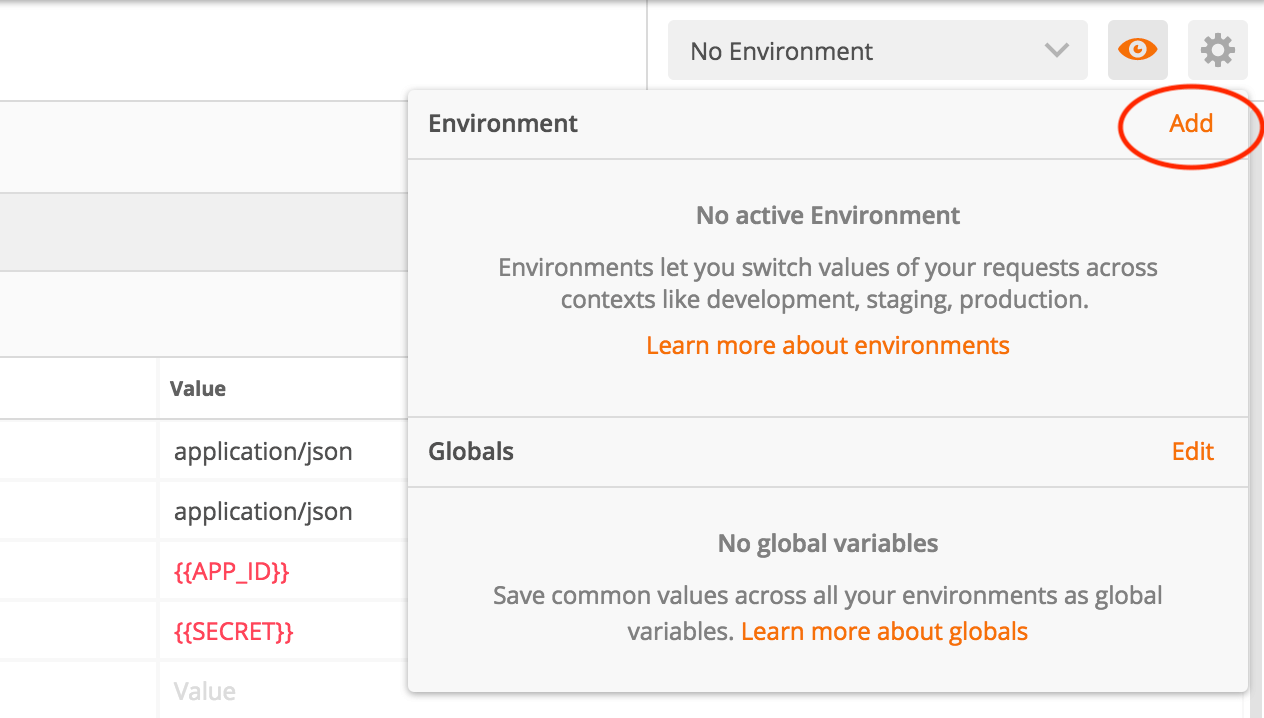
Variables APP_ID and SECRET should be defined with values from the key that was generated at https://www.saltedge.com/clients/profile/secrets and then the Environment should be added.
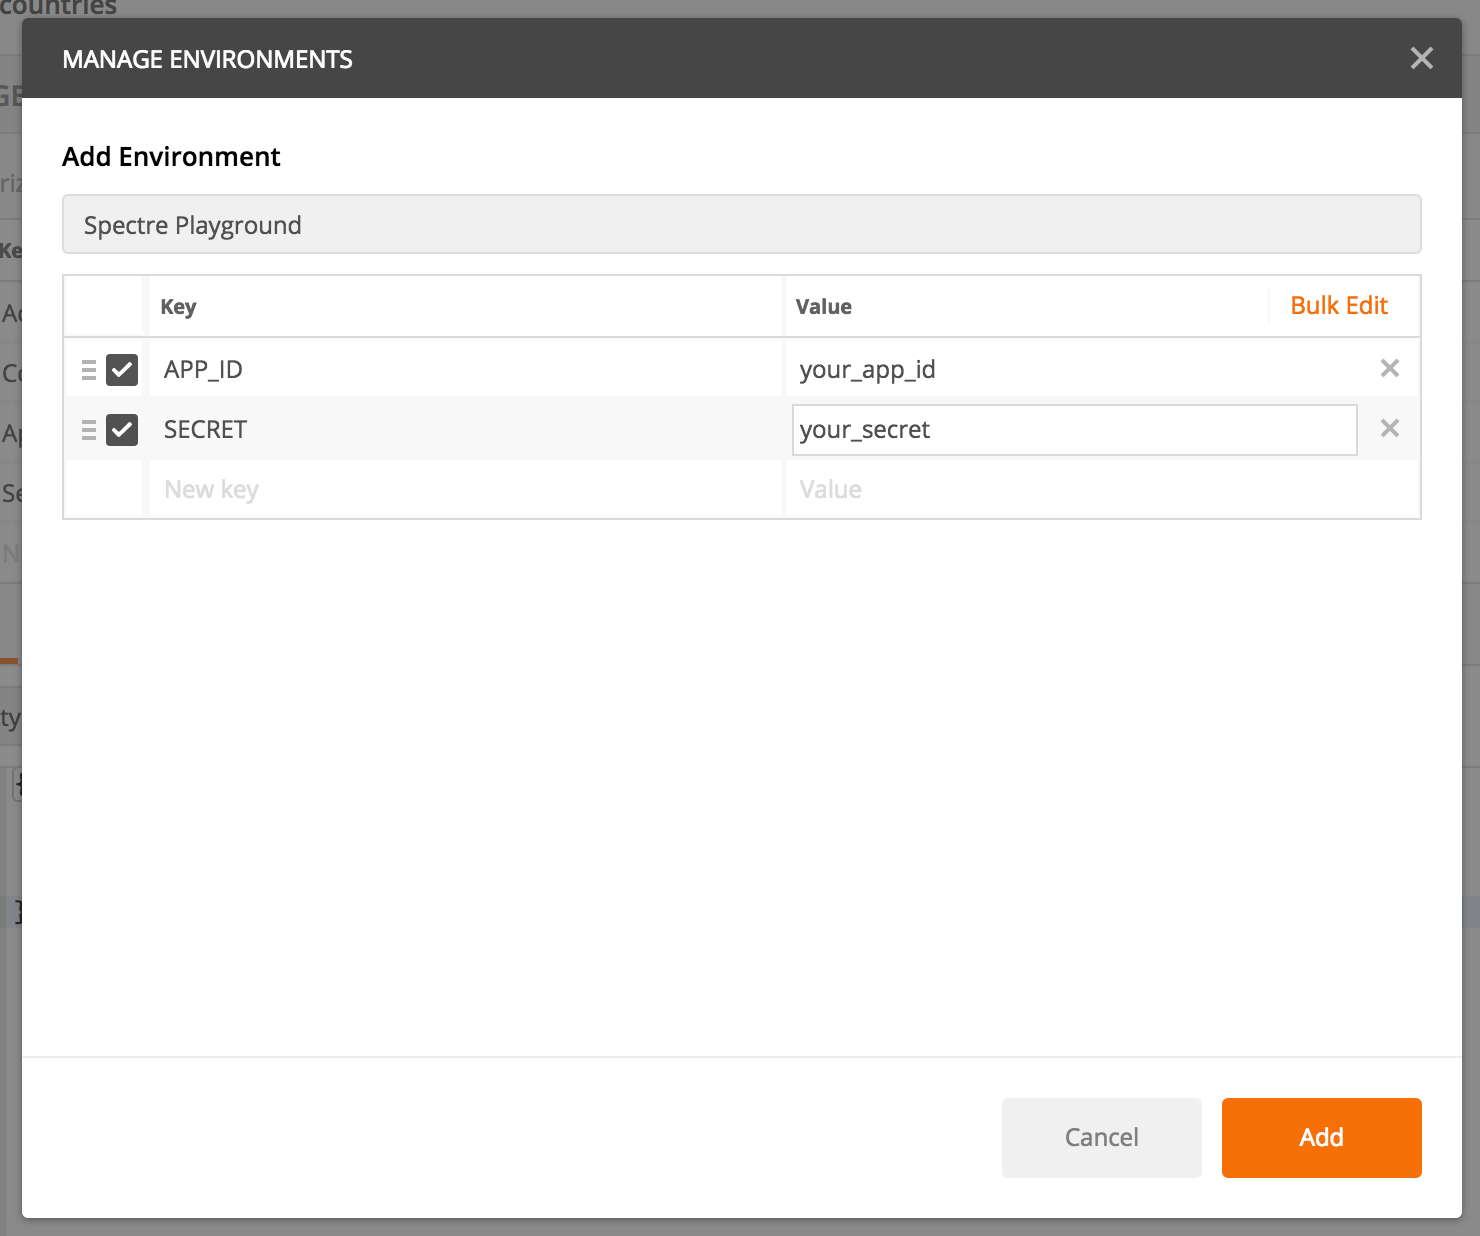
Once added, it can be selected in the top right corner, and all the requests to the API will be authenticated using the Client’s API key.
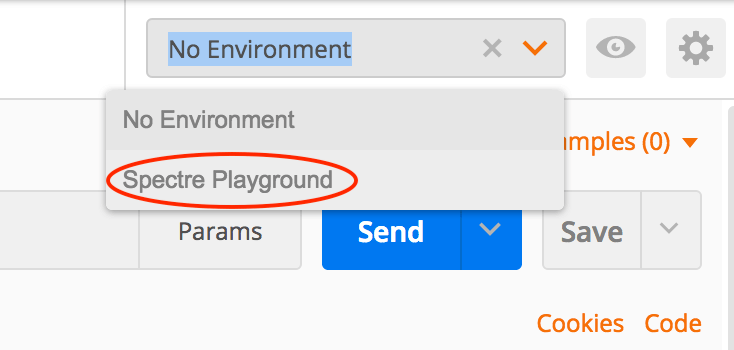
Try in Swagger
Swagger JSON should be imported by clicking the button below.
Create a Customer
Salt Edge provides a Postman and Swagger collection for testing the API. Please refer to the previous section for guidance. Upon successfully completing the preceding steps, the endpoints can be tested.
Before any Connections can be established using the Account Information API, a Customer must first be created via an API testing tool, such as Postman or using cURL.
A Customer refers to the end-user of the application.
It is essential to store the customer_id (in this case, "222222222222222222") as we shall use it later to establish Connections.
$ export CUSTOMER_ID=222222222222222222
Please refer to the Customers' documentation for API endpoints.
Create a Connection
At this stage, for generating a Connection and testing the flow, the Connection API request must be selected and click “Send”. This action will initiate an API request, and a response will be returned.
Additional information on this endpoint is available in our API Reference. The Errors section should also be consulted.
Note
Only Fake Banks & Sandboxes can be tested in Pending and Test status.
Please refer here for more details.
Once the customer_id is obtained (in this case, ID "222222222222222222"), a Connection can be created.
For creating Connections in the Account Information API Salt Edge Connect can be used, where the interface is already implemented in a fast and secure manner.
To initiate a Connection in Salt Edge Connect, a request needs to be executed to the Connections/ Connect endpoint.
A connect_url will be received in response. This URL is the one that will be visited to establish the Connection.
For more information and API endpoints related to Salt Edge Connect, refer to the Connections section documentation.
Visit the Widget
Initially, access to Fake Providers is granted to all Clients registered with the Account Information API. Connection will be established by one of them. The connect_url from the previous API response should be visited, and fake_oauth_client_xf should be searched for.

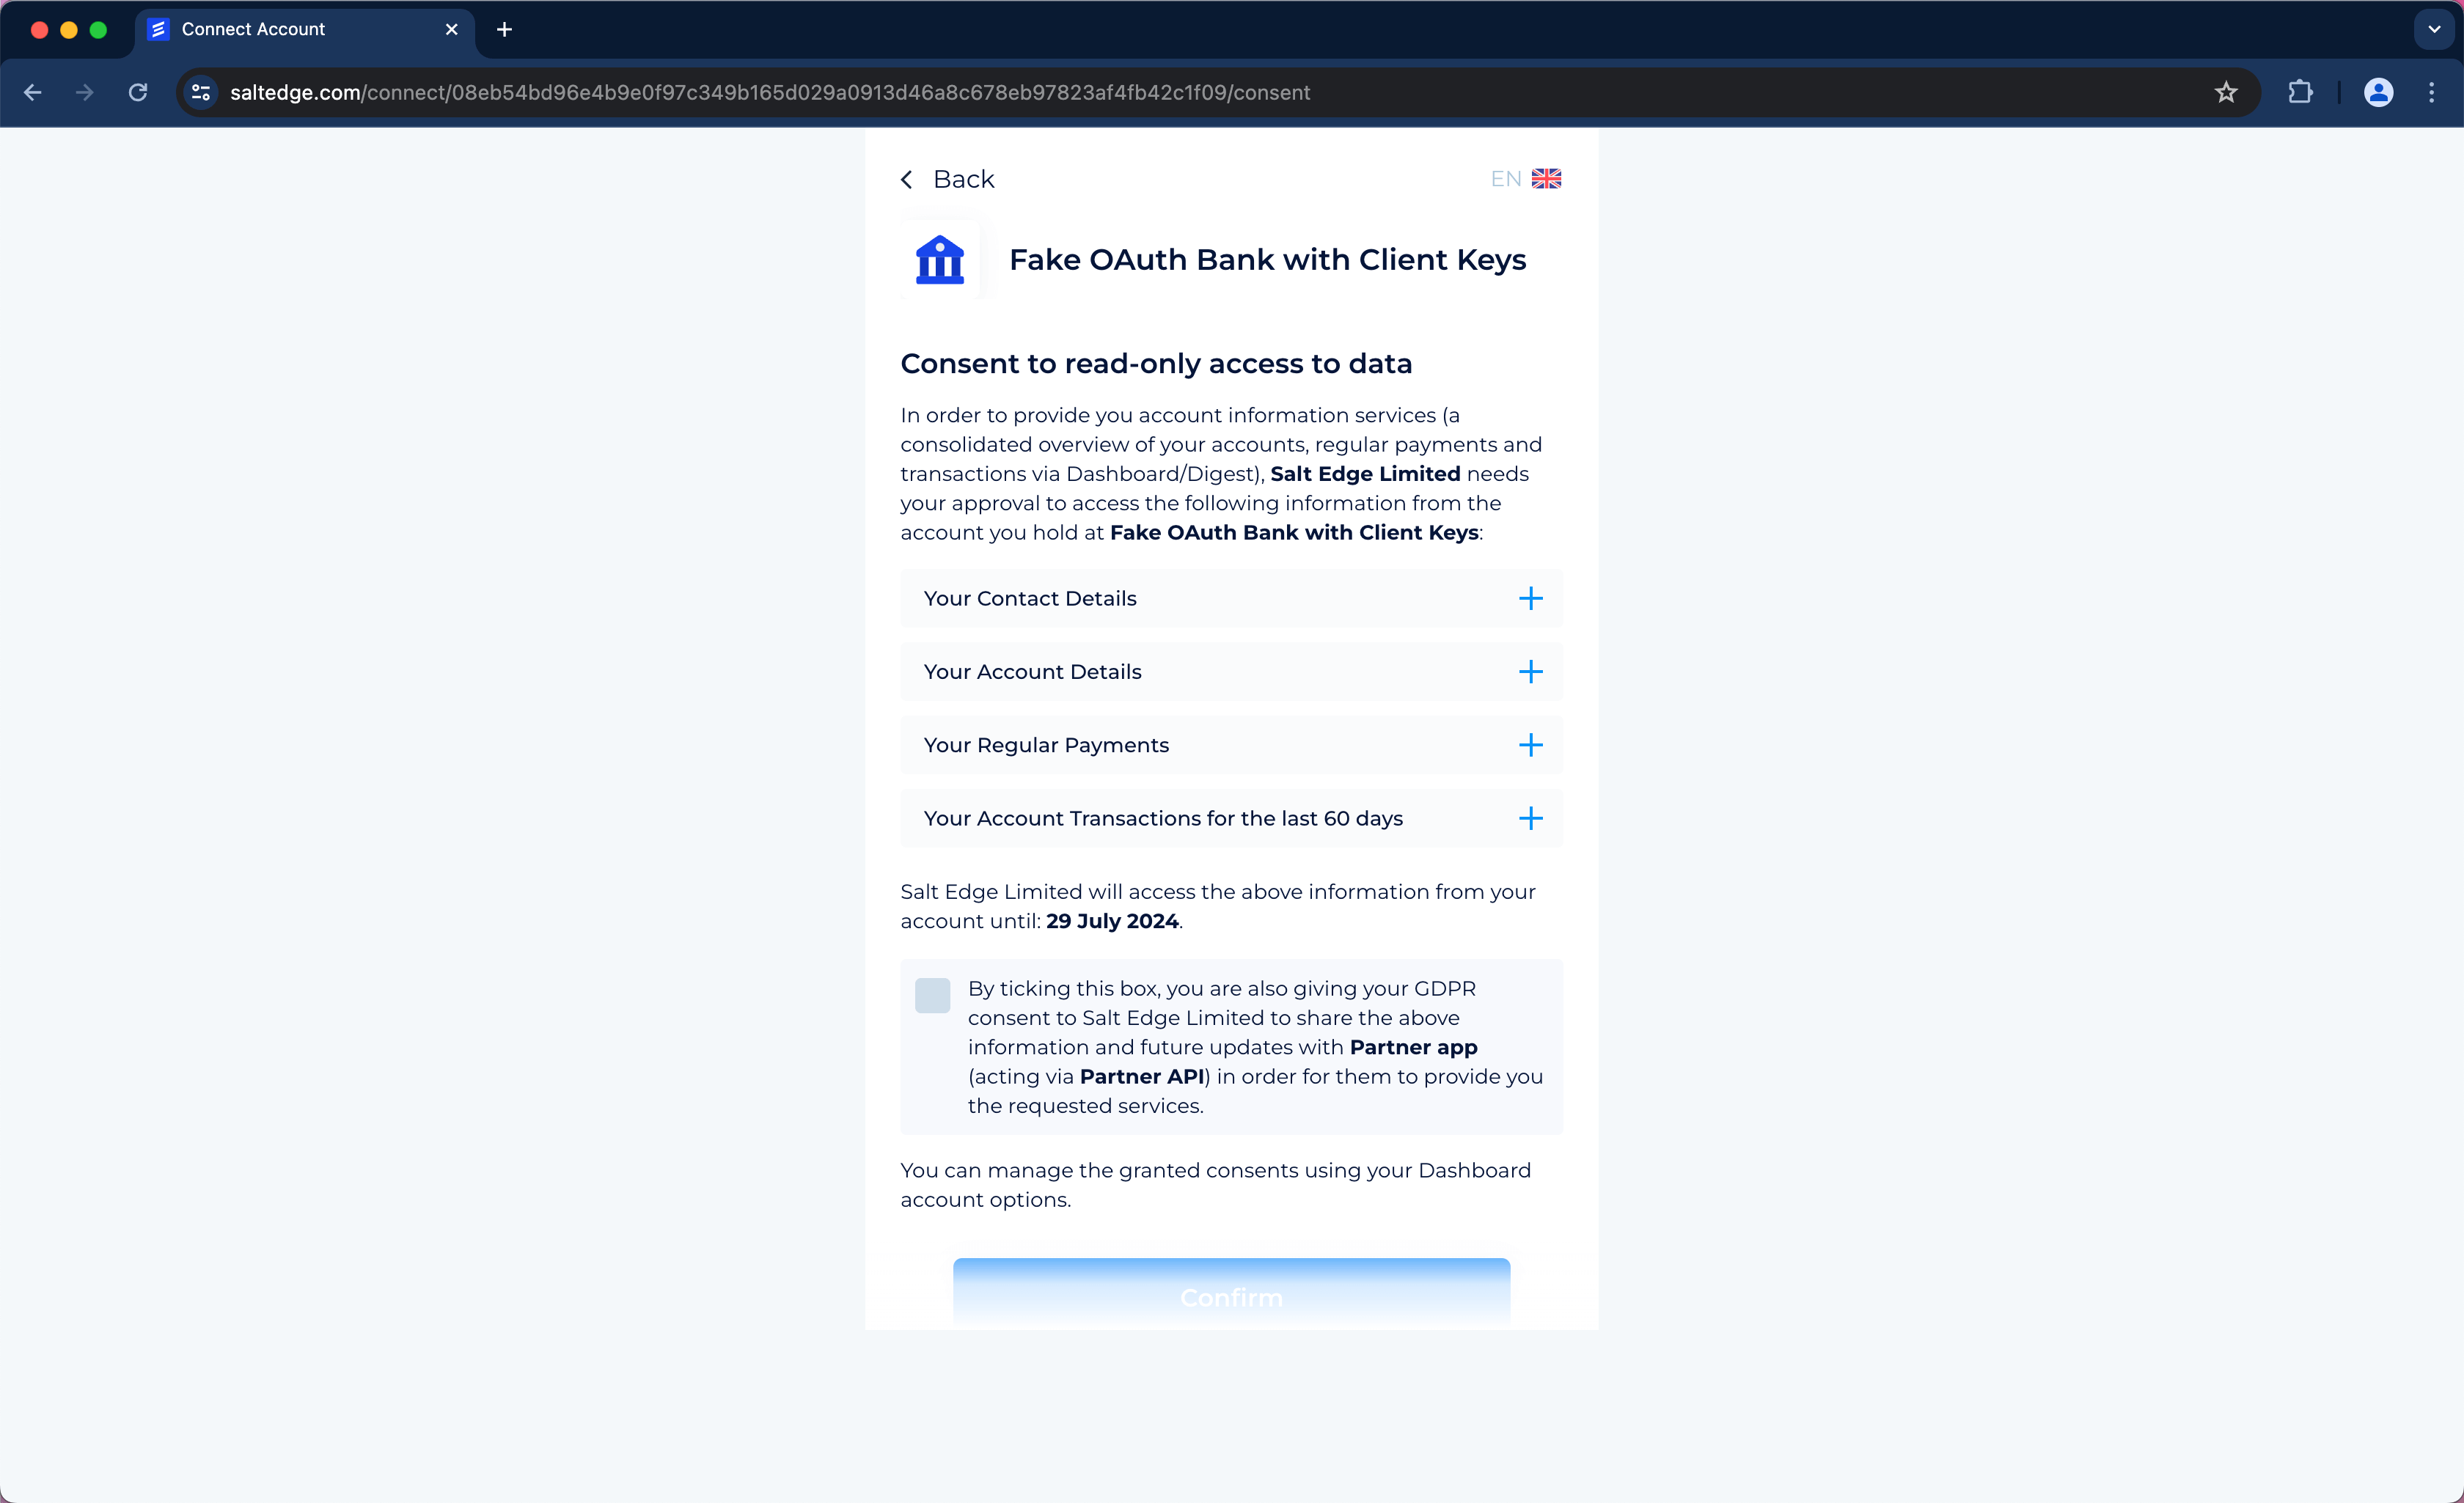

Subsequently, the Connection process will need to be waited for its completion, after which all data from the Provider can be retrieved via the API.
Get Connections
If multiple Connections exist for a User with several Providers, and it is necessary to identify all the related Connections for a specific User, the Connections/ List API request should be used.
Upon clicking "Send", a list containing all the Connections will be returned. The Connections will be sorted in ascending order based on their id, with the newest ones appearing last. It is recommended that the entire list of Connections be fetched to verify if any of the properties have been altered. Further information about the next_id field can be found in the Pagination section.
Fetch Accounts
Consequently, after a List of Connections has been fetched, a list of Accounts related to a specific Connection may be retrieved as well via accessing the Accounts/ List API request. With the connection_id, all its Accounts can be retrieved.
An array of entries, each representing an Account from a Provider is contained in the response. The id (in this case "333333333333333333") needs to be saved for later retrieval of all Transactions for this Account.
$ export ACCOUNT_ID=333333333333333333
Any Connection can be associated with one or more Accounts. The Accounts are linked to a currency, ensuring that all Transactions within a single Account share the same currency.
Fetch Transactions
Likewise, the same approach can be applied to fetching Transactions for a particular Connection and Account. It can be retrieved by accessing the Transactions/ List API request.
The connection_id and the account_id have to be provided in order Transactions to be retrieved.
Next steps
- The Test status should be requested to connect real Providers.
- The Live status is switched to bring value to Customers globally.
- In this guide, Connect was journeyed manually, but programmatically doing so is recommended. For more information, embedding Salt Edge Widget in the Clients application is advised.
- As new Account Information API Clients and Partners are in Test mode with access only to Fake Providers and Sandboxes, the request signature is not required. However, request signing implementation is necessary before going Live. More information can be found in the signature guide.
- Pagination is applied by default to all responses with arrays (like accounts or transactions), and guidance on implementation can be found in our Pagination section.
- The recommended method for synchronizing data with the Salt Edge APIs is through callbacks.
- This approach eliminates the need to poll servers for new data availability. For more information, our Callbacks section can be referenced.
Note
- Iframe embedding is disallowed in a webview. The Salt Edge Widget should be opened in a new browser window or in a pop-up window.
- Only the last 2 versions of modern browsers are supported by Salt Edge Widget.
KYC
This feature allows essential information about Customers from their bank accounts to be fetched for further use in KYC verification. Ensure that the holder_info scope is enabled for the Client Account by contacting the Sales Team.
To fetch holder_info data, a Connection must be initially created via the Connection/ Connect route or by having the connection_id of an already existing one and requesting Connections/ Show.
Note
In order to obtain the holder_info details of the Customer, include_holder_info: true should be sent
As a result, holder_info details per Provider can be fetched using the Providers/ List route. Information on Account holder details that can be retrieved from the queried Provider, such as names, emails, phone_numbers, addresses, and/or extra, is provided by this field.
Depending on the Provider, the following attributes might be returned in the holder_info:
Names- returns the name(s) on the Customer’s Account with the Provider, e.g.["John Doe"];emails: returns email(s) registered within the customer’s Account with the Provider, e.g.,["john.doe@example.com", "johndoe@gmail.com"];phone_numbers: returns the phone number(s) registered in the customer’s Account with the Provider, e.g.,["+16135550175", "+40981233422"];addresses: returns the address(es) on the customer’s Account with the Provider, e.g., [For some Providers, extra fields such as Social Security Number or Cadastro de Pessoas Físicas, can also be returned.
To test the holder_info attribute, the fake_oauth_client_xf Provider can be connected.
Before going LIVE
To have the Client Account transferred to Live mode, the following points should be addressed:
- The dedicated Project Manager at Salt Edge needs to be provided with a Test Account in the Client’s app for verifying Account Information API integration. If there are multiple apps (Android, iOS, web), a Test Account for each platform should be provided. If the applications share the same backend, sharing an Account for one platform is sufficient.
- Ensure that the signature is provided in accordance with the instructions.
Note
Partner related:Ensure that the user’s email address is verified before creating a Customer.- Ensure that the application does not create any duplicated Customers and/ or Connections (i.e., connecting a Provider with the same credentials for the same User using a different customer_id).
- Make sure that the User can Connect (for a one time and recurring Consents), Reconnect, Refresh, and Remove Connections (for recurring Consents).
- After deleting a User from the system, a Remove request should be sent - applicable only for recurring Consents.
- Ensure that the application handles the refresh_timeout in the Provider entity correctly - applicable only for recurring Consents.
- Do not allow the usage of disabled Providers in the application - applicable when the Provider selection is on the Client's side.
- Use the
Transactions/ Updateroute,duplicate: truefor a better User Experience. - Enable two-factor authentication for the Account and all the teammates.
- Indicate the incident reporting e-mail in the Dashboard settings on the Company page.
- Subscription to the status page should be completed, and confirmation of it should be provided.
Once the app's integration (including with any other Salt Edge API) has been reviewed by the Project Manager and successful testing has been confirmed, the Account status will be upgraded to Live.
PIS
The easiest path of integrating with the PIS API will be demonstrated in this quick start guide.
Get invitationPartner
Request an invitation to experience the Partner Program integration through the "Contact Us" section or reach out to our Sales Team.
Create an Account
a. Once the Partner has received an invitation to visit the Sign-Up page, they will be required to generate a secure password to confirm the creation of their Partner Account.
b. For Clients, just enter all the required information and create an Account on the exact Sign-Up page.

c. Confirm your e-mail.
d. Include the Technical Team members who will be involved in the next integration steps on the Team page and assign specific roles to them.

Create API keys
Any request to the Account Information API is authenticated, so before any data can be fetched, API keys need to be created.
To accomplish this, Applications page should be visited first.


The “Public key” field can be left blank, but it becomes mandatory once the Client goes Live.

Each API request is authenticated using an App-id and a Secret. They should be stored as environment variables so that all subsequent requests are authenticated.
  $ export APP_ID=YOUR_APP_ID
  $ export SECRET=YOUR_APP_SECRET
Begin testing different Connection types by using Fake and Sandbox Providers to ensure that the application can handle any scenario that might occur with a real data Provider.
Dynamic RegistrationClient
Providers that support Payments require a Provider Key in order to be used.
To create one, visit Provider Keys section or use Dynamic Registration.

Try in Postman
a. Postman can be installed by visiting https://www.getpostman.com/apps.
b. The Postman collection can be imported by clicking the button below.
Run in Postmanc. The inclusion of APP_ID and SECRET headers is required for the Authentication of Clients no matter the API. If an API key has not been created yet, assistance can be sought from the Quick Start guide for the creation process. Once the API key is generated, its secrets can be added to Postman.
The selection of the "Add" option next to "Environments" should be made by clicking on the eye icon in the top right corner.

Variables APP_ID and SECRET should be defined with values from the key that was generated at https://www.saltedge.com/clients/profile/secrets and then the Environment should be added.

Once added, it can be selected in the top right corner, and all the requests to the API will be authenticated using the Client’s API key.

Try in Swagger
Swagger JSON should be imported by clicking the button below.
Create a Customer
Before any Payment can be created using the Payment Initiation API, a Customer must first be created via an API testing tool, such as Postman or using cURL.
To send a request to create a Customer, please refer to the Customers' Documentation API endpoint.
The response will contain customer_id, it is essential to store it (in this case, "222222222222222222") as it will be used later to create a new Payment.
$ export CUSTOMER_ID=222222222222222222
Choose Provider and Payment template
In order to create a Payment, a Provider that supports Payments and has Client Provider Keys should be chosen. A request to Providers/ List endpoint will return a list of Providers with supported ways of initiating a Payment. In case the Provider is known, a request to Providers/ Show can be sent.
For the purposes of this guide, a request will be sent for fake_client_xf. Instructions on how to send a request to the Providers/ Show endpoint can be found in detail here.
The response contains a list of supported Payment methods or Payment Templates for the specified Provider. Each Payment template has a list of required fields that should be sent during Payment Initiation.
{
  "data":{
    "code":"fake_client_xf",
    "payment_templates":[
      "FPS",
      "SEPA",
      "SEPA_INSTANT",
      "SWIFT",
      "sepa_instant_payment",
      "sepa_instant_payment_with_account_select"
    ],
    "required_payment_fields":{
      "SEPA":[
        "amount",
        "creditor_iban",
        "creditor_name",
        "currency_code",
        "customer_ip_address",
        "description",
        "end_to_end_id"
      ]
    }
  }
}
The response shows that for a Payment to be initiated via SEPA with fake_client_xf, the following fields should be sent in the next step:
amountcreditor_ibancreditor_namecurrency_codecustomer_ip_addressdescriptionend_to_end_id
Initiate a Payment
To initiate a Payment in the Salt Edge Widget, a request to create a Payment should be sent. The required data for a successful Payment Initiation, aside from the Payment template and mandatory fields, is described in detail in the Payments Create API endpoint reference.
The response will contain the payment_url, which is the URL to be visited to authorize the User and initiate the Payment.
Visit the Widget
The payment_url from the previous API response should be visited.
A form for User credentials input, including login and password, will be presented.
After the credentials provided in the Instructions are entered, "Proceed" should be clicked.

After that, the Consent window will be displayed.

After confirmation, the Payment will be initiated on the Provider’s side.

In case interactive fields are required by the Provider, a form will be presented for filling these fields.
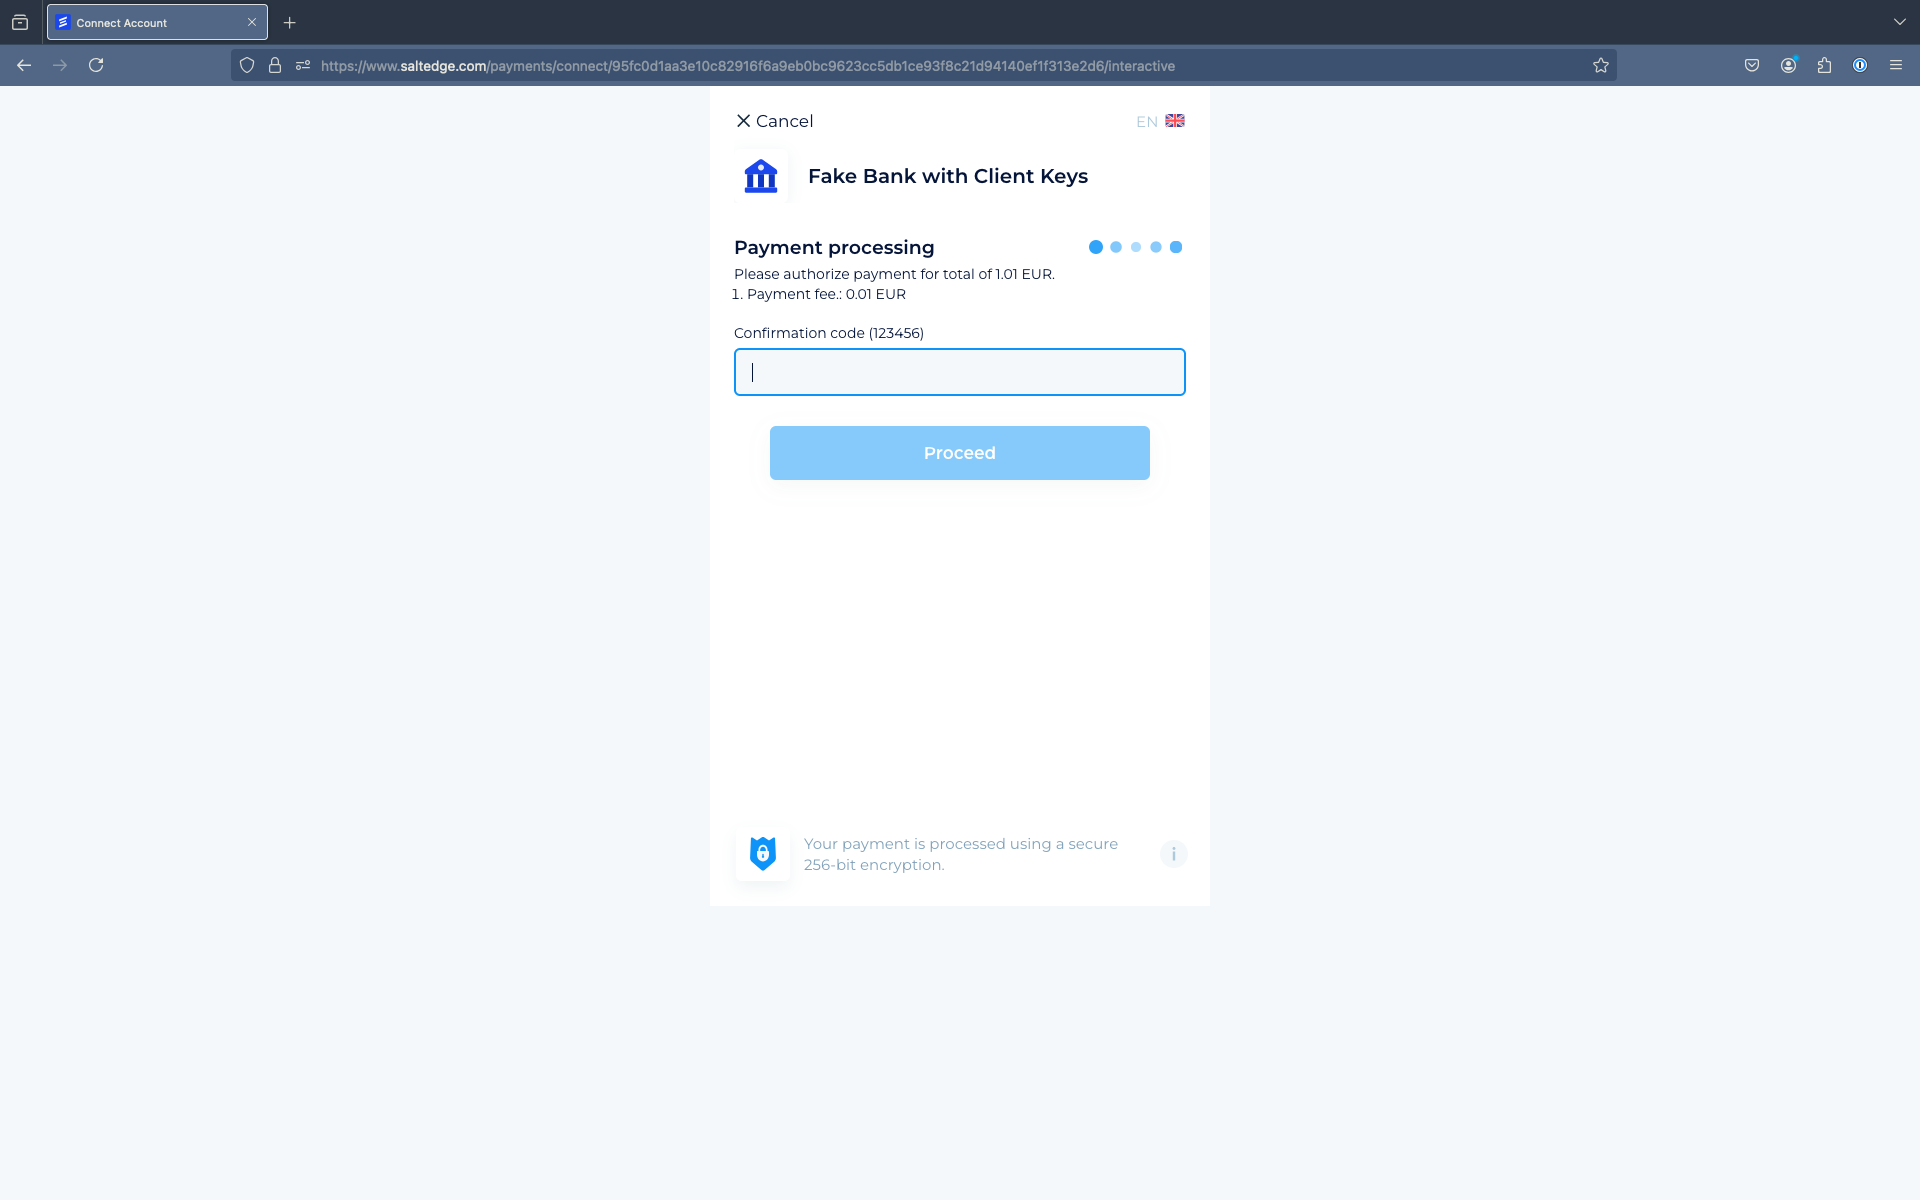
After that, the Payment process will need to be completed.

Next steps
- The Test status should be requested to connect real Providers.
- The Live status is switched to bring value to Customers globally.
- In this guide, Connect was journeyed manually, but programmatically doing so is recommended. For more information, embedding Salt Edge Widget in the Clients application is advised.
- As new Payment Initiation API Clients and Partners are in Test mode with access only to Fake Providers and Sandboxes, the request signature is not required. However, request signing implementation is necessary before going Live. More information can be found in the signature guide.
- Pagination is applied by default to all responses with arrays (like accounts or transactions), and guidance on implementation can be found in our Pagination section.
- The recommended method for synchronizing data with the Salt Edge APIs is through callbacks.
- This approach eliminates the need to poll servers for new data availability. For more information, our Callbacks section can be referenced.
Note
- Iframe embedding is disallowed in a webview. The Salt Edge Widget should be opened in a new browser window or in a pop-up window.
- Only the last 2 versions of modern browsers are supported by Salt Edge Widget.
Before going LIVE
To have the Client Account transferred to Live mode, the following points should be addressed:
- The dedicated Project Manager at Salt Edge needs to be provided with a Test Account in the Client’s app for verifying Payment Initiation API integration. If there are multiple apps (Android, iOS, web), a Test Account for each platform should be provided. If the applications share the same backend, sharing an Account for one platform is sufficient.
- Ensure that the signature is provided in accordance with the instructions.
- Do not allow the usage of disabled Providers in the application - applicable when the Provider selection is on the Client's side.
- Enable two-factor authentication for the Account and all the teammates.
Note
Partner related:to avoid legal issues with Users and Data Providers, the Client must ensure that the Users read and agree to End User License Terms.- Indicate the incident reporting e-mail in the Dashboard settings on the Company page.
- Subscription to the status page should be completed, and confirmation of it should be provided.
Once the app's integration with the PIS API has been reviewed by the Project Manager representative and it has been ensured that tests were successfully performed, the Account's status will be upgraded to Live.
Data Enrichment Platform
Salt Edge has developed the Data Enrichment Platform as part of the Open Banking Gateway and Standalone to assist Clients in delivering superior products through intricate financial analysis.
This platform aims to enhance User Experience, reduce operational costs, and expand Salt Edge's Client base.
Standalone Categorization & Merchant Identification API
The API assigns categories and merchant details to personal and business transactions, facilitating organized financial data.
Two types of category lists are available: personal and business, which aid in categorizing transactions made by Individuals or Legal Entities.
The categories are represented as strings and structured as parent and child categories, identified by the tree structure sent in the Listing categories request.
The categorization tool can be tested using the dedicated Dashboard Categorization page.
Note
Defaults for Country and Account Currency are GB and GBP, respectively. To test transaction categorization in other countries, configuration of the two codes accordingly is required.
Merchant Identification is a country based feature, that is currently available in the following countries:
Europe
- Austria
- Belgium
- Croatia
- Czech Republic
- Estonia
- France
- Germany
- Hungary
- Italy
- Latvia
- Lithuania
- Luxembourg
- Netherlands
- Poland
- Portugal
- Republic of Ireland
- Romania
- Russia
- SlovakiaNew
- Slovenia
- Spain
- United Kingdom
Middle East
- BahrainNew
- Israel
- Turkey
- Saudi Arabia
- United Arab Emirates
Africa
- South AfricaNew
Asia
- Hong Kong
- India
- Indonesia
- Malaysia
- Philippines
- Singapore
Australia/ Oceania
- Australia
- New Zealand
North America
- Mexico
South America
- Brazil
Dashboard categorization
The Dashboard Categorization feature enhances User Experience and efficiency by allowing Clients to directly upload a file with transactions into the Client Dashboard. This simplifies the categorization process and makes testing and verification of categorization results more seamless and streamlined. The feature is accessible in the Reports section.
Each Client is entitled to categorize up to 10.000 transactions per month.
Types of transactions possible to categorize: personal and business.
Note
The new Dashboard Categorization option serves as the only standalone categorization testing tool, offering a more efficient and user-friendly solution.
Caution
Clients must read all the instructions provided on the Categorization page before uploading a file. This ensures compliance with the required file format and process.
If any issues arise or assistance is needed, please contact the dedicated Project Manager.
Financial Insights
Financial Insights is represented as a report based on all the activities of a single User. All unique accounts of the User’s Connections to the Providers are analyzed for a selected period of time.
The Financial Insights report is provided as an additional service. Please get in touch with the Sales team to discuss the use case and receive a quote.